Saturday, February 1, 2020

February 2020 SOM Blog Hop


Welcome to the February Stamp of the Month (SOM) Blog Hop featuring Cherishing Her. You should have come from Krista's blog, but don't worry if you started here. The hop is a circle, so keep going until you get back to where you started. Head to Melinda's blog if you get lost anywhere along the way. She has a full list of all the participants.


I adore this stamp set not only because of the beautiful bouquet of flowers but because the sentiments can be customized. I decided to do two cards which are identical except for the cardstock. Here's the first one:


I started by white embossing the images on vellum paper. I then colored on the back side of the vellum with alcohol markers making sure I didn't take the color all the way to the edge. That extra white space makes the coloring look classy.

Here's a close up of the glitter dots I made. I started by adding Diamond Stickles Glitter Gel. It dries flatter than I wanted, so after they dried, I topped them with Liquid Glass.

The circle background die is in the Annual CTMH catalog which is good all year. I also used a banner die which was available as part of a special promotion back in September but is still available in the Online Only section of my website. There are only a few left of this background and banner set, so go here to order yours. The Online Only section has many "oldies but goodies" - as does the Clearance section - so be sure to check out both of them.

Here's the second card I made using the same circular background die, this time in Linen cardstock over white cardstock:


It was difficult to capture in a photo just how soft and pretty this card is. I LOVE how it turned out.

I used slightly different colors and made one boo-boo...I colored on the front side of the vellum on the little orange flowers. If you look closely, you can see that the white outline isn't crisp on them.

Because my sentiment didn't show well against the white and Linen background, I colored the back side of the vellum with the same pink markers I used on the largest flower. I colored with the medium tone first right behind the words then filled in around the edges with the lighter tone to fade it out. Look closely and you can see where I also smeared some of the Diamond Stickle Glitter Gel over the top of the sentiment on both this card and the first one. It will warp the vellum, but I wasn't worried about it.

I adhered the vellum to the backgrounds with Liquid Glass. A thin coat is all you need, and it dries pretty clear. If you're super fussy, add dots of Liquid Glass behind the flower centers and at various small points where the white embossing will hide it.

By chance, my colors match the current Color My Heart challenge, so I'm entering the second card over there.

Remember that February is Stamptacular month. There are some AWESOME deals--including some long-retired but still fabulous stamp sets which were brought back specifically for this sale. I think every stamp set, including those with coordinating thin cuts, is on sale. It's incredible. All items are while supplies last, so shop early for the best selection, and your sales go toward the $50 minimum to get Cherishing Her for only $5. Click HERE  to be taken directly to the sale. 

Now you're off to Michelle's blog. Be sure to make it all the way through the hop as the talent from these consultants is always inspiring.

Until next time,
Becca

Wednesday, January 22, 2020

Quick and Easy Bee Card

Popping in quickly to show you a card I made for my upline's color challenge this week: Charcoal.


I cut the hexagons from retired Hawthorne paper, but you could use any patterned paper cut into hexagons using a Cricut or punch. I glued them to some white cardstock then cut it out with Rectangular Stitched Thin Cuts. I used those all the time!!

I stamped the bee in Charcoal ink, colored his body and wings lightly with colored pencils--one in saffron for the body and one in julep for the edges of the wings--then added Clear Shimmer Pen to the wings. After cutting the bee using the medium size Stitched Bracket Thin Cuts, I added the sentiment from Say It In Style, also in Charcoal ink. To touch up the wings, I outlined parts of them with the Pewter Journaling Pen. I placed the bee where I wanted him (without glueing) then used Liquid Glass to adhere a few Julep Sequins, added Burlap Ribbon attached with Mini Staples, then foam mounted the background panel to my card base. I used more foam tape to adhere the bee over the ribbon and DONE!

Busy day so gotta run.

Until next time,
Becca

Monday, January 20, 2020

Coloring Class with Altenew Beautiful Day

Because today was a holiday, I decided to mark the occasion by taking an Online Card Class about coloring. I burned through the whole class and then sat down to make this for my niece who recently got engaged.

I used a combination of products, some long retired, from a variety of stamp companies. My main image is from Altenew called Beautiful Day. I love this stamp set!! And it was really fun to color using the techniques I learned today combining alcohol markers and colored pencils.


The background is from Stampin' Up! which I white embossed over Linen cardstock from Close To My Heart (CTMH). I sponged the edges in CTMH ink Toffee and Mink. The sentiment is also CTMH embossed on Cocoa cardstock. I cut it with a word bubble die from MFT but then snipped off the part that made it a word bubble. I followed the instructions from the first day of class taking three colors which weren't necessarily from the same color family and combining them. I used Copics in the brown, red, and red violet families with shading in the blue violet family. I then added depth and shade with colored pencils. I decided to make one flower a deeper shade than the other and placed it on the bottom.

I was quite happy with the way the flowers looked after coloring with the markers, so I almost stopped. But the point of the class was to take things up a notch much coloring in the nooks and crannies. Um...yeah! It really did make a difference by the time I was done. Not gonna lie, it was a lot of work, but I hope you agree that the result was worth the effort.

One of the things the teacher talked about was to consider "the trash factor" before spending hours coloring. Because my niece is very artistic, I think she will appreciate the effort that went into this.

Until next time,
Becca

Wednesday, January 15, 2020

New Product Blog Hop - January/February 2020 Catalog


Welcome to the New Products Blog Hop! You should have come from Gina's blog. The hop is a circle, so no matter where you start, keep going until you get all the way through. If you get lost along the way, hop over to Melinda's blog for a full list of participants.

In addition to featuring some of the new stamp sets, I wanted to show you a fun technique with the Shimmer Brushes. Now...to be honest...I figured I could gerryrig my own shimmer with paint and a waterbrush. And you can. But it's not the same. I mean, it's REALLY not the same. I'm now sold on these little gems and am adding to my collection with each order. The Jan-Feb catalog introduced two more colors, which I'm featuring on the last card.

For now, here's an example of what can be done with just the Clear Shimmer Brush:


I sponged the background in Lagoon ink, adding more color in the center and fading out as I got to the edges. I then squeezed the Clear Shimmer pen until I got a small drop of product on my All-purpose Mat (which is AWESOME for this technique because the coating doesn't absorb the shimmer before you can pick it up again). Using the shimmer brush, I dipped it back in the little puddle of shimmer then tapped the brush with my finger to splat product all over. The small circles under and to the top right of the bird were done by touching the pen to the background for larger circles.

I also stamped some snowflakes and little white dots (which are in the Spruced Up - Cardmaking stamp set shown) in White Daisy ink.  When the background was dry, I ran it through my Stitched Rectangle Thin Cuts and mounted it to a card base. I stamped, colored, and die cut my focal images. I added a bit more of the snowflakes and white dot images in White Daisy, then (after letting the pigment ink dry for a long time) glued and foam mounted them over my base. The sentiment is from Say It In Style, which is featured in the Core Catalog that lasts all year.


This background was done the same way except I used Lemonade ink for the sponging and splattered Mint and Ballerina Shimmer. I made my own Ballerina shimmer by swiping Ballerina ink on my All-purpose Mat (that thing is PRICELESS!), squeezing my Clear Shimmer Brush until a dollop of shimmer dropped into the ink, and using a separated small paint brush to pick up the colored shimmer before flicking it onto the card base. The stamp set is Your'e Not Old, which is my absolute favorite set of the entire Jan-Feb Catalog! Isn't she just fabulous!

I colored her with Copic markers (which are the same as the Tri-Blend markers, I just purchased Copics before CTMH came out with the Tri-Blend ones). I also added some white accents with a White Gel pen I got from Hobby Lobby.


This last one uses Mint, Raspberry, and Sapphire Shimmer pens over the entire card after it was assembled. I used the middle-size Stitched Bracket Thin Cuts to create my little band behind the sentiment (also from You're Not Old). I cut two pieces from the Celebrate Today paper, folded one over the left side of the card and tucked the other under the circle cut with the Shaker Thin Cuts. I could have filled the inside with confetti and/or sequins, which is how that thin cut is designed to work, but I wanted to let my shimmer brushes be the star of this card instead of sequins. Before adhering the two bracket cuts of paper, I punched two small holes and weaved a long piece of Sapphire Crochet Thread through the holes. Getting the thread through before gluing down was critical. Tying the bow after the paper was glued down was essential.

If you can only get one shimmer brush at this time, I highly recommend the Clear one...and then get the All-purpose Mat so you can create your own colors as described in the second card. The mat is an investment, but I'm tellin' ya...SO worth it!

Now you're off to Krista's blog. Again, be sure to hop all the way around to see oodles of inspiration. As always, please shop with your personal consultant. If you don't have one, I'd be honored to be yours.

Until next time,
Becca

Sunday, December 1, 2019

December SOTM Blog Hop


Welcome to the December Stamp of the Month Blog Hop. You should have come from Krista's blog, but don't worry if you started here. The hop is a circle so just keep going. If you get lost, you can always go to Melinda's blog for a complete list of participants.

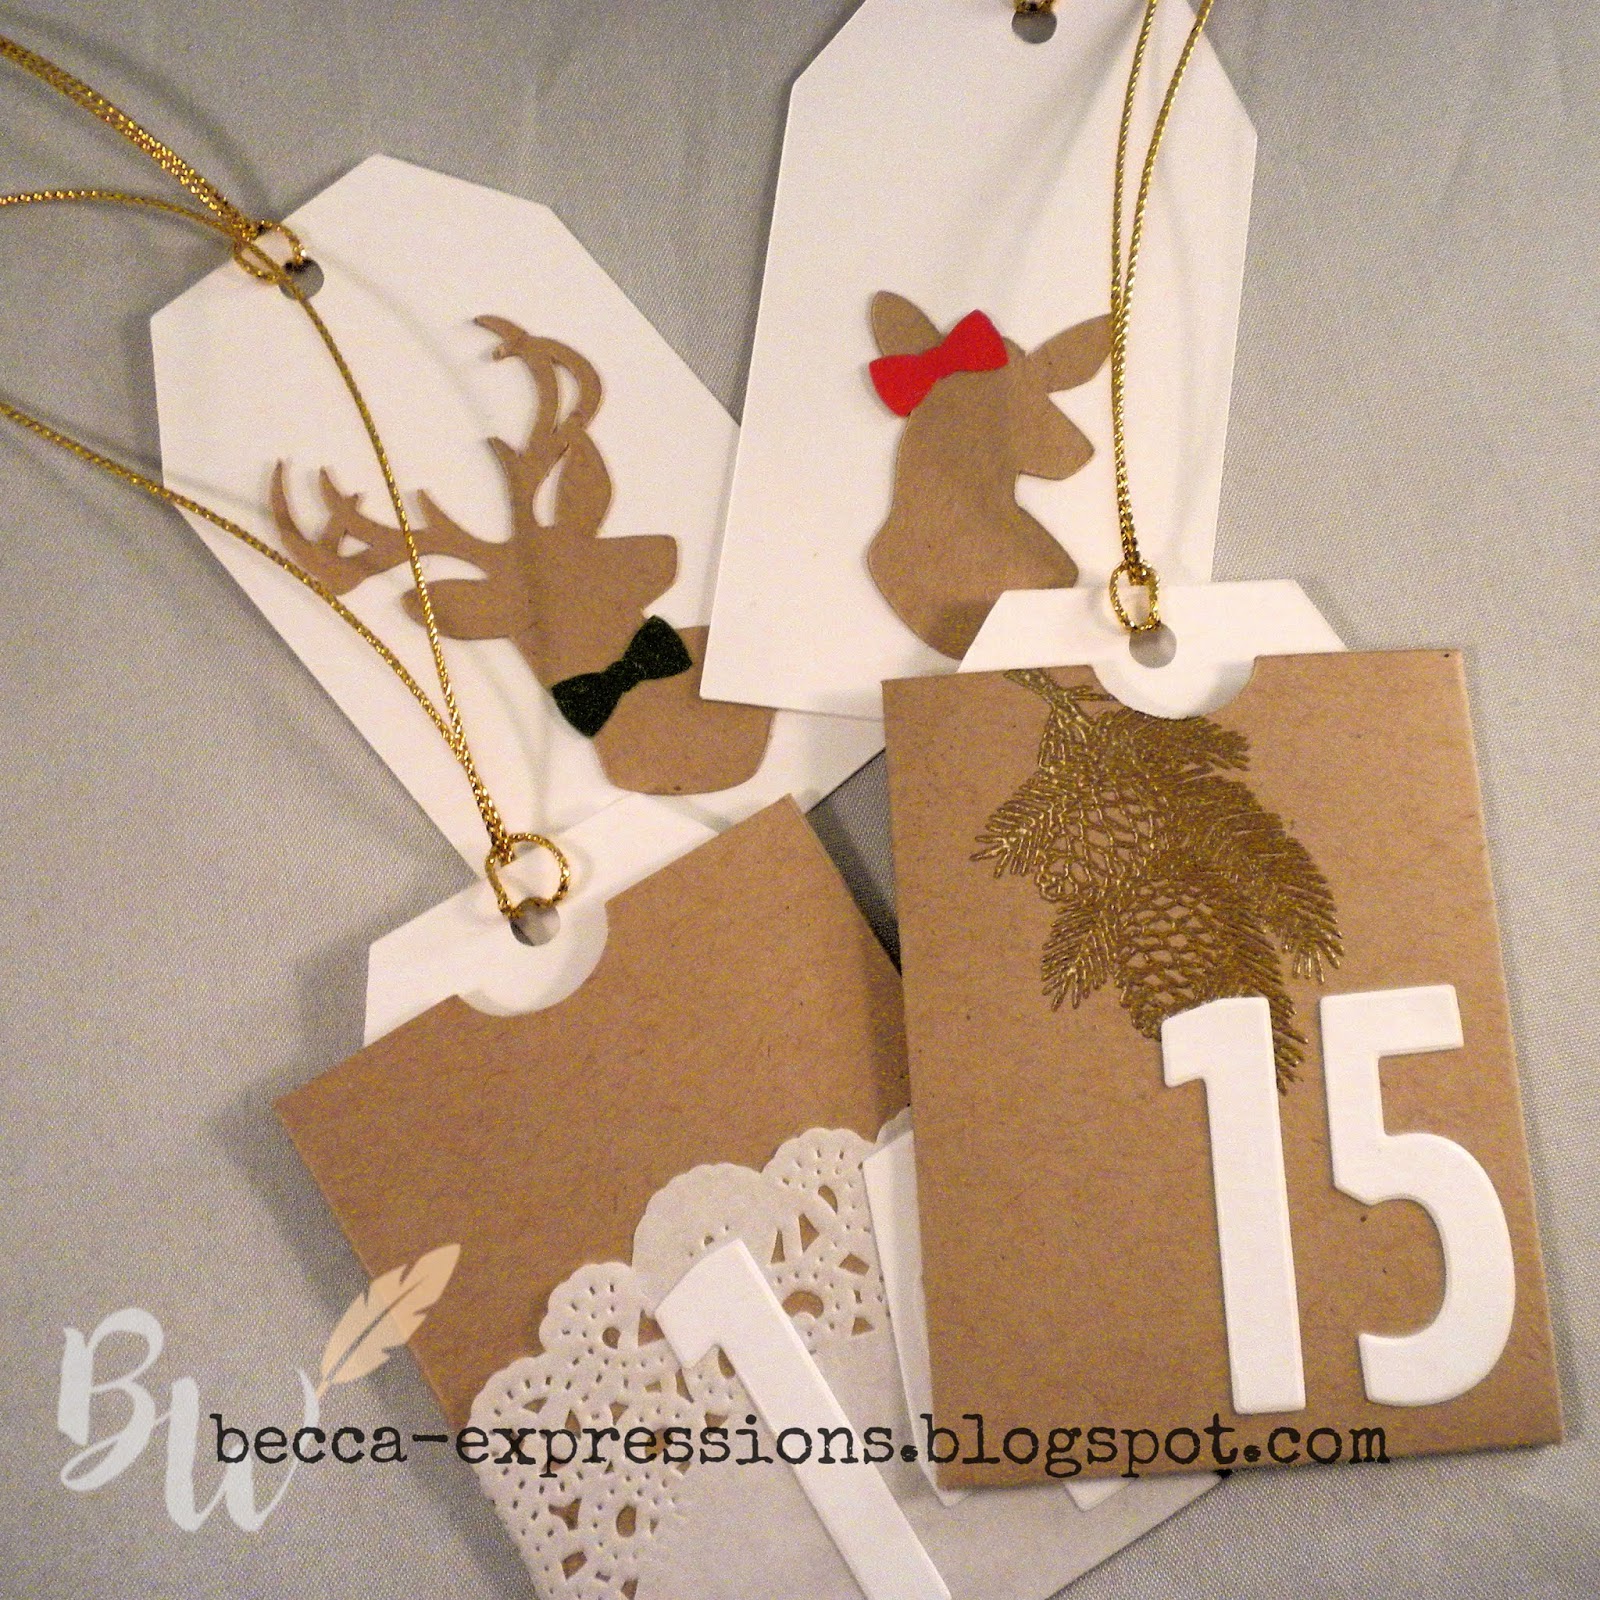
For my project, I used a little old, a little new, and a little non-CTMH in addition to the Reindeer Crossing stamp set. I made a very special kind of advent calendar for my daughter's gender reveal party. In fact, as this hop goes live, I'm probably still there. The man who made their cake and I were the only two people who know that it's...

A girl!


I'm so excited. Here's the advent calendar I made.


Inside the pockets, five of the tags are decorated with two bucks and three does. Guests will all put their names in a bowl. As their names are drawn, they will chose which day they think she'll deliver by taking down the pocket and pulling out the tag. Most of them will be blank. We'll keep guessing dates and pulling out tags until the three girl tags are revealed. With any luck, the two decoy boy tags will be revealed before the third girl one is, adding to the suspense.

My son-in-law built the frame. I made the Kraft pockets, tags, and the bucks and does using Cricut Design Space. Here's the file if you'd like to replicate this project, and here's the Pinterest picture I used for inspiration. I didn't want my calendar to be quite so intricate, so on the pockets without the doiley, I gold embossed the small pine cones and fir tree branches from Reindeer Crossing.

The currently available product I used includes various CTMH Cricut cartridges, Kraft paper, White Daisy paper, Candy Apple paper, Evergreen paper, Versamark ink, Gold Detail Embossing powder, and the SOTM, Retired product includes the Block Numbers Thin Cuts (still available in Online Only) and the doileys (I used pre-made ones, but a thin cut is available in Online Only). Non-CTMH product is the gold cord and mini clothes pins used to attach the pockets to the frame. CTMH used to sell smaller sized frames with chicken wire centers which is where I got the idea.

You're next stop on the hop is Cat's blog. Again, be sure to keep hopping until you've seen all the great projects.

Before you go, CTMH is having a sale on Monday, December 2 beginning at 3pm MST. Items are up to 50% off in limited quantities. It only lasts for 24 hours, so shop early. And, as always, if you spend $50, the Stamp of the Month is only $5.

Until next time,
Becca
(aka Grandma!)

Tuesday, November 5, 2019

New Product Blog Hop


Welcome to the November-December New Product Blog Hop. You should have come from Gina's blog. There are LOTS of consultants participating, so be sure you make it all the way around. If you get lost, head over to Melinda's blog for a complete list of participants.

As much as I love Christmas, I have something even more exciting to look forward to...my daughter and son-in-law's gender reveal party. This is our first grandchild, and we are over-the-moon excited about it. The fun thing is that, not only is our daughter pregnant, many of her friends are also getting pregnant, so I'm back to making baby cards a lot. I took the Buttoned Up Thin Cuts designed to make Santa's beard and belt and turned it into this...


I used Ballerina and Carolina cardstock, alternating between the light and darker sides of the paper for the dual tone. I love this two-tone feature!! I also used vellum paper with the sentiment from one of the Melissa Esplin sets in the Core Catalog embossed in white layered over top. I used vellum paper because didn't want my sentiment to take away from the pattern I'd created with the thin cuts. I did a similar design in the second card of this post.

There are so many ways to use this Buttoned Up Thin Cut set. I wanted to show you more, but I'm in the middle of promoting The Telegraph Proposal, the final book of The Montana Brides series...so I'm in Montana! I actually made this card at 4am the morning I left. I barely had time to finish it and get it photographed before packing up the car and heading out.

Now it's time to head over to Lauren's blog to see what she's created. Again, be sure to get all the way through the hop as there's wonderful inspiration to be had.

Until next time,
Becca


Friday, November 1, 2019

November Stamp of the Month Blog Hop


Welcome to the November Stamp of the Month: Family Blessings. The stop before mine is Krista's blog. The whole hop is a circle, so just start wherever and keep going until you get back to where you started. If you get lost along the way, hop over to Melinda's blog for a full list of participants.


I decided to combine the stamp with Cedar and Pine paper to make an assortment of all-occasion and Christmas cards.


I stamped the flower in Smoothie with Candy Apple and Saffron. The leaves are stamped in Evergreen. I layered a few pieces of Cedar and Pine paper on the left edge then stamped the row of X's in Evergreen at the top. With no sentiment on the front, I could turn this into any kind of card I needed, from thank you to birthday to Christmas.


For this card, I added dies from the Buttons and Bows Thin Cuts. This die set can be used to create Santa's beard and jacket, but on this card I used the "beard" as a scalloped top. I cut one in Evergreen paper and one in white. I used Peach, Smoothie, Candy Apple, Ruby, Saffron, and Evergreen inks. The sentiment is from the special Holiday Cheer promotion we featured on this blog hop. I cut the top panel with the Stitched Rectangular Thin Cuts and added Clear Shimmer Pen to the flowers.


The final card also uses the Buttons and Bows Thin Cuts. I used the same ink colors, but this could be done in any colors you chose. I really liked the leaves hanging over the right edge but, to make sure it still fit into a standard A2 envelope, I trimmed 1/4 inch off the left edge of the card.

Now you're off to Darlys' blog. Again, be sure you hop all the way around to see all the great inspiration offered.

If you follow my author career, today marks the official release of the final book in the Montana Brides series. After five years and six stories, it's a joy to have the entire set of stories available.

Until next time,
Becca