Saturday, December 26, 2015

Mr. & Mrs. Snowman

Hubby and I celebrated our 31st Anniversary last Monday.  I made him this card using stamps from a long-retired, wood-mounted set by CTMH:


I stamped the lady first, masked her left side, then stamped the man. I used about thirty colors of Copic markers to get the shading and chose Seahawk colors to coordinate with the neck scarf I got him for his gift.  To keep from obscuring the view of all my coloring, I used clear snowflakes from Heidi Swapp.  It was a lot of work, but my husband's look of awe and, "I love that you can do this," made it all worth it.

For those of you who might have missed it yesterday, my Christmas novella "Letters from Santa" is still free today on Kindle only.  The sale is gone at the end of today, so hurry and get your copy.

If you link through and see only the $5.97 print version, click on "See all 2 formats and editions" just below the reviewer stars to see the Kindle only format.

I'd like to get up to 40 reviews on this so, even if you don't like the story, I'd really appreciate your honest opinion. (I always mistrust all 5-star reviews. Don't you?)

I hope you all had a Merry Christmas.  We hosted four single soldiers who couldn't make it home this year.  It was the first year where I fully embraced this army tradition.  I think God rewarded me for finally getting the proper attitude by sending us a man who was born in what he describes as the bush of Kenya.  He didn't want to eat off my everyday plates because they were too fancy and took home a paper napkin because the print was so beautiful.  How humbling and rewarding to be in the presence of such gratitude.

Until next time,
Becca

Friday, December 25, 2015

FREE for Christmas


As a special gift to you, I made "Letters from Santa" free today. Please share the link and give it as a gift to anyone you know likes to read.

Merry Christmas!
Becca

Wednesday, December 23, 2015

Kaleidoscope and Baby Zoo (and Farewell)

This is my last post for Mary Brooks as a design team member.  How is that even possible???  I have three cards today to show a few more ways to use the Kaleidoscope Workshop on the Go and Baby Zoo stamp set together.  I have lots of pictures today, so let's get right to it


This first card piles on the fun.  Instead of using a standard size, I cut it down to 4.25x4.25 and let my images run over the top.  It will fit in a standard A2 envelope, so you get loads of impact without having to pay for extra postage.  I used a regular black ball point pen to add the stitching.  The balloons are spaced by using a small bit of Foam Tape. I think everything else is pretty self-explanatory, but leave a comment if you have a question.


For the second card I stayed with a birthday party theme.  I stamped the lion in Canary, watered down some of the Pixie (using the squeeze the lid into the pad method explained here), used a small brush to paint over his mane and tail, used more of the Pixie to add blush to the cheeks and color the ears, and then watered down some Slate ink to create the shadow.  I used a Sharpie pen to outline the Lion and a black ball point pen to outline the mats.  I think I'd like this better if the lion had been outlined with the smaller ball point pen, too.  I love that the birth announcement stamp from Baby Zoo can be selectively inked to make a party invitation.


The last card was difficult to photograph.  I used the bow, circle border, and "congratulations" stamp from Baby Zoo with the cake building stamps from Kaleidoscope to create a wedding cake.  The patterned paper banner was given a wash of watered down Pixie ink to give it a little more muted look.  The yellow fish-tail banner at the top was created by stamping the smaller of the two cake pieces, trimming it out very close, and cutting a "V" in the bottom.  The cake stand was done by stamping in Slate ink, keeping the stamp and inkpad connected, and swiping the stamp off the edge of the inkpad.

Before I show you how many supplies I have left, here's a picture of all the cards I made this month.


Here's a picture of the supplies I have left after making them and the 15 cards that come in the kit.


To be fair, I'm a "Clean & Simple" (CAS) card maker, but even so...that's a lot of supplies after 26 cards.  There's over half of the shimmer trim roll left.  In case you aren't already convinced that you absolutely need this combo, I did a little math (using a calculator because it's safer on my brain cells). I added up the Kaleidoscope WOTG, Baby Zoo, all four ink pads, and an extra pack of White Daisy cardstock.  Then I divided by 26.  The cost per card comes to $3.12.  I dare you to find a card in the store for that much...one you'd be proud to send, that is.

Here's the list of supplies (with embedded links for your shopping convenience):
My thanks to Mary for allowing me to be her guest designer these past few months.  We are talking about a second go around, but I'll have to see what my writing schedule looks like.  I have some extraordinary news to share about a new contract, but I have to wait until the i's are dotted and the t's are crossed.  In the meantime, I hope you will take advantage of a two-day sale on my Christmas novella, "Letters from Santa," which will be FREE on Christmas Day and the day after Christmas.

Wishing you and yours a very Merry Christmas and a blessed New Year!

Until next time,
Becca

Sunday, December 20, 2015

Special Care

I have a very special friend who is expecting a precious little girl in a few months.  Using the sketch from Mojo Monday #428, I pulled out some old stamps and supplies for this card:


The tag says, "Special Care and Treatment: Feed Frequently, Tickle Gently, Encourage Often, Kiss Generously."  Good advice for any new parent.  And I love how the sentiment matches the background I created with the baby clothes hanging out on a line to dry.

Time to get ready for church!

Until next time,
Becca

Thursday, December 17, 2015

Baby Cards with Kaleidoscope and Baby Zoo

Last week for design team duties with Mary Brooks, I created three birthday cards.  This week, I want to show you a couple baby cards.  I'm still working with leftover supplies after completing the Kaleidoscope Workshop of the Go and the suggested ink pads of Slate, Pixie, Canary, and Pear but I added Crystal Blue this week.

I've been making use of second generation stamping quite a bit to fade the stronger Slate ink color to match the Whisper colored cardstock that comes in the WOTG.  I did the second generation stamping on the horse.  I stamped the horse again in Pixie ink, squeezed the lid and ink pad together so I could "watercolor" with a wet brush (see the third card from this post for an example) to get the softer pink on the saddle, cut out the saddle and glued it over the top of the horse.  I also used the watercolor Pixie on the bridle.  Everything on this card comes from Baby Zoo except the bow that's stamped in the horse's mane.  I know...it feels a little like I'm cheating to say I'm combining the two stamp sets, but think how many times you could use that bow to create "girlie" animals from Baby Zoo.

For the background paper, I stamped "Congratulations" in Pixie ink onto Pixie paper except for the one time I stamped it in Slate.  I tore the edge of one side only.  To get the paper to tear so the white core is exposed, tear toward you.

This next card is the one I've been waiting to show you for MONTHS!  I know...it doesn't look like much right now but wait...wait...

 
It's a gender reveal card!!  That's why I needed the Crystal Blue ink pad to go along with the Pixie so both genders are represented.
 
The easy way to do this card would be to cut a strip of the patterned paper that comes in Kaleidoscope.  The problem was it overpowered my cupcake, so I created a less busy background using the dot border from Baby Zoo.
 
The tag measures 1.75" by 6.75" and is scored at 3" and 4" from the bottom then rounded on the top.  The cupcake wrapper was created by stamping in Slate and then, with the stamp and ink pad still touching, sliding the stamp straight down off the edge of the ink pad. I stamped it on a separate piece of White Daisy cardstock, cut it out, folded my tag into the "Z", and glued the wrapper image at the bottom of the fold. I stamped the cupcake top and sprinkles (Kaleidoscope WOTG) plus the "It's a" flag from Baby Zoo, and glued them in place on the top part of the "Z" fold.  Both the cupcake and flag got Pixie and Crystal Blue sprinkles to carry the "Is it a boy? Is it a girl?" theme forward.
 
I stamped the inside before doing this next part, but the fun of a gender reveal card is the suspense of waiting... **Wicked little laugh**
 
To keep the cupcake closed, I did two things.  I poked holes with a piercing tool and used a needle and sewing thread to tie a bow.  The problem was the top part of the tag wanted to fall down, so I added a Hook & Loop dot.
 
 
The two closures worked together to keep the gender a secret until...
 
 
Clever, right?  And I thought of it all by myself. (I'm so very proud. I usually have to copy someone else's creative cuteness!)  The balloon and string come from Kaleidoscope WOTG, and "BOY!" comes from Baby Zoo.
 
Here's the list of supplies (with embedded links for your shopping convenience):
I'll have three more cards for you next Wednesday instead of Thursday (because it's Christmas Eve), and you'll be amazed how many supplies I still have to work with.
 
Until next time,
Becca

Saturday, December 12, 2015

Twelve Days of Christmas Blog Hops with Heart


Is Christmas music going non-stop at your house?  If so, you've undoubtedly heard "The Twelve Days of Christmas" play a few times.  Inspired by this beloved (or maybe annoying) song, Blog Hops with Heart has put together several things for you to enjoy. 

Here's my "partridge in a pear tree" or wreath, as the case may be...


It's a very simple card, and I must give credit to the inspiration piece which can be found here.
 
I love how elegant the Cranberry and Cashmere color scheme is.  I've used most of my "White Pines" paper, so part of why I was so excited about the inspiration card was being able to use the merest scrap of paper in a fun and unusual way.

Here's a close up of my partridge. I cut it with Artiste (p. 51) at 2" W out of vellum. I crinkled it up to give it a little extra "oomph" before gluing it down.  I had the entire card assembled when I remembered I needed it for the Twelve Days theme and, luckily, had the foresight to attach the sentiment banner only at one end.

It's always difficult to photograph vellum.  It shows up better in real life.

The hardest part about this card was adding all the star sequins.  I was rummaging through my "accessories" drawer when I found a zip lock baggie full of them.  I have no idea where they came from, but they were perfect for this. I tossed a pinch onto my card, fiddled around until I got them arranged how I wanted, and used Liquid Glass to glue them down.  All I can say is, thank goodness for tweezers!

Go on to see what Stephanie has for you.  And then keep going until you've circled back to where you started.

Wishing you and yours a very Merry Christmas!

Until next time,
Becca

Thursday, December 10, 2015

Kaleidoscope WOTG meets Baby Zoo

Let the fun begin!  Ever since Mary Brooks and I have been planning my time with her as a design team member, I've been waiting to show you the combination of Kaleidoscope Cardmaking Workshop on the Go and Baby Zoo. 


Like last week, I'm still working with leftover paper after creating all 15 cards for the WOTG, and I'm sticking with the four ink colors suggested. Today is more with birthday cards.  Next week, I'll add baby cards.  Okay...here we go!


I used "Boy" and the border of small circles from Baby Zoo in combination with the balloons, string, and "Birthday" from Kaleidoscope.  For the fun of it, I notched the edges of the Whisper cardstock after it was glued to my card base.


Everything here is from Kaleidoscope except the elephant.  I'll be using this as an "Oops...forgot your birthday" card.  I made it in gender-neutral Pear and Slate because, when you're late getting a card out, you need to grab whatever's handy rather than fussing over "girly" vs. "manly" color schemes.

The only accessory I used that's not in the WOTG is Foam Tape.


On this card, all but "sweet" comes from Kaleidoscope. The two accessories not in the WOTG are Foam Tape and a Sponge Dauber.

The patterned paper is 4" by half-way between 1/2" and 3/4". It was just an odd bit leftover after I cut all the paper needed for the 15 cards in the WOTG. I sponged the edges with Pear ink, mounted it to a 4"x1.25" piece of white cardstock, and mounted both onto a 4"x 1.5" of Pixie cardstock.  Once I had these glued, I worked on the sentiment.

The small sentiment from Kaleidoscope reads "Hope Your Day Is". By carefully inking, I got just the first two words on the top line. I cleaned the stamp well, added "sweet" on the end, then carefully inked just "is sweet" and stamped it on the bottom line. I added the separate sentiment "Birthday" in the middle.  I was lucky enough that my stamping came out okay.  Sometimes I have to start all over again if my hand shakes before the ink touches the paper.  That's why I stamp before I adhere the strip to the card.  If I mess up, I've lost three small bits of paper.  Otherwise, the whole card needs to be redone.

I stamped the cupcake base in Slate, stamped off on a scratch piece of paper, then stamped a "second generation " image onto my card.  To create the cherry, I inked one end of the balloon string in Slate, stamped it at the apex of the cupcake frosting, and added a dark Pink Enamel Gem over top.

Here's the list of supplies (with embedded links for your shopping convenience):
I hope you're starting to see the possibilities and can see why I'm having so much fun!  Add them to your Christmas wish list so you're ready to get those birthday and baby cards going after the holiday rush is over.

Until next time,
Becca

Thursday, December 3, 2015

Kaleidoscope Cardmaking Workshop on the Go - Using Leftovers

Oh...I'm so excited to get this new month of design team duties for Mary Brooks going!  I'll be featuring the Kaleidoscope Cardmaking Workshop on the Go...and maybe I'll know how to spell it by the end of the month!

Like all CTMH Cardmaking WOTG kits, Kaleidoscope comes with stamps, paper, accessories and a package of cards & envelopes to create 15 cards.  You have to add the coordinating inks, which are Slate, Pear, Canary, and Pixie in this case. I put together the entire workshop and will be using the leftover supplies to show you what else you can do.  It's going to be a lot over the next four weeks, so here's a picture of the 15 cards made per the WOTG guidelines offered as proof I'm not fudging:


To my eye, the addition of pink makes all these feel a little girly.  So...here are some "manly" -- or at least ones that won't offend masculine sensibilities -- cards made with leftover patterned paper and accessories (adding only White Daisy cardstock and a few other items):


The WOTG comes with Pink Enamel Gems.  I used almost all the light and medium pink ones on the 15 cards.  All the red gems were leftover. You could make six cards like this using only the large size gems. And when you run out of those, you have medium and small sizes left.  And when you run out of those, you can make your own by punching circles out of Cranberry cardstock, gluing them down, and adding Liquid Glass over the top.  Since there's no patterned Kaleidoscope paper on this card, you can keep making this card over and over and over.  My only additional supply here is Foam Tape under the banner, but you don't have to use it.


I borrowed the banner idea from one of the cards in the WOTG.  In addition to Foam Tape, I added regular staples over the Green Shimmer Trim. It's a household item that doubles as an accessory, so I figured it was fair to use. (BTW, there's 5 yds. of shimmer trim on a roll.  The 15 cards used 70" which comes to just under 2 yds. Yep, I have over half the roll left to play with.)

For the cupcake bottom, I used Slate ink but stamped it onto scratch paper before stamping a "second generation" impression that's lighter onto my card. The sentiment is stamped in both Slate and Pear.  I fit the three stamps together, peeled out the center stamp, inked and stamped "Happiest" and "Birthday" in Slate, then stamped "Who Counting?" in Pear between them.

If you've been coming to my blog for any length of time, you'll notice I do a lot with 4x5.25 white panels foam mounted over top of a 4.25x5.5 card base. While the smaller top panel isn't necessary, it does hide the underside of the staples so the inside of my card is pristine.  Plus, it just looks cool.


This was the last large chunk of patterned paper...from one of the two pieces included in the WOTG.  I still have almost an entire sheet left.  I added a Sponge Dauber and Foam Tape (which is optional) and used another "pretty much everyone has one of these lying around the house" items -- a fine point Sharpie.

The gray mat around the balloon is Whisper cardstock from the WOTG.  I sponged the edges in Slate to get the deeper color.

Here's the list of supplies (with embedded links for your shopping convenience):
What has me most excited about the Kaleidoscope birthday theme stamp set is pairing it with Baby Zoo. I can't wait to show you what you can do with two stamp sets that coordinate as perfectly as these do.

Until next time,
Becca


Friday, November 27, 2015

Snow Thankful

Sometimes you need cards in a hurry, and sometimes you need to take time for a little color therapy.  Today was a coloring kind of day.  There's snow outside, Christmas music playing, and Thanksgiving leftovers in the fridge...and I needed a thank you card for the lovely couple who hosted us this year.

When you're far away from family during the holidays, it's such a joy to be invited to celebrate where the table is full and the fellowship sweet.  I wanted to create a card that adequately expressed our gratitude. 


The snowman is called "Peekin' Josh" and is one of those oldies-but-goodies. I stamped him three times: once on the background, once on the frame, and once on scratch paper. It's a lot of work, but it preserves the fun edge with its stitched feel in places where I layered.  I colored him with Copics then cut out the brim of his hat and the scarf and mittens together.

What you can't see is that the bottom layer of white cardstock was cut after I'd adhered the banner frame.  Basically I completely messed up my original idea and improvised.

When I added the hat brim, I put a bit of foam tape in the center, some glue on the edges, and then held everything in place until the side glue held and I had the curved brim. 

You might not be able to see it well, but I also curled up the bottom edge of the scarf.  I'm not sure if that will hold during the mailing process, but it's a fun dimension.

Speaking of dimension...I'm entering this in the following the challenges:

Addicted to CAS: Dimension
Simon Says Stamps: Anything Goes

I created my fun photo frame banner by welding two images from CTMH Artbooking Cricut cartridge.  Here's the link to create your own if you'd like.

Therapy over.  Time to write my thank you note and get this in the mail.

Until next time,
Becca

Wednesday, November 25, 2015

A Little Altering with White Pines

For my last week using the White Pines Workshop on the Go (CTMH) for design team duties with Mary Brooks, I wanted to go back to the Christmas theme...mostly because I still need cards for mailing to family and friends this year. 

Before we begin, I have to apologize to Mary for mis-labeling her blog address on these pictures.  I tried to go back and fix it, but my photo editor wouldn't let me.  The correct blog address is: mary-rmsbrooks.blogspot.com.

And now for the fun stuff!

I've shown you how to stretch the stamp images to cover more than just Christmas, but today I want to show you how to "stretch" your paper by altering the look of it.


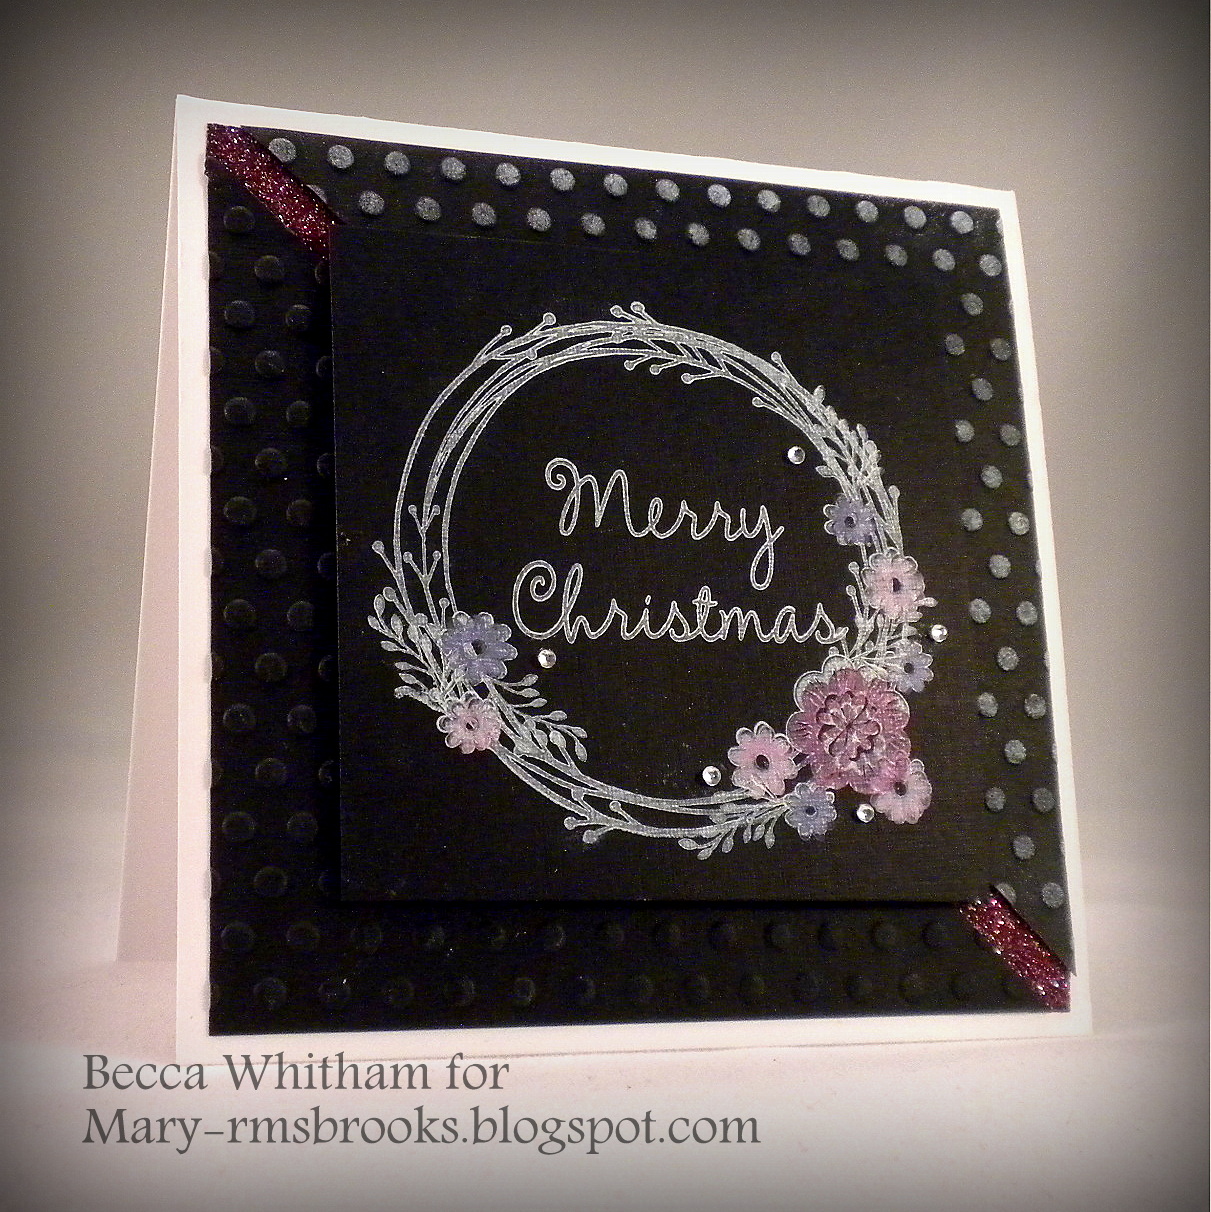
On this card, I painted the background paper with watercolors.  I used actual water color paints, but you could achieve the same effect by squeezing your dye ink lid into the pad. When you open the lid, add a little water to create a water color. (See the third card of this post for an illustration.)

My ink colors here are Fern and Smoothie. The tree was done by inking the solid image in Fern, stamping once on scratch paper, then stamping the "second generation" onto my card base.  The outline was stamped in Fern over top.  I used a sponge dauber to add a little extra Fern on the horizontal strip of paper and then I did something clever. I inked the solid image tree trunk in Smoothie, stamped it off once to fade the color, then used the Fern ink still on my sponge dauber over top of the stamp before pressing onto the paper.  It gave me a nice brown color.

I also added the Chevron Border Punch to my list of supplies this week. I've used it multiple ways, as you'll see coming up.  Above, a small piece of scrap of Cranberry paper gets extra interest.  Below, the punch adds interest without adding any "bulk".


For this card, I added two more ink colors: Black and Glacier. Working from left to right, here's how I altered the paper.  I stamped Fern ink onto Fern cardstock in a random pattern before stamping the tree. The middle tree was stamped on background paper which I altered by stamping with small cluster of dots in Glacier ink. The third tree is plain Cranberry. No altering required. I stamped all three tree trunks in Fern ink, using second generation for the middle tree. I also sponged the edges of each tree in Fern once they were cut out.

Admittedly, stamping a color onto patterned paper doesn't alter it much, but I remember how surprised I was when I first saw it done.  I tend to take things as they come, so the thought of changing up a pre-printed pattern wouldn't occur to me.  I'm also amazed at how tone-on-tone stamping gives interest without being overwhelming.

I think this is my favorite use of the Chevron Border Punch. Plus, I used the leftover cut outs for...


...this card. 

The altering I did here was paper piecing.  The top is more Fern tone-on-tone used on the left tree above.  The center is Cranberry tone-on-tone with the small cluster of dots in Glacier (pigment) added like the center tree above. (Note: you can use dye ink for stamping on the middle tree of the second card, but to get a lighter color to show on a darker cardstock, use pigment ink). The bottom layer of the tree is straight patterned paper. 

The trick to paper piecing is to outline your cut pieces with the same color you stamped your overall image before you adhere them together. Since CTMH  colored cardstock has a white core, outlining gets rid of that peek of white.  Because my outline was stamped in black, I used the wide end a dual-tip black Sharpie.  Once the entire tree was put together, I outlined the entire outside edge. I also used the Sharpie -- fine-tip end --  to hand-draw the black line border around the Cranberry and White Daisy panels.  The Sharpie is my only non-CTMH supply.

Like the trees in the second card, I sponged the whole tree in Fern before gluing it to the white panel.

Here's the supply list (with embedded links for your shopping convenience):
Mary and I decided to post a day early this week so we could enjoy our Thanksgiving.  We wish you and yours a wonderful time with family and friends.

I'll be back next week with a new WOTG.  Since most of you will be moving on from Christmas cards soon, the focus will shift. I have to tell you, I'm more excited about what's coming up than the previous two months.  I'm having a blast!!

Until next time,
Becca

Tuesday, November 24, 2015

Sangria Blog Hop with Heart


I'm thrilled to be joining the lovely ladies from "Blog Hops with Heart". This month we're featuring Sangria paper and a "Gratitude" theme.  The hop is a circle, so it doesn't matter where you start.  If you've come from Kelly's blog, you're on the right path. 

I'm linking this to the "Give Thanks" challenge over at Heart2Heart

Lately, I've been into using up scraps, and for this card I went back to elementary school. 


This is basic basket weaving, except I used a variety of widths, and I didn't worry about a tight fit.  I glued the woven pieces onto a coordinating color of cardstock, Champagne, and then used my paper cutter to trim off the rough edges.  I was going sew zig-zag stitches to create a quilted look, but my machine is jamming on me.  I think it might need professional help, but don't we all!

I used some Copic markers to color two of the gold sequins red and to outline the sentiment panel. I only did the latter for photographing purposes.

My favorite part about this card is the sentiment.  If you want to know the truth, I bought the entire stamp set to get it. It beautifully sums up how I hope to live my life. 

Now, you'll want to go see what Shelly has for you.

Wishing you and yours a wonderful day of giving thanks on Thursday...and all life long!

Until next time,
Becca

Thursday, November 19, 2015

White Pines Does Eight Challenges

This week for design team duties over at Mary Brooks' blog, I decided to see how many challenges I could enter with my three cards.  I came up with eight.


This card meets the following challenges:

CAS on Sunday - tag
Mojo Monday - card layout
Color My Heart - color scheme

To color the tree, I inked the solid image tree stamp in Pixie.  Then I "watercolored" using ink from the lids of Poppy, Ruby, and Hollyhock.  They were just drops of colored water placed directly on the tree stamp, but when I pressed to the paper, all the colors mushed together.  After it dried, I stamped the outline of the tree over top, added the star on top, and colored the star and tree trunk by painting Eggplant ink (substituted for Pomegranate from the CMH color scheme).

The tag was done by laying a spool of ribbon over top of a piece of black cardstock and cutting using the edge of the spool as my guide.  I stamped the sentiment in White Daisy ink and drew the outline with a white gel pen.  The trick with White Daisy ink is to have the re-inker handy and add just a bit into the pad before stamping. The "ribbon" is White Shimmer trim folded in half lengthwise to make it thin, then folded in half to create the illusion that it's ribbon through a hole.  To keep the ribbon folded and adhered to the tag, I used Liquid Glass.  I also used it to adhere the pink Shimmer Trim banner on top of the black one.

Since I had my Liquid Glass out, I added it to the tree.  I filled the star and tree trunk and outlined the tree.  Have I mentioned how much I love this stuff?!?!

I made good use of ShinHan markers on this card.  The sequins are actually gold.  I colored them with three different colored markers to coordinate with my color scheme.  I colored them while still on the plastic packaging sheet, adhered them to the tag, then touched up with the marker again.  In real life, they look a little blotchy, but it's a great way to add color in the absence of ten-thousand different colors of sequins.  I also used a ShinHan marker to turn White Shimmer Trim into pink.  This takes a little time if you don't want to shred your marker, but I used the chisel tip end and pressed it over and over and over.  Again, not as easy as buying colored, but still works.


This card meets the following challenges:

Runway Inspired - color scheme and florals
CASual Friday - precious metals
Retro Sketches - card layout

Since I was playing with my White Daisy ink, I used it here as well.  Then I used more pigment ink and a dye ink to add color.  I practiced this card on a piece of scratch black paper before doing the real thing.  After stamping the wreath, I added the flowers in pigment ink.  They didn't stand out enough.  So I tried stamping the flowers in White Daisy and adding color over top.  Then I wondered if I could add dye ink, too.  It worked.  So...on the card, I stamped the wreath, sentiment, and all the flowers in White Daisy pigment ink. I cleaned my flower stamps (using StazOn Cleaner because that works best on pigment ink), then inked them again to overstamp.  I didn't worry about being exactly lined up for the second stamping.  The large flower is stamped in Eggplant dye ink, while the smaller flowers are Gypsy and Thistle pigment ink.

After running both sides of my background through the embossing folder, I lightly dabbed White Daisy ink over one side.

The colored shimmer in the background is more of the White Shimmer Trim with ShinHan marker coloring.  I cut two 1" long pieces, cut the ends to a 90 degree angle, and colored them with the markers. I find it's easier to maneuver small pieces, not to mention it saves supplies.

I popped the center panel up on foam tape and added Bitty Sparkles (comes in the White Pines WOTG) to finish.  The card is 4.25"x4.25", the center panel is 3"x3".

Any time you use pigment ink or color something other than paper with ShinHan markers, you must let it dry for an outrageous amount of time.  But...oh, it's worth it!


This card meets the following challenges:

Heart to Heart - watercolor
CASology - pretty

After the long explanations above, I'm giving you a break with this one.  Watercolor paints in lots of different colors over top of a piece of water color paper.  Let the paper dry and cut off about a 3/4" strip.  Before mounting the panels on the card base, paint the flower stamps with red watercolor paint.  It will need to be a little thicker than for the background, so play around with stamping on scratch paper to get it right before stamping the small flowers on your (dry) watercolor panel.  Stamp the larger flower on scratch paper and trim it out.

Mount your two watercolor pieces to the card base using foam tape. Cut the foam tape small enough to fit into the space between panels.  Use a double layer to mount the larger flower.

Here's the supply list (with embedded links for your shopping convenience):

  • Stamps: White Pines Cardmaking WOTG 
  • Paper: Watercolor Paper, White Daisy cardstock
  • Pigment Ink: White Daisy (plus White Daisy Re-inker), Gypsy, Thistle 
  • Dye Ink: Pixie, Hollyhock, Ruby, Poppy, Eggplant, Black
  • Accessories: Watercolor PaintsWatercolor Brushes, Gold Sequins (although you could use Silver Sequins just as easily), Black Shimmer Trim, White Shimmer Trim, Bitty Sparkles (come in White Pines WOTG), Dot Embossing Folder, Liquid Glass, Foam Tape, Bonding Memories Glue, ShinHan Carmine Marker, ShinHan Tender Pink Marker, Shin Han Cherry Pink Marker, Shin Han Lavender Marker, (please note: I actually used Copic markers because I own them.  I've substituted the best options in ShinHans. You could easily use Purple Shimmer Trim and Pink Shimmer Trim instead of coloring with markers), StazOn Cleaner, Micro-tip Scissors, Paper Trimmer


  • Since next Thursday is Thanksgiving, I'll be posting for Mary on Wednesday instead.  I'm not sure what's coming your way, but I hope you'll come back to find out.  I also hope to (update: it's live!)have a link in the sidebar to my new Christmas novella which will be releasing December 1 in Kindle format.  Here's a picture of the cover:


    For a chance to win a copy of my story as well as prizes by the other eight authors in this collection, come to our Facebook party on Nov. 20 between 12:30 and 6pm.

    Until next time,
    Becca

    Thursday, November 12, 2015

    White Pines and Artfully Sent

    This week for design team duties for Mary Brooks, I'm combining the White Pines Workshop on the Go with the Artfully Sent Cricut cartridge to stretch a Christmas theme set a little.  As promised last week, I've used the wreath.


    This card has a very spring-like feel, which is quite lovely when it's -15 outside!


    This card is almost a repeat of the above one, but I wanted to show you both the Artfully Sent "Picture My Life" cut and the banner, because between these two, you can cover a lot of greeting card occasions.  I also wanted to show this second variation because, if you don't have Artfully Sent, you can use this same layout and substitute a straight banner you cut yourself with a stamped greeting on it like what's on the third card in this post.  The bow and banner are on p. 16 and are cut at 2" W and 4.85" W respectively.  I used ShinHan Markers to create a little depth on the bow and covered it with Liquid Glass for texture and shine.  The only "accessory" not listed below is the sewing around the edges of the top panel.  I use white stitching a lot to add interest without adding bulk to my cards.  If you don't have a sewing machine, the Stitch Guide would also work.


    This one goes back to Christmas, but any sentiment could be stamped inside the wreath to change the occasion.  I used Cranberry colors on this one, but I can see this in either of the color schemes above for spring and fall.

    Here's the supply list (with embedded links for your shopping convenience):
  • Stamps: White Pines Cardmaking WOTG 
  • Paper: Cranberry, Fern, Canary (from Whimsy Paper Fundamentals), Kraft
  • Ink: Fern, Cranberry, Cashmere, Crystal Blue, CanaryTopiary, Sunset, Poppy, Eggplant
  • Accessories: Artfully Sent Cricut CartridgeFern Thick Twine (comes in WOTG), Liquid Glass, Foam Tape, Bonding Memories Glue, ShinHan Mahogany Marker, ShinHan Clay Marker

  • I'm not sure what's coming next week. I think I'll see how many challenges I can play along with.

    Until next time,
    Becca

    Wednesday, November 11, 2015

    Veteran's Day Thanks

    On Veteran's Day, it's traditional to thank someone you know who is serving or has served. Today I'd like to turn that around and thank all of you for allowing my husband to serve in the army. 

    His military career started at an age when most are getting out rather than getting in, but several years ago the army needed chaplains so badly, they raised the age limit.  Nathan joined at forty-six. I tease and call it his mid-life crisis, but the truth is, this is the job God had been preparing him to fill all his life. 

    And he loves it. 

    Where else can a fifty-two year old man repel down a wall as part of his job? In Japan, no less!

    We have lived in three different states so far, making dear friends and wonderful memories both inside and outside of the army. The two women most responsible for helping me get published were met along this journey--one in Colorado; the other in Oklahoma. 

    So, not only do I get to watch my husband literally glow with joy in his job, but I get to live--not just visit but live--in places all across the country so I can do setting research for stories and never have to go more than a few miles from home.

    For that and much more, I thank you. It is our privilege to serve the fine men and women of the United States Army.

    Until next time,
    Becca

    Thursday, November 5, 2015

    Cards with White Pines Workshop on the Go

    I love Christmas. Love, love, LOVE Christmas!  Now that we live in Alaska and the snow shows up in October, it feels like Christmas already and those decorations in stores don't feel quite so "early" as they did last year. 

    Anyway...

    For design team duties over at Mary Brooks' blog, I'm using the White Pines Cardmaking Workshop on the Go.  The workshop comes with three card ideas, but once the paper is gone, what else can you do with it?  I took the stamps and created a few new ideas using the same suggested supplies needed for the card making plus an additional supply or two.  If you aren't already familiar with the White Pines Cardmaking Workshop, I suggest you link here before going on.  The suggested supplies you need to complete the shown cards are Fern, Cranberry, Cashmere, and Black ink.


    Here, I added Gold Sequins.  The squiggle line was stamped in Cashmere ink in a straight line.  I used a ruler and a pencil to draw a guide before stamping.  The Fern pine bough was done by inking one side of the smaller pine spray image and stamping it along the line. I hand-drew the black lines linking the small ornaments to the line with a black pen.  The finishing touches were the Fern Thick Twine, Bitty Sparkles ( both come in the WOTG), and Gold Sequins.


    This card adds Crystal Blue ink and Liquid Glass.  I inked a 2"x2" Acrylic Block in Crystal Blue, lightly spritzed it with water, and stamped it on my white card panel.  I added Liquid Glass to the Cranberry berries for added texture and shine. 


    This last card uses the Artfully Sent Cartridge and coordinating Frames stamp sets included in the price.  I also added Versamark ink and Fine White Embossing Powder.  Now, yes, I used a bit of the White Pines paper but just a tiny bit.  And the same effect could be done by stamping paper to create your own pattern, so...yeah...

    I sewed down the Cranberry banner, but the same effect could be achieved by white embossing the swirly line that comes in the stamp set.

    While Cranberry and Fern cardstock comes in the WOTG, you won't have enough left over to make the first two cards, which is why I've included it in the supply list, below (with embedded links for your shopping convenience):
    There's a wreath stamp in this set that I didn't feature here.  That's because you'll be seeing a lot of it in the coming weeks.  A lot!!  I'm a sucker for wreaths, and this one is my favorite so far.  Next week I'll pair the wreath and a few other images from the White Pines Cardmaking WOTG with Artfully Sent to create cards for a variety of occasions.

    Until next time,
    Becca