Sunday, December 1, 2019

December SOTM Blog Hop


Welcome to the December Stamp of the Month Blog Hop. You should have come from Krista's blog, but don't worry if you started here. The hop is a circle so just keep going. If you get lost, you can always go to Melinda's blog for a complete list of participants.

For my project, I used a little old, a little new, and a little non-CTMH in addition to the Reindeer Crossing stamp set. I made a very special kind of advent calendar for my daughter's gender reveal party. In fact, as this hop goes live, I'm probably still there. The man who made their cake and I were the only two people who know that it's...

A girl!


I'm so excited. Here's the advent calendar I made.


Inside the pockets, five of the tags are decorated with two bucks and three does. Guests will all put their names in a bowl. As their names are drawn, they will chose which day they think she'll deliver by taking down the pocket and pulling out the tag. Most of them will be blank. We'll keep guessing dates and pulling out tags until the three girl tags are revealed. With any luck, the two decoy boy tags will be revealed before the third girl one is, adding to the suspense.

My son-in-law built the frame. I made the Kraft pockets, tags, and the bucks and does using Cricut Design Space. Here's the file if you'd like to replicate this project, and here's the Pinterest picture I used for inspiration. I didn't want my calendar to be quite so intricate, so on the pockets without the doiley, I gold embossed the small pine cones and fir tree branches from Reindeer Crossing.

The currently available product I used includes various CTMH Cricut cartridges, Kraft paper, White Daisy paper, Candy Apple paper, Evergreen paper, Versamark ink, Gold Detail Embossing powder, and the SOTM, Retired product includes the Block Numbers Thin Cuts (still available in Online Only) and the doileys (I used pre-made ones, but a thin cut is available in Online Only). Non-CTMH product is the gold cord and mini clothes pins used to attach the pockets to the frame. CTMH used to sell smaller sized frames with chicken wire centers which is where I got the idea.

You're next stop on the hop is Cat's blog. Again, be sure to keep hopping until you've seen all the great projects.

Before you go, CTMH is having a sale on Monday, December 2 beginning at 3pm MST. Items are up to 50% off in limited quantities. It only lasts for 24 hours, so shop early. And, as always, if you spend $50, the Stamp of the Month is only $5.

Until next time,
Becca
(aka Grandma!)

Tuesday, November 5, 2019

New Product Blog Hop


Welcome to the November-December New Product Blog Hop. You should have come from Gina's blog. There are LOTS of consultants participating, so be sure you make it all the way around. If you get lost, head over to Melinda's blog for a complete list of participants.

As much as I love Christmas, I have something even more exciting to look forward to...my daughter and son-in-law's gender reveal party. This is our first grandchild, and we are over-the-moon excited about it. The fun thing is that, not only is our daughter pregnant, many of her friends are also getting pregnant, so I'm back to making baby cards a lot. I took the Buttoned Up Thin Cuts designed to make Santa's beard and belt and turned it into this...


I used Ballerina and Carolina cardstock, alternating between the light and darker sides of the paper for the dual tone. I love this two-tone feature!! I also used vellum paper with the sentiment from one of the Melissa Esplin sets in the Core Catalog embossed in white layered over top. I used vellum paper because didn't want my sentiment to take away from the pattern I'd created with the thin cuts. I did a similar design in the second card of this post.

There are so many ways to use this Buttoned Up Thin Cut set. I wanted to show you more, but I'm in the middle of promoting The Telegraph Proposal, the final book of The Montana Brides series...so I'm in Montana! I actually made this card at 4am the morning I left. I barely had time to finish it and get it photographed before packing up the car and heading out.

Now it's time to head over to Lauren's blog to see what she's created. Again, be sure to get all the way through the hop as there's wonderful inspiration to be had.

Until next time,
Becca


Friday, November 1, 2019

November Stamp of the Month Blog Hop


Welcome to the November Stamp of the Month: Family Blessings. The stop before mine is Krista's blog. The whole hop is a circle, so just start wherever and keep going until you get back to where you started. If you get lost along the way, hop over to Melinda's blog for a full list of participants.


I decided to combine the stamp with Cedar and Pine paper to make an assortment of all-occasion and Christmas cards.


I stamped the flower in Smoothie with Candy Apple and Saffron. The leaves are stamped in Evergreen. I layered a few pieces of Cedar and Pine paper on the left edge then stamped the row of X's in Evergreen at the top. With no sentiment on the front, I could turn this into any kind of card I needed, from thank you to birthday to Christmas.


For this card, I added dies from the Buttons and Bows Thin Cuts. This die set can be used to create Santa's beard and jacket, but on this card I used the "beard" as a scalloped top. I cut one in Evergreen paper and one in white. I used Peach, Smoothie, Candy Apple, Ruby, Saffron, and Evergreen inks. The sentiment is from the special Holiday Cheer promotion we featured on this blog hop. I cut the top panel with the Stitched Rectangular Thin Cuts and added Clear Shimmer Pen to the flowers.


The final card also uses the Buttons and Bows Thin Cuts. I used the same ink colors, but this could be done in any colors you chose. I really liked the leaves hanging over the right edge but, to make sure it still fit into a standard A2 envelope, I trimmed 1/4 inch off the left edge of the card.

Now you're off to Darlys' blog. Again, be sure you hop all the way around to see all the great inspiration offered.

If you follow my author career, today marks the official release of the final book in the Montana Brides series. After five years and six stories, it's a joy to have the entire set of stories available.

Until next time,
Becca

Friday, October 25, 2019

Holiday Cheer Blog Hop


Welcome to the Holiday Cheer blog hop. This special set is designed to make Christmas ornaments. However, true to form, you'll be getting something different here. The stop before mine is Michelle's blog. The entire hop is a circle, so keep going until you get back to where you started. If you get lost, head to Melinda's blog for a full list of participants.

I make around 80-90 Christmas cards every year, so I'm always looking for ways to stretch my paper purchase. The following cards all use the Mix-In paper from the Nov-Dec catalog (which went live two weeks earlier than planned due to customer demand).

This first card uses a strip of 3x1 paper, which means I could make 48 cards from one 12x12 piece of Mix-In paper.


The colors are Evergreen and Mint. I used both the Stitched Rectangle and Stitched Oval Thin Cuts as well as the Mint Shimmer Brush to accent.

My second card uses a 3x3 square of paper from the same pack, so I could get another 16 cards with this design.


Here I used the Stitched Square Thin Cuts. As with the above card, you have to line up the Thin Cut with the paper carefully to make sure you're getting the stitching all the way around. Because my purpose was to get as much use out of one piece of paper as possible, I was willing to do the fussy work of lining up my Thin Cut with the paper.

My final three cards all use a 4x4 piece of red plus a 1.25 x 4 piece of kraft paper from the Mix-In pack. With careful planning, I can get 3 cards from each piece of red cardstock, adding another 27 cards to my stash.

I started with the 4x4 piece of red cardstock and centered the stitched circle frame from the Circle Shaker Card Thin Cuts set on top. This thin cut set us used on the ornaments, but you must purchase them separately; it's not included in the kit. I figured, if you're getting it for the ornaments anyway, you might as well get some more use out of it. Once I cut the circle, I had three pieces of red cardstock.

Here's the first card I made using the 4x4 piece with the center cut out.


The wreath is stamped in Toffee and the sentiment is stamped in Candy Apple. The only extra thing I added here was a teensy, tiny piece of white cardstock to add a border between the red and kraft papers.

Here's the second card using the stitched circle frame.


I stamped the December 25 image in both Candy Apple and Toffee ink, cut them both with Micro-tip Scissors, and glued the Toffee partial image over top of the Candy Apple full image. I also used my Micro-tip Scissors to cut a small fishtail in the kraft paper to create a banner.

Here's my final card.


I cut 1/2 inch from the edge of my kraft cardstock and glued it to the right hand side of the card while glue the other piece on the left hand edge. Once my circle with the sentiment goes over the top, no one knows it's two pieces of paper instead of one. I stamped the sentiment then cut it out with Stitched Circle Thin Cuts.

And I still have two pieces of Mix-In paper left!

Okay...yes, I used a lot of the stitched thin cuts which are pricey to purchase all at once. So don't. Get one set at a time. I'm getting a total to 91 cards with just under four pieces of Mix-In paper. They aren't fancy cards, but they are more personal than anything you can get in a store (and I can do all of them while watching football). I'm ALL ABOUT justifying my purchases. I haven't purchased Christmas cards in ages, but the last time I checked, they were around $7 for a box of ten. What I've showed you here is the equivalent of nine boxes of cards. That would be $63 I'd spend with nothing to show for it at the end. Why not take that $63 and spend it on craft supplies? Get the stamps and paper first, of course, but then start adding in the thin cuts as your budget allows. Once you have them, they are good forever.

Now you're off to Darlys' blog. And don't forget to visit the Flash Sale going on until October 26, 2019 at 3pm Mountain Standard Time. That's another great way to stretch your crafty dollars.

Until next time,
Becca

Tuesday, October 15, 2019

Fall Into Christmas with the Hawthorne Cardmaking Workshop

It's an exciting day for those of us who love Close To My Heart (CTMH). Today, the Seasonal Expressions catalog released two week early because consultants were clamoring for holiday stamps and papers...and the head office listened! So I'm going to show you how to take a cardmaking workshop which was released in the September-October catalog and make Christmas cards with it. Here's the sample images shown in the catalog:


Here's the exact same cards made for Christmas:


I added the following supplies to make them:

  • Say It in Style stamp set (which is an absolute "must have" set!)
  • Cedar & Pines paper
  • Candy Apple Cardstock
  • Black Cardstock
  • Evergreen ink
  • Toffee ink
  • Christmas Red Stickles

My variations include using a third pine cone to cover up the acorn, "watercoloring" the back left image by smushing the Evergreen ink pad together to pick up ink in the lid then painting. I left off the Mink Twine (which comes in the workshop kit) and used the Christmas Red Stickles instead.

And then - because I just love the whole smushing of ink pads together to watercolor technique - I created this:


I started by getting my watercolor paper wet then stamping the Hawthorn image in Fern ink. The edges of the image feathered out immediately. Using the smushing method, I added more Fern, Saffron, Eggplant, and Raspberry here and there, letting the colors blend into each other. I had to add more water as I went along. Once the background was dry, I stamped over top of it again but I only inked the edges of the Hawthorn image and used a sponge dauber to be sure it was soft. I die cut a panel using the Stitched Rectangle Thin Cuts.

Using a separate piece of watercolor paper, I stamped the pumpkins from the Autumn Blessings stamp set in Black Pigment ink then embossed with Clear powder. Then...I smushed and painted some more. I used all the colors except Fern in the pumpkins, adding Paprika because I wanted some orange. It didn't work well, so I mopped it up with a dry paper towel.  I did used a combination of Paprika and Fern in the stems and colored outside the lines because it was going to be impossible to trim them right to the edges. After the pumpkins were dry, I added Nectarine ink because I wanted them to stand out a bit more against the background. To make them stand out even more, I added Clear Shimmer Pen to them, too.

I cut them out, trimming very close to the edges, with Micro-tip Scissors. After stamping the sentiment in Black ink over the background panel, I glued and foam mounted the pumpkins over the top.

But what about the black splatters, you may wonder. Well...let me tell you about that. If I had known then what I know now, I would have added them before the pumpkins were glued down. In truth, I added them after the fact which was awkward, to say the least. I used the smallest stamp in the Strokes of and Artist set. I inked only parts of  the stamp - even though it's really small - so it didn't look like I stamped the same image over and over again. Because I stamped after the pumpkins were down, I had gaps where the stamp couldn't get to. I still had the small paintbrush I'd used to watercolor on my desk, so I used the wooden end like a stamp, pressing it into the ink and then stamping here and there to fill in as needed.

For the final touch, I cut a piece of 4 x 5.25 Eggplant cardstock and glued it to the watercolor paper. I then foam mounted the top panel to the card base.

I want to give credit to the card maker who inspired this idea. Here's a link to the blog post with the card I used as my example.

Granted, this card used a large number of products, but that's one of the great things about having a large number of products. Sometimes it's fun to put them all to work...although my workspace is a crafty mess right now. Still, it's been fun!

Until next time,
Becca

Tuesday, October 1, 2019

October Stamp of the Month - Autumn Air


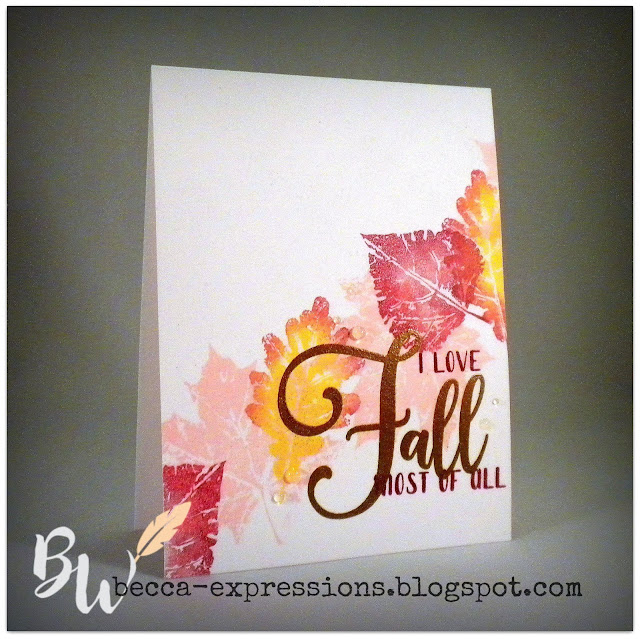
I love Fall most of all. Maybe it's because my birthday is this month, maybe it's pumpkin spice everything, and maybe it's the beautifully colored leaves. Whatever it is, I truly do love Fall most of all. So this set is perfect.


If you didn't start this Blog Hop here, you should have come from Darlys' blog. If you get lost, head over to Melinda's blog for a full list of participants. There are almost thirty participants this month (it seems I'm not the only one who loves Fall), so be sure you get all the way around to see the wonderful inspiration.


My upline does a weekly color challenge. Last week it was Ballerina. That's not a color we usually associate with Fall, but I love how this turned out. The other colors here are Ruby and Canary. I wanted my Ruby to have a light touch, so I applied it to my stamp using a sponge dauber, concentrating a little more color around the edges. I inked the thin leaf in Canary and sponged Ruby around the edges. The Ballerina leaves are straight stamping. The small font of the sentiment is stamped in Ruby, the large was embossed with Gold powder. It's tough to see them, but I added dots of Liquid Glass around the sentiment to look like dew drops. I thought about adding sequins, but I really liked how the Liquid Glass looks.

Now you're off to Kathy's blog. Again, be sure to hop all the way around.

Until next time,
Becca

Friday, September 27, 2019

Autumn Blessings

Sometimes I want to sit and color images, and sometimes I want a quick fill in. For these two cards, I filled in the pumpkins from Autumn Blessings with plaids. The first one, the plaid comes from the Hawthorn - Scrapbooking stamps set (all images from CTMH), and the second one I used the Build-a-Plaid set.


My colors are Glacier, Nectarine, Toffee, and Saffron. For this second card, the sentiment comes from the Perk Up set and the tiny leaves come from the Share the Seasons special promotion of the month. I colored the leaves with markers to tie in the orange color in the second pumpkin.

These were perfect cards to make on this perfect autumn day in the Pacific Northwest.

Until next time,
Becca

Saturday, September 21, 2019

Build-a-Plaid Goes Wonky

One of my must-have stamp sets in CTMH's new Core Catalog is Build-A-Plaid. It comes with a number of straight line images you can use to create patterns or borders. Sets like this have so much versatility to them, and I was eager to put it to work...in my own "can't always be normal" way.


I used three different stamp sets for this. Two are in the Core Catalog and one is in the Sept/Oct Catalog. After it was stamped, I ran it through the largest Stitched Rectangle Thin Cut. This step isn't necessary if you don't smudge ink on part of your card. Go ahead...laugh.

I embossed the sentiment in white over black cardstock and used a small bit of foam tape to adhere it to my card.

Here are the products used (linked to my website for your shopping convenience):


Here's hoping you have a wonderful - and maybe a little bit wonky - weekend.

Until next time,
Becca


Friday, September 20, 2019

Share the Seasons Blog Hop


Welcome to the third blog hop for this month. There was so much to show you with two new catalogs, the Stamp of the Month, and this September special promotion, we couldn't confine ourselves to just one hop...or even two of them. You should have come from Miss Carrie's Creations, but don't worry if you started here. The hop is a circle so you can start anywhere and keep going. If you get lost along the way, head to Melinda's blog for a complete list of participants.


I decided to clump my images together rather than using them to fill the squares. I haven't quite outgrown my rebellious streak which says, "But I don't want to do it the way it's pictured." Given my age, I'm guessing I'm stuck with that particular character trait.

I tried several different colors of background paper behind the grid before settling on Pebble. It had just enough contrast to provide interest without overpowering my little images.


This card uses the Mix In Paper for my card base. The leaf colors are Saffron, Sage, Toffee, Paprika, and Sapphire. I embellished with Gold Sequins.


Here I added the coffee cup from the Perk Up stamp set and "for you" from the September Stamp of the Month. I added veins to my leaves and outlined my coffee cup with a 0.5 Black Journaling pen. In addition to cutting my background panel with the largest Rectangular Stitched Thin Cut, I also ran it through my machine with the Stitched Circles Embossing Folder. The Washi Tape down the side is called Hello Pumpkin. It was released last year but can still be found in the Online Only shopping category. It's showing "Low Quantity" so order quick!

Now you're off  to Gina's blog. Again, be sure to keep hopping until you see all of the awesome inspiration for this fun special. It retires at the end of the month so get yours now by clicking HERE!

Until next time,
Becca

Thursday, September 5, 2019

New Product Blog Hop


I'm so excited about today's blog hop. I literally gasped when I saw the front cover of the seasonal catalog shown above. So pretty. And there's a second "Core" catalog with products which will be available all year. Because Fall is my favorite time of year, I always look forward to the pretty papers and products in this catalog, and I wasn't disappointed. Yumminess abounds!!

You should have come from Haley's blog, but the hop is a circle so keep going. If you get lost, head to Melinda's blog for a full list of participants.

For my card, I used a mix of products from the Core Catalog (items available all year) and the Seasonal Catalog (items available Sept-Oct 2019).


I started by layering the Mix-In background paper at angles on a 4.25 x 4.25 square of white cardstock. I glued the watercolorish stripe pattern along the left side then stamped the X's (Every Little Thing - Scrapbooking stamp set) over top in black ink before adding the other layers of paper. The plaid stripe with the Hello! stamped on it is a zip strip. Once I had the paper glued, I ran it through my die cutting machine using the largest Stitched Square Thin Cut. Next I stamped and colored my bird (also from Every Little Thing - Scrapbooking) with markers. I then ran it through my die cutting machine using the largest Stitched Circle Thin Cut. I also die cut one of the Layered Leaves Thin Cuts from black cardstock and snipped apart the leaves. I glued the stitched square to a 4.25 x 4.25 card base then played with the arrangement of the leaves until I was happy. I added a lot of foam mounting tape to the back of my bird and carefully laid it over top of the leaves. I wanted the leaves to float, so it was important to have foam tape all the way to the edges of the bird layer to keep the leaves from falling off.

Here's a list of the products which are available all year:
Here are the products available only through the end of October:
And now here's the exact same card using almost the exact same products, only this time it's a Christmas card.

The only difference in products used between the two cards is that, on this one, I used Diamond Stickles instead of the Layered Leaves Thin Cuts.

My absolute favorite new product out of both catalogs is the Say It In Style stamp set. It goes with everything! My next favorite is the Mix-In paper. I adore the wide variety of colors and patterns in it. So many possibilities. I hope you'll take time to view the new catalogs online and see all the wonderful ideas and products now available.

Your next stop is Gina's blog. Remember to keep going because there's a ton of goodness being shared. If you missed the hop featuring the Stamp of the Month, click here to begin. And be sure to come back for the hop featuring the Share the Season special which will be coming to you soon.

Until next time,
Becca

Wednesday, September 4, 2019

New Cricut Cartridge Available

The brand new Cricut cartridge from Close To My Heart is now available. Here are few of the images.

And here's some artwork done with them...


To shop all the cartridges available through CTMH, or if you need supplies or want to sign up for a subscription, please click here or use the link on my sidebar.

Until next time,
Becca

Sunday, September 1, 2019

September SOM Blog Hop


Welcome to the September Stamp of the Month (SOM) Blog Hop. You should have come from Haley's blog, but if you started here don't worry. The hop is a circle so you can start anywhere and just keep going until you get back to your first stop. There are a bunch of consultants participating this month, so if you get lost, head over to Melinda's blog for a full list of participants. I'll post the link for your next stop at the end of this post.

I absolutely ADORE this stamp set. I've always wanted something that has a "just because I felt like making you a card" sentiment, so the Random Act of Cardness is perfect. However, I also really love that "hello." The font is so elegant. I decided to do a little...are you ready for it...cutting of my stamps. I get so much more use out of them by snipping out bits and pieces, but I always cut using curves or notches so I can easily fit everything back together.

My other rules about cutting stamps apart are: 1) to only do it when I will often use the part I'm cutting out alone, and 2) to only do it if masking off part of the stamp is difficult. For example, I will likely use "random act of cardness" on it's own lots of times, but because the "R.A.C." is on a straight line above it, I can easily tape that off before inking or just avoid that part of the stamp with my ink pad. On this card, I used just "handmade" from the bottom right sentiment by avoiding inking "100%" and the cut apart "A little hello..."


I started by stamping hello in Mint ink, stamped handmade in black over the top, then let both dry before running my anti-static pouch over it and stamping hello again with Versamark ink. I used clear embossing powder to give the hello a shiny, raised appearance. I would not have been able to get the crisp image of handmade if I'd tried to do my embossing first and then stamped in black over top later. I cut the oval with the now-retired Oval Thin Cuts. I don't have the Stitched ones (yet...and they would have been perfect for this), so I hand-drew a black border to frame my sentiment.

For the background, I started out using the Multi-circle Frame Thin Cut but decided to use just the interior circles. I used the full cut image as a guide to add the base circles, then used the smallest circle from Stitched Circle Thin Cuts with black, white, and the lighter side of mint cardstocks. After gluing them in place, I added the sentiment oval with 3D Foam Tape then accented with Black and White Enamel Dots. I liked how the card looked without the addition of the enamel dots, but I LOVE how it looks with them. The shine on the dots is echoed in the shine on my sentiment. It's almost like I planned it. LOL!

Here's a complete list of the supplies I used with links for your shopping convenience. Please be sure to use your personal consultant, if you have one, to do your shopping.
While your shopping, be sure to check out all the new, wonderful products which released today. Well be doing another blog hop in a few days to featuring them, so be sure to come back.

This card will be going in the mail along with an Advance Reader Copy of The Telegraph Proposal. The publisher sent me five copies so I'm mailing them out to fellow authors and influencers to garner some reviews before the book releases in November. Only two months now! I want to include a card with each packet as a way to say thank you for agreeing to read and review the story.

Now you're off to Gina's blog. Again, there are quite a few participants in this month's hop so be sure to keep clicking until you see all the inspiration.

Until next time,
Becca

Saturday, August 24, 2019

Stitched Flowers - Going, Going...

We're down to the last week of the current CTMH catalog. I'm very sad that the Stitched Flowers are being retired, but lovely new products are on the way which are filling my crafty heart with joy. However, if you've been hemming and hawing over getting these flowers, now is the time to do it. I used two different flowers for the focal point of this card...


I used Emerald ink to stamp the top part of the background using the Charming Borders stamp set.  The bottom part of the background is from the Craft On paper suite. All of these items are retiring. Not retiring are the White Daisy and Raspberry cardstocks, Raspberry ink, sponge daubers (inking the edge of the flower), and the Stitched Rectangular frames.

One of the great things about being at home is that I can now hand-deliver dimensional cards like this. I have a baby shower coming up for a little girl. I think this will work perfectly.

Until next time,
Becca

Saturday, August 10, 2019

Craft On Project

We moved into a new house a couple months ago. My craft area, while nice, needed some decoration. Craft On paper to the rescue!!


Now please don't think I came up with this idea on my own. I saw several similar ideas, but what I did was the cheap version. Where others used images of scissors, glue, and paint tubes made from the Crafting Shapes Thin Cuts, I used the cut apart sheet from the Craft On paper suite. Additional supplied I used include Stitched Square Thin Cuts, Stitched Circle Thin Cuts, and Stitched Heart Thin Cuts. After gluing down the cut out images onto the squares, I glued them to a 8.5+ a smidge square black piece of cardstock. I had an 8.5x11 piece which was just a fraction...like 1/16 of an inch...over 8.5, but that tiny bit of overage allowed me to just barely fit all of the squares over top with a thin border around and between them. I would probably have cut my black square to 8.75 square if I'd used a 12x12 piece of cardstock for the base. The border around the edge and between would have been larger but that would have looked just fine.

I glued the 8.5 square to a 12x12 piece of white cardstock and then added Craft On sequins. To make sure my sequins stay in place, I added a dollop of Liquid glass to the paper, placed my sequins over top and pressing enough for some of the Liquid Glass to bubble up through the center hole, then I added another dollop of Liquid Glass over the top. This under/over technique really makes those sequins secure.

I so love how this turned out. The fresh, vibrant colors - as well as the sentiments - bring joy to my heart.

The great part about this project is that, while the stitched die cuts are nice, you can create all of it with the Craft On paper, a paper cutter, a pair of scissors (plus maybe the bottom of a small jar if you want the center circle shape) and some glue. The "frame" here is just a border added via photoshop but represents how I plan to have it framed.

Eat. Sleep. Craft. Repeat. Gotta love it!!

Until next time,
Becca

Tuesday, August 6, 2019

Card #2 with From Me to You - August SOM

Someone we know just got really good news. To celebrate, I made this fun little card using the August Stamp of the Month (SOM): From Me to You. (See the sidebar for a complete image of all the great stamps in this fun set.)


I love the little smiley faces inside the shaker. I cut them from Lemon cardstock using the smallest stitched circle thin cut from this set. I then cut the circle frame from the Craft On paper suite. Using the coordinating foam mounting tape and plastic circle, I created my shaker with Craft On Loose Sequins and the smiley faces which are too large to turn over inside the plastic. I stamped the sentiment in Black ink, cut it with Micro-tip Scissors to create a banner, then outlined it and the 4.5x4.5 cardbase with a black micron pen.

Craft On paper, sequins, and this fun stamp set are all gone at the end of the month, so be sure to get them quick.

Until next time,
Becca

Thursday, August 1, 2019

August SOM Blog Hop - From Me to You


Welcome to the August Stamp of the Month Blog Hop featuring "From Me to You." You should have come from Michelle's blog. The hop is a circle, so you can start anywhere and keep going. If you get lost along the way, pop over to Melinda's blog for a full list of participants. You can view the full image of this SOM set on my side-bar or by clicking here.

I'll admit it...every time CTMH releases a new catalog, the first place I look is at the Stamp of the Month (SOM) specials because it's usually where I find my favorite stamp sets. Before I became a consultant, I planned which month I would order in based on which SOM I liked the best. And this one was the first set on my list because I love, love, LOVE sets with multiple sentiments. Privately, I call these stamp sets "justifiers." Let me show you why...

Below are two stamp sets with coordinating thin cuts which I absolutely love but would give me limited usefulness when it came to making cards.


Yes, I love the "bloom" sentiments in the watering can set, and the "enjoy each day" from the camper set could be used for cards. But how many of those would I actually send? Not that many. However, if I purchase the stamp sets and then add a $5 Stamp of the Month with lots of great sentiments, suddenly I can make a boatload of cards without adding very much to my overall stamp budget.


To get the shaded effect on my watering can, I swiped Mink ink across my stamp the pressed it down using my MISTI stamp positioner. I then sponged Heather ink around the edges with a Sponge Dauber - a tool I used constantly - and pressed down again. The leaves were stamped in Mint ink then sponged with Sage, and the flowers were stamped in Peach ink. I also stamped the small line of solid hearts in the From Me to You stamp set across the top of the watering can in Ballerina, although you could just as easily use Peach ink.

After cutting out my background paper from the Sweet Girl paper suite with Stitched Rectangle Thin Cuts, I glued it to my card base and then stamped the splotchy thing (yes, that's a technical term)  from the Timeless Textures stamp set in Ballerina ink before gluing  down my die cut watering can.

The sentiment and small swoosh are both from the SOM. I stamped them in Heather and Peach inks respectively. I then cut it out using the Circle Thin Cuts (which are retiring as of August 31, so get them before they sell out).


Okay...how cute is this for a retirement card? I used the exact same supplies except this one features the Oval Thin Cuts (also retiring August 31). I fussy cut the plaid bottom and peach curtains out of leftover paper in Sweet Girl. It doesn't really take that long and it sure ups the cuteness factor. You'll really want Micro-tip Scissors for this.

Now, just for the fun of it, here's the watering can again with various sentiments from this set.


See. Justifiers! But now I need to stop playing with them and actually get back to work. I'm heading to a writer's conference in a couple weeks, and it would be good to have some proposals for books ready to pitch to editors.

Your next stop is Jessica's blog. Again, the hop is a circle so be sure to keep going until you see all the inspiration these amazing consultants have for you.

Until next time,
Becca