Showing posts with label Cricut. Show all posts

Sunday, December 1, 2019

December SOTM Blog Hop


Welcome to the December Stamp of the Month Blog Hop. You should have come from Krista's blog, but don't worry if you started here. The hop is a circle so just keep going. If you get lost, you can always go to Melinda's blog for a complete list of participants.

For my project, I used a little old, a little new, and a little non-CTMH in addition to the Reindeer Crossing stamp set. I made a very special kind of advent calendar for my daughter's gender reveal party. In fact, as this hop goes live, I'm probably still there. The man who made their cake and I were the only two people who know that it's...

A girl!


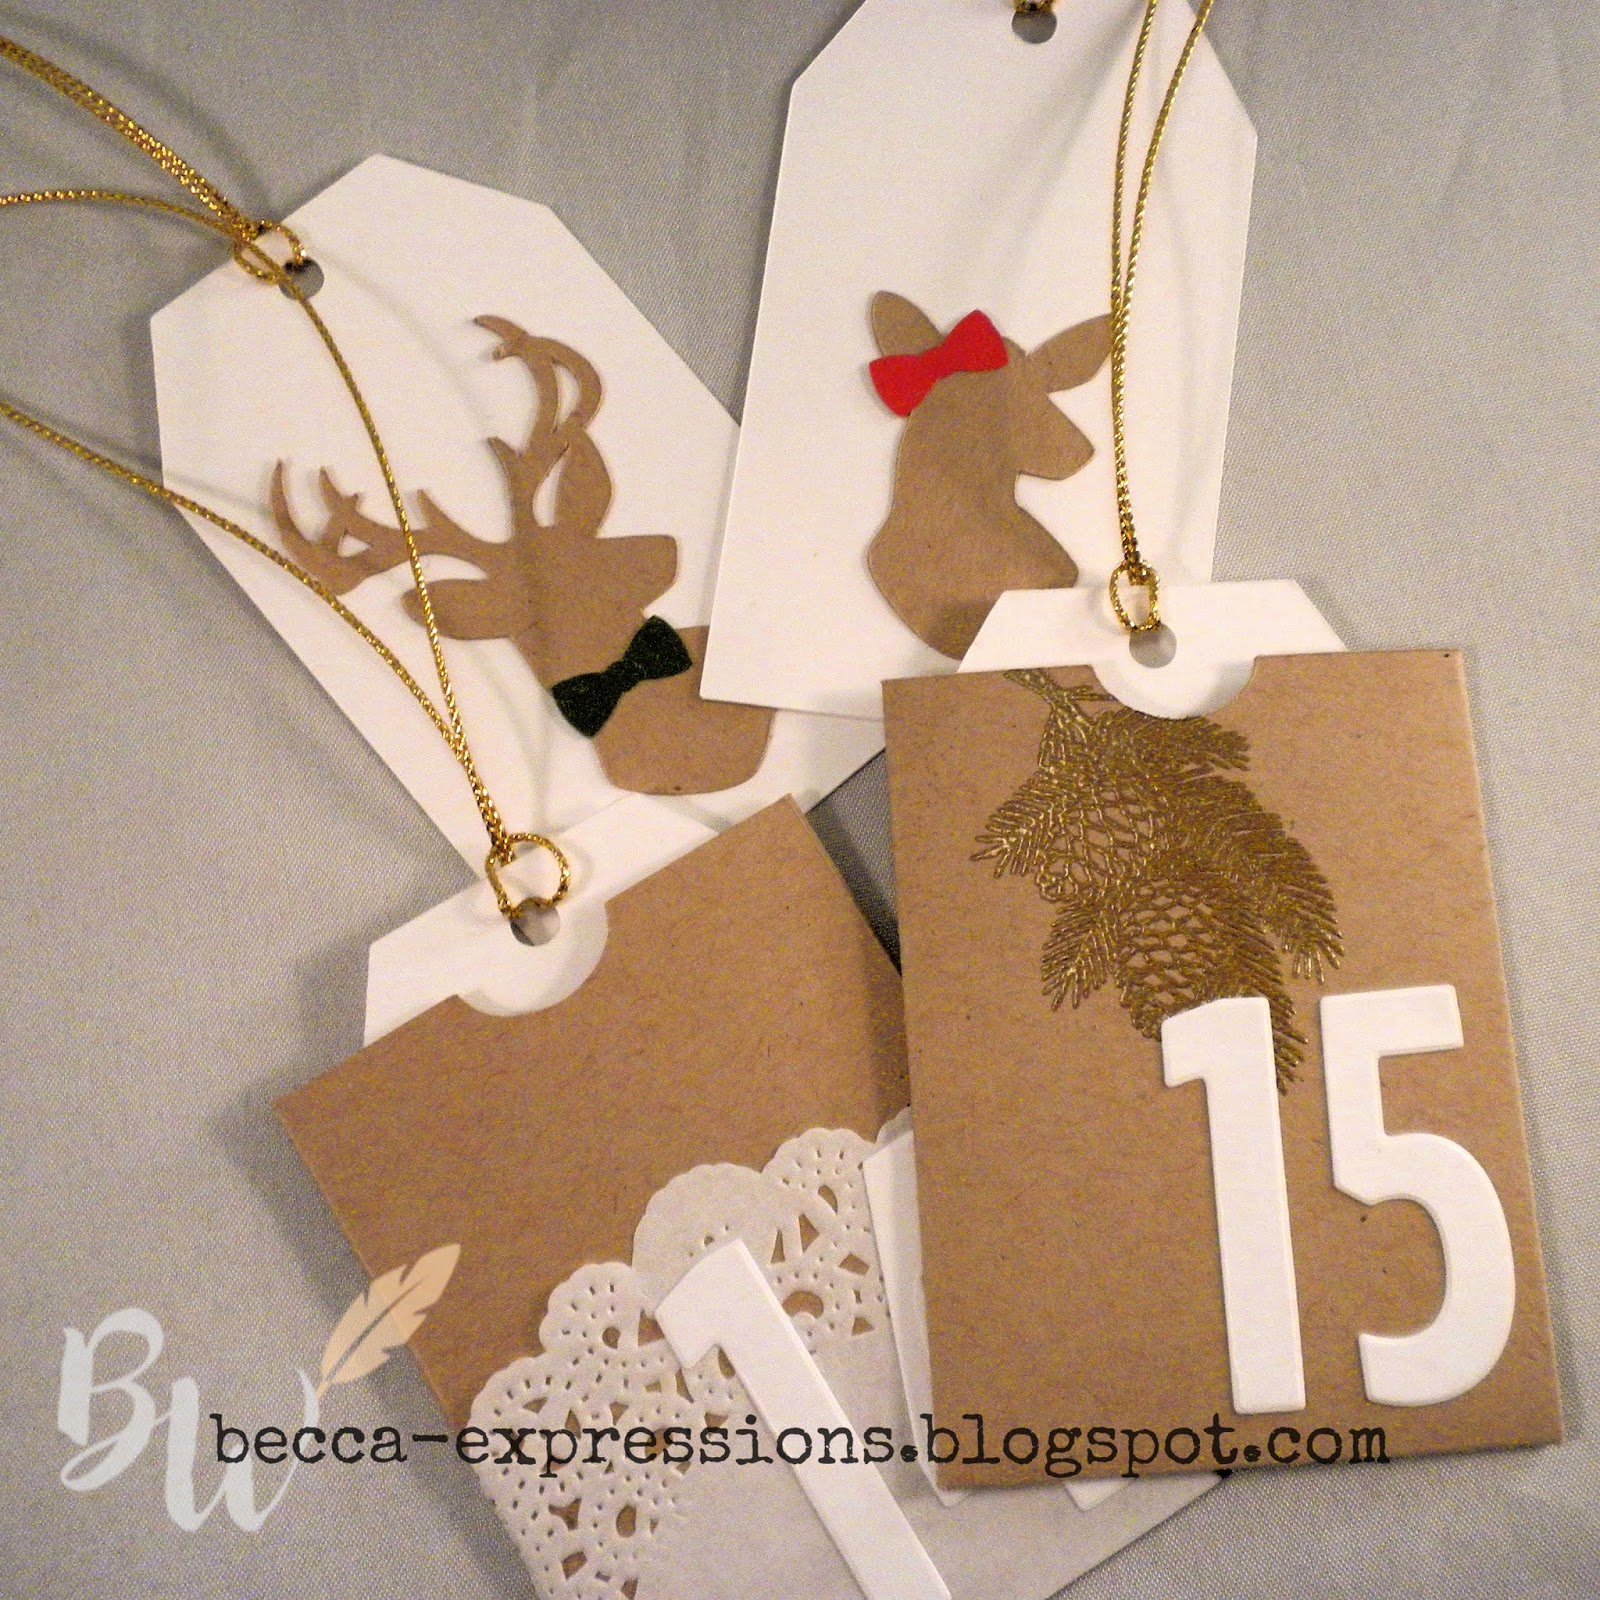
I'm so excited. Here's the advent calendar I made.


Inside the pockets, five of the tags are decorated with two bucks and three does. Guests will all put their names in a bowl. As their names are drawn, they will chose which day they think she'll deliver by taking down the pocket and pulling out the tag. Most of them will be blank. We'll keep guessing dates and pulling out tags until the three girl tags are revealed. With any luck, the two decoy boy tags will be revealed before the third girl one is, adding to the suspense.

My son-in-law built the frame. I made the Kraft pockets, tags, and the bucks and does using Cricut Design Space. Here's the file if you'd like to replicate this project, and here's the Pinterest picture I used for inspiration. I didn't want my calendar to be quite so intricate, so on the pockets without the doiley, I gold embossed the small pine cones and fir tree branches from Reindeer Crossing.

The currently available product I used includes various CTMH Cricut cartridges, Kraft paper, White Daisy paper, Candy Apple paper, Evergreen paper, Versamark ink, Gold Detail Embossing powder, and the SOTM, Retired product includes the Block Numbers Thin Cuts (still available in Online Only) and the doileys (I used pre-made ones, but a thin cut is available in Online Only). Non-CTMH product is the gold cord and mini clothes pins used to attach the pockets to the frame. CTMH used to sell smaller sized frames with chicken wire centers which is where I got the idea.

You're next stop on the hop is Cat's blog. Again, be sure to keep hopping until you've seen all the great projects.

Before you go, CTMH is having a sale on Monday, December 2 beginning at 3pm MST. Items are up to 50% off in limited quantities. It only lasts for 24 hours, so shop early. And, as always, if you spend $50, the Stamp of the Month is only $5.

Until next time,
Becca
(aka Grandma!)

Wednesday, September 4, 2019

New Cricut Cartridge Available

The brand new Cricut cartridge from Close To My Heart is now available. Here are few of the images.

And here's some artwork done with them...


To shop all the cartridges available through CTMH, or if you need supplies or want to sign up for a subscription, please click here or use the link on my sidebar.

Until next time,
Becca

Thursday, May 23, 2019

60th Birthday Card

To prepare for our move in a few weeks, I'm getting a jump on all the cards I'm going to need in June and July. One of them is for my brother-in-law who is turning 60, which meant he needed a number-specific card. I don't normally show them ahead of time, but I'm fairly certain he won't be visiting my blog and it features the May Stamp of the Month (SOM) which retires in about a week.


I wish I could take credit for the card design, but I flat-out stole it from this card. I created my own version using the Flower Market Cricut Cartridge (banner - which normally reads "Happy Place" but I altered to suit my needs). I also used some free shapes and a font from Design Space. Here's the file if you want to recreate it. The extra circle in the file is for two reasons: 1) to cut vellum if you want to recreate this exact card, and 2) so you can copy and paste it to create your own numbers.

Here's the supply list with links included for your shopping convenience:


I love that our cardstock is two-toned. It allowed me to cut the two nested stars at the same time. And, as I told you in this post, I'm crazy about the Timeless Textures stamp set so I add random splatters in a controlled way. Yes, I might have a bit of an OCD thing going on over here.

The moving company shows up tomorrow to do a walk-through to determine how much it will take to get us out of here. I always love the reactions I get to my craft cabinet. They are never neutral. Either the guy is impressed by the amount of work it took to create a customized cabinet or (most of the time) appalled that they have to take it down piece by piece then reassemble it on the other end. I do try to have it clean so it's a little less intimidating. Right now it looks like I've been on a crafting binge...which I have. Better clean-up!

Until next time,
Becca

Saturday, May 4, 2019

Hey Baby with CTMH Zoe Paper

One of the promotions CTMH is running this month is "Bring Back My Pack" featuring the popular Zoe papers and stamps. I have a baby shower coming up and we don't know the gender yet, so the soft pastels in this pack were perfect.


I used both the Artiste and Artistry Cricut cartridges. Artiste is retired, but if you have it and Artistry, here's the Design Space file. I altered "baby" by slicing off part of the "y" then welding a small circle at the end to make it match the font style. I cut three "baby" images, two from plain cardstock so I didn't waste the patterned paper, and glued them together for depth. I altered the duck by getting rid of the wing shape cut and highlighting the bill and eye with a white gel pen. 
To make sure I didn't have a gap in the stamped sentiment which comes from the Sweet Girl-Cardmaking set, I had to do a little planning. I placed all the cut elements on the card base without gluing them down, used my stamp positioner to place the "HEY" where I wanted it, removed the cut images and stamped once in Heather ink. I then glued the duck in place and stamped again. I glued "baby" so the swirl on the left went off the edge, trimmed it off, then glued it to the inside of the card.

I finished off with Mink Twine and sequins from the Crafty Sequins Pack. The colors don't match Zoe perfectly, but close enough. The dark green sequins was the worst offender, which is why I deliberately chose the smallest one and placed it farthest away from any of the other green in the card.

Here's the supply list with links for your shopping convenience:
I absolutely LOVE the Zoe papers and coordinating stamp set. How fun that CTMH decided to bring them back as part of their 35th Anniversary Year-Long celebration. Be sure to check out all the other great promotions offered this month.

Until next time,
Becca


Friday, May 3, 2019

Mother's Day Card with CTMH May Stamp of the Month

I wasn't able to join the May Stamp of the Month (SOM) Blog Hop because of my travel, but I wanted to post something with this lovely, versatile set. Mother's Day is coming soon, and even though the SOM has a best friend theme, I was easily able to alter it for this card.


The paper is from the new Mix-Ins paper suite which is a gorgeous mixture of Ballerina, Charcoal, Black, and White. I cut the envelope from the Flower Market Cricut cartridge, folding it so the pink side was out and the gray side was in. I also cut two M's with the Block Alphabet Thin Cuts. My final cut was the stitched rectangular panel which adds a lovely border without taking away from the clean and simple feel of the card.

Here's a look at the SOM. I love how both the balloons and the small bouquet of flowers has a space for the girl's hand to hold them. For the sentiment, I cut "friend" off  from the center sentiment using Micro-tip scissors. I also used them to trim out the flower images which I stamped in Charcoal ink and colored with markers.

Because the card utilizes flowers, I'm adding it to this week's Heart2Heart Challenge: Florals.

After gluing the flowers into the envelope, I stamped the sentiment in Charcoal ink. I then adhered the envelope to the background panel using a ruler to make sure it was straight. I added the M's to both sides, again using the ruler. The final touch was a Mink Twine bow adhered with Liquid Glass. Once everything was adhered to the stitched panel, I added it to the card with 3-D Foam Tape.


Here's the supply list (with shopping links for your convenience):


The new CTMH catalog went live two days ago (see link in sidebar). In addition to all the fabulous new products and the May SOM (which is only $5 with a $50 purchase), there are three other great promotions running. The first is Bring Back My Pack with the fun Zoe pack from four years ago. The second is Made With Love, a mini-album package that is perfect for Mother's Day. And the third is The World is Yours. I'm part of a Blog Hop promoting this special which goes live Sunday night, so be sure to come back for that.

Until next time,
Becca

Friday, December 7, 2018

Final Ugly Sweater Card

All 72 Christmas cards went in the mail yesterday. Whew! I wanted to show you the final card I made to finish.


This combines two stamp sets from CTMH (see below for shopping links), retired and current paper from CTMH, two die cuts from MFT, and a Cricut cut.

So here's the deal...the Ugly Sweater stamp set comes with "Fa la la!" but I'm a singer and the full thing is "Fa la la la la la la." I know. I'm a little obsessive compulsive. However, I got an unexpected royalty check for the large print edition of The Promise Bride which needed to be spent and MFT had just released this adorable die.

To get the texture on the sweater, I used a background stamp included in the Flower Market Cricut Cartridge (CTMH exclusive). I'm not sure where the actual sweater cut comes from only that I fussed with altering the image because that obsessive compulsive part of me didn't like that the image came with the red part on top of the ribbing bands. I changed it so the sweater was the full image and the ribbing parts were separate cuts. I used retired Cranberry paper and current Linen paper (light side) and stamped with retired Cranberry ink and Black ink to decorate it.

Here are the shopping links for the current supplies available through CTMH:


That royalty check was large enough to purchase some other supplies, so here's my second card for the day...


I've coveted the Peony flower from Altenew for quite a while and then they went and released a plaid cover die. Oh yeah...put that in my cart right away! The sentiment is a mix of MFT (praying) and retired CTMH (for you).

In writing news, I took a long break after sending off the final book of the Montana Brides series but now it's time to get back to work on proposals for new stories. The rest of my royalty check went toward a couple of research books so I'm off to read.

Until next time,
Becca

Sunday, September 16, 2018

More with Decorative Border Thin Cuts and Just Treats

As promised yesterday, here's another card using the Decorative Border Thin Cuts and the September Stamp of the Month (SOM) Just Treats.


I went with a traditional red and white color scheme for this card using the new Candy Apple color and 'Tis the Season Paper Pack. Remember yesterday when I talked about the fun things to do with the striped border included in the Just Treats SOM set? Well, those striped hearts were made by stamping that border twice (because once wasn't quite wide enough for the smallest heart thin cut). The other fun thing I did was to cut the scallop border from White Daisy cardstock, flip the border over and line it up so I ended up with a border of stitched circles...and wonder of wonders, the inside of the peppermint candy fit inside perfectly. It's almost like I planned it, which I didn't (but maybe the genius designers at CTMH did).

The tag was cut using an image from Artiste, which is retired but still wonderful. I dressed it up by adding some of the 'Tis the Season paper along the bottom and trimming off the excess with scissors. I also made my own ring to go around the opening of the tag. I simply used the "Hide Contour" button in Design Space to get rid of the outside edge of the tag (leaving me with only the center hole) then used the "Shapes" button to add a circle, size it to a bit larger than the center hole, used the "Slice" feature to cut the smaller circle out of the larger one, and then cut using the patterned paper. The only non-CTMH thing on this card is the wider red ribbon which is tied with White Twine at the top of the tag. I also used White Twine along the bottom of the tag between the white space and the red bottom border.

For the sake of design principles, I used the same patterned paper for two places on the tag plus on the larger heart, positioning it so it created a triangle. The stripe on the smaller hearts is similar in design to the swirled images along the bottom border, and they also create a triangle. My third triangle is the placement of the three hearts. The very bottom border of Candy Apple grounds the entire card and highlights the scalloped edge, drawing your eye so you see the fancy stitching. I used a gray marker to highlight "Friends" because it's the trend to add that swoosh and because gray is a neutral that adds interest without fighting with the rest of the color scheme.

Here's the supply list (with links for your shopping convenience):
I love tags on cards. Pretty soon I'll start showing you ideas with the new Fancy Tags, but many of you have already purchased Artiste or other CTMH Cricut Cartridges, all of which have some kind of tag. Let's make sure you're getting your money's worth out of them before we encourage you to spend more...although the stitched and pierced edges of the Fancy Tags is what pushed me over the edge to purchase them. Both the Fancy Tags and Decorative Borders are spendy, but remember you can always get them half-price if you host a party that goes over $250. With all the fun new things just released, I doubt you'll have trouble getting to that level if you know two or three people who enjoy crafting. Who knows, you might even be able to host your own party!

Until next time,
Becca

Monday, September 10, 2018

Love Notes - 3

As I said yesterday, this card is the entire reason I purchased the Love Note stamp set. The ENTIRE reason. I'll be making a bunch of these cards because, honestly, who doesn't love a chocolaty frappuccino?


I created the cup using the You Are Here Cricut cartridge and basic shapes included in Design Space. Here's the cutting file (which includes some extra images I didn't use but didn't want to delete).

Here's the supply list (with links for your shopping convenience):
We should have arrived home from our European river cruise in the wee hours of this morning. I'm sure today will be filled with lots of caffeine in order to function...which is why I saved this card for today.

I have lots more ideas to share with you, but I hope you've enjoyed the last ten days of daily cards. I've already got more ideas for the Bunches of Love set featured the first week, but you'll have to wait until next month because I've used it with the October Stamp of the Month.

Speaking of which, I'll be back in a few days to feature this month's SOM. It's only $5 with a qualifying purchase...which shouldn't be hard given the number of fabulous new products that went live ten days ago!

Until next time,
Becca

Sunday, August 26, 2018

Altered Basic Fundamentals

Last night, as I was working through the process of getting ready for the new CTMH products releasing September 1, I was putting away the Basic Fundamentals paper and suddenly had an idea...coloring the flowers on the pattern with the Nutmeg background. I'm really happy with the result.


I used Copic markers, but the ShinHans sold by CTMH would work just as well. I did both a yellow and pink version just because I was enjoying playing with the technique. On the yellow version, I used three colors, yellow, orange, and red. On the pink, I only used two shades of pink. I used the same green marker for the leaves and stems on both.

The sentiment was created using the Artbooking Cricut Cartridge. I typed in the word, ungrouped the letters, moved them until they were touching (except for the "B"), then welded the letters together.

I didn't want to cover up my pretty coloring, so I glued my sentiment to Vellum Paper cut to 4.25 x 3. I then glued the vellum to the background paper only behind the sentiment. Glue shows through, so you need to hide it. The chisel tip of the Dual Action Glue Pen works great for this.

Here are both cards individually:


The nice thing about doing the coloring on this paper is that you don't need to be precise. The dark background hides all the smudges.

Now the sad news is that, if you don't already have this paper, you're out of luck. Supplies have run out. The new catalog goes live in five days, so some products are sold out and others are running low on quantity. However, the good news is that there are some really great deals in the Clearance section, so be sure you check that out while you're shopping. And don't forget about the promotional items which are also retiring August 31: Here's to You  and the stamp of the month, which is only $5 with a qualifying purchase.

I have been playing in my craft room with some of the new goodies and have lots of cards to share with you. Can't wait for you to see the new yumminess!

Until next time,
Becca

Wednesday, April 25, 2018

Speed Limit Birthday Card

My husband recently turned 55. I'd had my idea for his card for a long time, and it turned out exactly like I planned...


To create the Speed Limit part, I used my Cricut. I used the new centering feature with text. I forget which font I used, but I'm pretty sure it's one that comes with Cricut Design Space. For the numbers, I used Block Number Thin Cuts, which will retire in five days so get them quick. After cutting the top panel, I cut the corners using scallop edge scissors. It was a little painstaking to line up the scallop so only a small bit got rounded, but it really made the card look exactly like a speed limit sign. I did the same on the black cardstock. I glued the white top layer to the black, then glued both onto my card base.

On the inside I wrote, "Congratulations! You're finally up to speed." My husband roared with laughter. Score!!

Until next time,
Becca

Tuesday, March 20, 2018

Rose Bouquet with CTMH Hello USA Cricut Cartridge

Can we talk a minute about the wonders of White Daisy Ink? It's probably the most versatile and under-utilized ink pad in my stash. And can we also talk about the wonders of Cricut Design Space which allowed me to ungroup, resize, and mess until I created this beautiful floral bouquet from the flowers included in CTMH's Hello USA Cricut Cartridge?


Yep...the ungroup feature! These flowers are from New York, Oklahoma, USA, New Mexico, and Alaska. I cut them in Cranberry, Smoothie, Sweet Leaf, Mink, and White Daisy then sponged the White Daisy and Mink flowers with Blush ink and the leaves with Willow ink. Before gluing the roses together, I stamped layers from the Beautiful You stamp set in White Daisy ink on both the flowers and leaves.

The white lilac-ish flowers (New Mexico) cut with a long stem before you get to the frond leaves. I simply cut the stem holding the flower, re-glued it to the frond leaves, and then tucked the whole flower under the edge of the roses to hide the cut. The only extra thing I did was to use a round hole punch to create the centers of the Mink flowers. I don't know if I deleted the layer that would have given me a back or if they come open, but it saves paper and doesn't take much time to punch the holes and glue them on the back side.

The scallop edge background is Basic Fundamentals Charcoal paper cut with a die from My Favorite Things.

If you have the USA Cricut Cartridge from CTMH, here's the Design Space file you can use to recreate this. If you don't have it, click on the colored link above to order.

Here's the supply list with embedded links for your shopping convenience:
This is going out to my mother for her birthday, but I can easily see it as a mother's day card. The Beautiful You stamp set includes "Mother" as a sentiment. I was planning to use a folding banner thin cut (which is also on sale), but in the end, I couldn't bring myself to cover up any of the flowers.

Until next time,
Becca

Saturday, March 17, 2018

Spring Card with CTMH Flower Market

I've been having fun with my Cricut and the Flower Market cartridge. My upline, Shannon Baker, runs a color challenge weekly, and this time it was Almond, Tangerine, and Poppy. I loved the boot card I  made for winning the Spur Award (link HERE) and the tulip one I made where I highlighted with white gel pen (link HERE), so I combined them for this card:


For the rubber boots, I used a combination of the Basic Fundamental Paper and Basics Cardstock Combo. Both of these were on sale a couple months ago, so I stocked up. I love that subtle pattern on the boots. I filled in a few of the cuts just because I liked the solid look better. I could have used the Hide Contour feature while I was in Design Space to fill them in, but I actually like the bit of outline you get with the cut.

After cutting the flowers in cardstock, I sponged the edges with their coordinating Tangerine and Poppy ink colors with Sponge Daubers. I also sponged Poppy ink along the edges of the Almond cardstock used as a matte. Both the Almond matte and the White Daisy matte were cut using rectangular stitched dies from My Favorite Things. The banner, which was stamped using a coordinating stamp set in the Flower Market Cricut Bundle, is also a stitched die from My Favorite Things.

Once the flowers were sponged and glued together using alternate sides of the two-tone Tangerine and Poppy cardstock (which doesn't show up well in this photo but adds subtle interest), I highlighted them with a combination of white gel pen and some black dots from a micro-tip pen. The flower image in Flower Market comes with a center, but I decided I wanted the pen dots instead.

What a fun card to brighten someone's day.

Before I go, don't forget the Die-namite special CTMH is running. It took me a while to get on the die cutting band wagon, but - OH! - I'm loving it now. For some more examples of projects I've made using these die cuts, please link to the following:
Block Letters
Thankful for You

Until next time,
Becca


Monday, March 12, 2018

Anniversary Card with Flower Market Cricut Cartridge

I saw a picture recently with a charcoal gray background and colorful flowers over the top. The flowers were highlighted with white strokes. I wanted to see if I could recreate the look and am mostly happy with the result.


To begin, I cut five tulips using CTMH Flower Market cartridge. I used Willow, Bashful, Blossom, and Raspberry paper. (All of these colors except Bashful come in the Flower Market bundle but can be ordered individually here.)  Once the images were cut, I started adding streaks of white with a gel pen. It's times like these that I wish I was more artistic. They seem very rough and haphazard, but overall they are the effect I was going for.

Once the flowers and leaves were highlighted, I glued them together using the chisel-tipped Glue Pen, alternating which side of the cardstock I used to get some more shading and to change up the look of the tulips. Note in the close up picture that the far left tulip has the broader petals of the top two layers on the left where they broader petals on the tulip one place over has the broader top two petals on the right.  You'll also see the subtle color difference between these two top layers. I'm LOVING the dual tones of our cardstock now that I've started to really play with it. (See this post for another example.) I didn't use all five of the flowers, and some of them were only two or three layers instead of all four. I only used three of the stems, the center one in the lighter tone of Willow dual tone cardstock.

Once the petals were glued together, I glued the entire bouquet to a piece of Charcoal cardstock cut to 2.75 x 5.5. I then added more dots and strokes of white with the gel pen.

To embellish, I added Basic Ribbon in the grey on white. I was fortunate in that the word in the end of my roll was "amazing." I wrapped it around the base of the flowers, securing the ends behind the Charcoal panel with tape. I then glued the entire panel to a card base. I was going to search for stamps to create a full sentiment and then decided it would be quicker to just hand write it. Again, I wish I could do fancy, swooshy-swirly writing like a calligrapher, but my scrawl matched the rustic feel of the flowers. That's what I'm telling myself, so please don't correct my delusion.

Off to my writing cave. Wish me luck because I've come down with a sore throat and cough. I'm drinking copious amounts of tea and orange juice thanks to my beloved husband who went grocery shopping not once, but twice this weekend. Chivalry at its finest!

Until next time,
Becca

Sunday, March 11, 2018

2018 Spur Award - Best Western Romance Novel


Friday evening, I got an email from the publisher of The Promise Bride congratulating Gina and me on winning the 2018 Spur Award from the Western Writers of America for "Best Western Romance Novel."

Uh...I didn't even know we entered.

I'll spare you the details (although if you want to read about them, you can visit my author blog post here) and say only that these past few months I've contemplated giving up writing pretty much every day. I can't express how much I needed some good news.

To celebrate, I made two identical cards - one for my writing partner and one for our editor - using a free Cricut cut, some CTMH paper and stamp (both current and retired), and an MFT die cut.


I searched "My Images" in Cricut Design Space for a boot, and this one came up as free. Sweet!! It didn't have the spur, so I created that by altering a square, circle, and star from the shapes button. The spur itself is a star that I copied, pasted, and then rotated one 45 degrees before welding both together. I cut everything with CTMH cardstock in Peacock, Linen (both current), Saddle, and Barn Red (both retired).

The scallop and stitched frame is from My Favorite Things. I tried it in plain white, but I liked the card much better with the added oomph of the Peacock cardstock frame.

The sentiment is from a retired CTMH Cricut bundle called Artiste. Technically, the sentiment should be "Brava" since the recipients of the cards are both women, but I didn't have that stamp. I had this one. Close enough. I stamped it in Peacock ink.

Part of what makes this win so remarkable is that The Promise Bride is an Inspirational story, meaning it comes from a Christian worldview and doesn't include any descriptions that would make my mother blush. That's atypical for a "Romance Novel." The coolest thing, though, is that I can now call myself an award-winning author. You might see some of my social media accounts begin to reflect that. **Big cheesy grin**

Until next time,
Becca

Wednesday, March 7, 2018

Die-namite Special

CTMH's Die-namite Special is bringing a number of great products out of retirement for a limited time. One of my favorites is "Thankful for You." Each word is a separate die which makes it incredibly versatile. You can use all three, just two, or only one. Here are some of the cards I've created using this set. I've provided the link to the original blog post for a full explanation of how it was created (including shopping links, although some of the products might be discontinued now):


This one never made it into a blog post, but it's a folded paper lunch bag turned into a placecard holder for Thanksgiving. The front pocket behind the leaves holds a note card where each person around the table can write what they are thankful for to be read as part of the Thanksgiving celebration. The leaves have also been brought out of retirement for the Die-namite special. They are part of the Falling for You-Cardmaking set.


 also from Beautiful You and Country Collections
(which includes a Cricut cutting file for the floral overlay)


Do you see why I love this die set so much??? And it's on sale for only $7.46!

Again, these dies and stamp sets with coordinating dies are available only this month and only while supplies last. As you shop, look for ways you can mix and match the sentiments from the various dies. For example, I (Heart) Christmas could easily combine with Thankful for You to say, "I (Heart) You." With Be Merry you can say, "Be You". With Happy, you can say, "Happy for You." And don't forget about the infinite possibilities afforded by adding the Block Letters and Numbers Bundle to your stash. Mixing fonts is very on trend, so your cards and scrapbook pages will look amazing.

Until next time,
Becca

Sunday, March 4, 2018

Two More Easter Cards

I was recently inspired by Jennifer McGuire's tutorial on creating cards from cover dies. As I was watching it, I thought about ways to recreate the lacey look of a cut card front and back using my Cricut. I opened up my Artbooking cartridge and went to work.


Both of these cards use a cut out front panel, but the cutting file I created has an option for a front with a solid panel. They are a solid cut, so you won't need to do anything but score them down the center and fold. I will say that they are pretty "soft" after cutting so many holes in the paper.

For the top card, I used Easter Basket. This mini stamp is so beautiful colored up. I used Copic markers, but you could easily use any markers you have or even colored pencils. The stamp is so detailed, you don't have to do much coloring to make it lovely. The second card uses Chelsea Gardens-Cardmaking (the coordinating die cuts are now sold out.). I used Copic markers on these, too, then cut out the images, mounting some to the back solid panel and some to the front for added dimension. The Happy Easter sentiment comes from one of the coordinating stamp sets in the Artbooking collection.

There isn't a lot of room to write on these, a problem only because I chose to have an open panel on the front of the card. Again, the cutting file has the option of both an open center as shown or a closed one. The Artbooking cartridge is no longer featured in the catalogs, but it is still available while supplies last.

Time to get ready for church!

Until next time,
Becca

Friday, January 26, 2018

Baby Girl Card with Pizazz


I recently hired an assistant to help me build my author social media presence. She's taking a little break because a much more important job came up...delivering baby number three. I made this card for her using vellum paper for this month's Blog Hops with Heart Paper Pizazz theme.


I took a great deal of time on this card because I just couldn't stop embellishing.

I began by creating an envelope, the flowers, and lace in Cricut Design Space using CTMH's Flower Market Cartridge. Here's the cutting file. I used Bashful paper for the bottom layer, Gimme Some Sugar for the patterned paper, and White cardstock for the lace. (Image is from a jar with a lace band which I ungrouped from the jar. I copied and pasted two more lace images then welded all three together.)

The flowers were cut with Bashful, White, and Blossom cardstock and more Gimme Some Sugar paper for the leaves. The letters were cut from White cardstock using Block Alphabet Thin Cuts.

The envelope was cut with Vellum paper, which is what qualifies it for the Paper Pizazz theme.

All stamped images come from the Sent and Delivered hostess only set in the current CTMH Seasonal Expressions Catalog. (No shopping link is available, but you can view the stamp set on p. 5 of the catalog.) "Special Delivery" was stamped in Bashful ink with a hint of Raspberry ink sponged in the center and around the edges. The circled heart, postage stamp and wavy lines (which I think is technically called a stamp cancel) were all stamped in Peacock. The border along the lace was stamped in Juniper. I also sponged Juniper around the edges of the leaves and a bit of Raspberry in the center of the largest Cricut cut flower. I colored the stamp using Copic markers and fussy cut it with Micro-tip Scissors.

I used the Piercing Tool to create holes for my sewing borders. The pink border on the patterned papers was actually done with thread. I poked the holes first then weaved thread through them. The white one on the Bashful paper was done by drawing lines with a white gel pen first and adding the pierced holes later. I added more of the pink thread through every other hole along the top of the lace border, weaving one layer all the way across, turning the border, then weaving another layer through the remaining holes. I didn't really need to do that, but like I said, I couldn't stop embellishing.

The final embellishments were White Twine and a small safety pin which CTMH sold years and years and years ago. It's technically Baby Pink, but it's close enough to Bashful for me.

If I were doing this card without the baby's name, I would enlarge both the envelope and the accent flowers in my Design Space file.

Now you're off to Aime's blog. You should have come from Jayma's blog. It's only the three of us this time around, but be sure to link through so you see their projects. If you are interested in the Sent and Delivered stamp set and don't already have a CTMH consultant, please leave me a comment along with contact information so I can help you earn this fun set. If you'd prefer to keep your information private, visit my author website and use the "Contact Me" page. Any information sent there goes straight to me.

Back to my day job. My writing partner and I got an extension on our latest deadline, and we're going to need every minute of it to finish editing book to of our Montana Brides Romance series.

Until next time,
Becca

Friday, January 12, 2018

You Are Here Cricut Collection from CTMH

A quick video that shows you just a few of the possibilities with the new You Are Here Cricut collection.


Here's the ordering link: You Are Here

It comes with three stamp sets and the Enchantment Cardstock pack so you can get started crafting immediately. If you are one who prefers the booklet and cartridge as opposed to the digital only version (shown here), you'll want to order right away as that option is being discontinued by Cricut soon.

Until next time,
Becca

Wednesday, November 29, 2017

Joyeux Noel

Movers come in less than a week. I have a hundred things to do between now and then--not the least of which is helping my friend with edits on her latest novel--yet I was obsessed with making this new Christmas decoration...probably because I'm moving in a week and my after Thanksgiving tradition of decking the house is a waste of effort. I used up a bunch of retired CTMH paper and supplies though, so I'm counting that as getting ready to move.


I used my Cricut to cut each letter and the "Joyeux" five times, once with the colored paper and four times from off-white cardstock. I used Arial for NOEL and Adlery for Joyeux. Much patience was required to glue the layers together but it needed the stability. After each letter of NOEL was assembled, I sponged the edges in coordinating ink colors.  I laid everything out on my kitchen table and fussed with embellishments until I was happy before gluing anything down.  I used Liquid Glass to connect my letters and adhere almost all the embellishments and on top of the holly berries for added shine.

I used the Artbooking CTMH Cricut cartridge for the reindeer and mail stamp; the tags on the L as well as the holly leaves and berries come from Art Philosophy.

Now I really do need to clean up the craft room and get ready for the movers.

Until next time,
Becca

Friday, August 25, 2017

End of Summer Blog Hop


I got on a scrapbooking kick a couple weeks ago and started putting together layouts with pictures that are almost twenty years old. One of them was about Camas Meadows Bible Camp in Leavenworth, WA which is a place near to our family. It IS summer to us.


I used the soon to retire Jack paper and CTMH Artbooking Cricut Cartridge (everything but "CAMP") and Artistry (for "CAMP" only) with coordinating Black, Ruby, Juniper, and White Daisy Cardstock. If you have Cricut Design Space and the Artbooking Cartridge, here's the cutting file. (NOTE: If you don't also have the Artistry cartridge, just delete "CAMP" before you cut...or buy the cartridge using the link below. **Big, cheezy grin**) Color My Heart's challenge this week is Jack, so I'm joining the fun there.

On the three polaroid framed pictures along the bottom right, I saved the arrows from each frame and refit them inside one of the others. And, yes, that is underwear hanging from the rafters in the middle picture.

This is probably the busiest layout I've ever done as far as background paper, but I tried a bunch of other papers besides that buffalo print and they just didn't work. Here are a few detail shots:


I used a white gel pen to accent a few of the cuts. As you can see, I wasn't worried about being super neat with my sketchy drawing. This is a camping layout, after all!

Remember, Jack retires in a week, so be sure to check out the shopping links below. Now you're off to your next stop along the hop: Katy. You should have come from Jayma's blog, but if you get lost somewhere along the way, you can always go to Amie's blog for a full list.  I got a sneak peek at some of the projects, and you don't want to miss a single one.

Until next time,
Becca

Shopping Links: