Showing posts with label CTMH. Show all posts

Wednesday, January 22, 2020

Quick and Easy Bee Card

Popping in quickly to show you a card I made for my upline's color challenge this week: Charcoal.


I cut the hexagons from retired Hawthorne paper, but you could use any patterned paper cut into hexagons using a Cricut or punch. I glued them to some white cardstock then cut it out with Rectangular Stitched Thin Cuts. I used those all the time!!

I stamped the bee in Charcoal ink, colored his body and wings lightly with colored pencils--one in saffron for the body and one in julep for the edges of the wings--then added Clear Shimmer Pen to the wings. After cutting the bee using the medium size Stitched Bracket Thin Cuts, I added the sentiment from Say It In Style, also in Charcoal ink. To touch up the wings, I outlined parts of them with the Pewter Journaling Pen. I placed the bee where I wanted him (without glueing) then used Liquid Glass to adhere a few Julep Sequins, added Burlap Ribbon attached with Mini Staples, then foam mounted the background panel to my card base. I used more foam tape to adhere the bee over the ribbon and DONE!

Busy day so gotta run.

Until next time,
Becca

Monday, January 20, 2020

Coloring Class with Altenew Beautiful Day

Because today was a holiday, I decided to mark the occasion by taking an Online Card Class about coloring. I burned through the whole class and then sat down to make this for my niece who recently got engaged.

I used a combination of products, some long retired, from a variety of stamp companies. My main image is from Altenew called Beautiful Day. I love this stamp set!! And it was really fun to color using the techniques I learned today combining alcohol markers and colored pencils.


The background is from Stampin' Up! which I white embossed over Linen cardstock from Close To My Heart (CTMH). I sponged the edges in CTMH ink Toffee and Mink. The sentiment is also CTMH embossed on Cocoa cardstock. I cut it with a word bubble die from MFT but then snipped off the part that made it a word bubble. I followed the instructions from the first day of class taking three colors which weren't necessarily from the same color family and combining them. I used Copics in the brown, red, and red violet families with shading in the blue violet family. I then added depth and shade with colored pencils. I decided to make one flower a deeper shade than the other and placed it on the bottom.

I was quite happy with the way the flowers looked after coloring with the markers, so I almost stopped. But the point of the class was to take things up a notch much coloring in the nooks and crannies. Um...yeah! It really did make a difference by the time I was done. Not gonna lie, it was a lot of work, but I hope you agree that the result was worth the effort.

One of the things the teacher talked about was to consider "the trash factor" before spending hours coloring. Because my niece is very artistic, I think she will appreciate the effort that went into this.

Until next time,
Becca

Sunday, December 1, 2019

December SOTM Blog Hop


Welcome to the December Stamp of the Month Blog Hop. You should have come from Krista's blog, but don't worry if you started here. The hop is a circle so just keep going. If you get lost, you can always go to Melinda's blog for a complete list of participants.

For my project, I used a little old, a little new, and a little non-CTMH in addition to the Reindeer Crossing stamp set. I made a very special kind of advent calendar for my daughter's gender reveal party. In fact, as this hop goes live, I'm probably still there. The man who made their cake and I were the only two people who know that it's...

A girl!


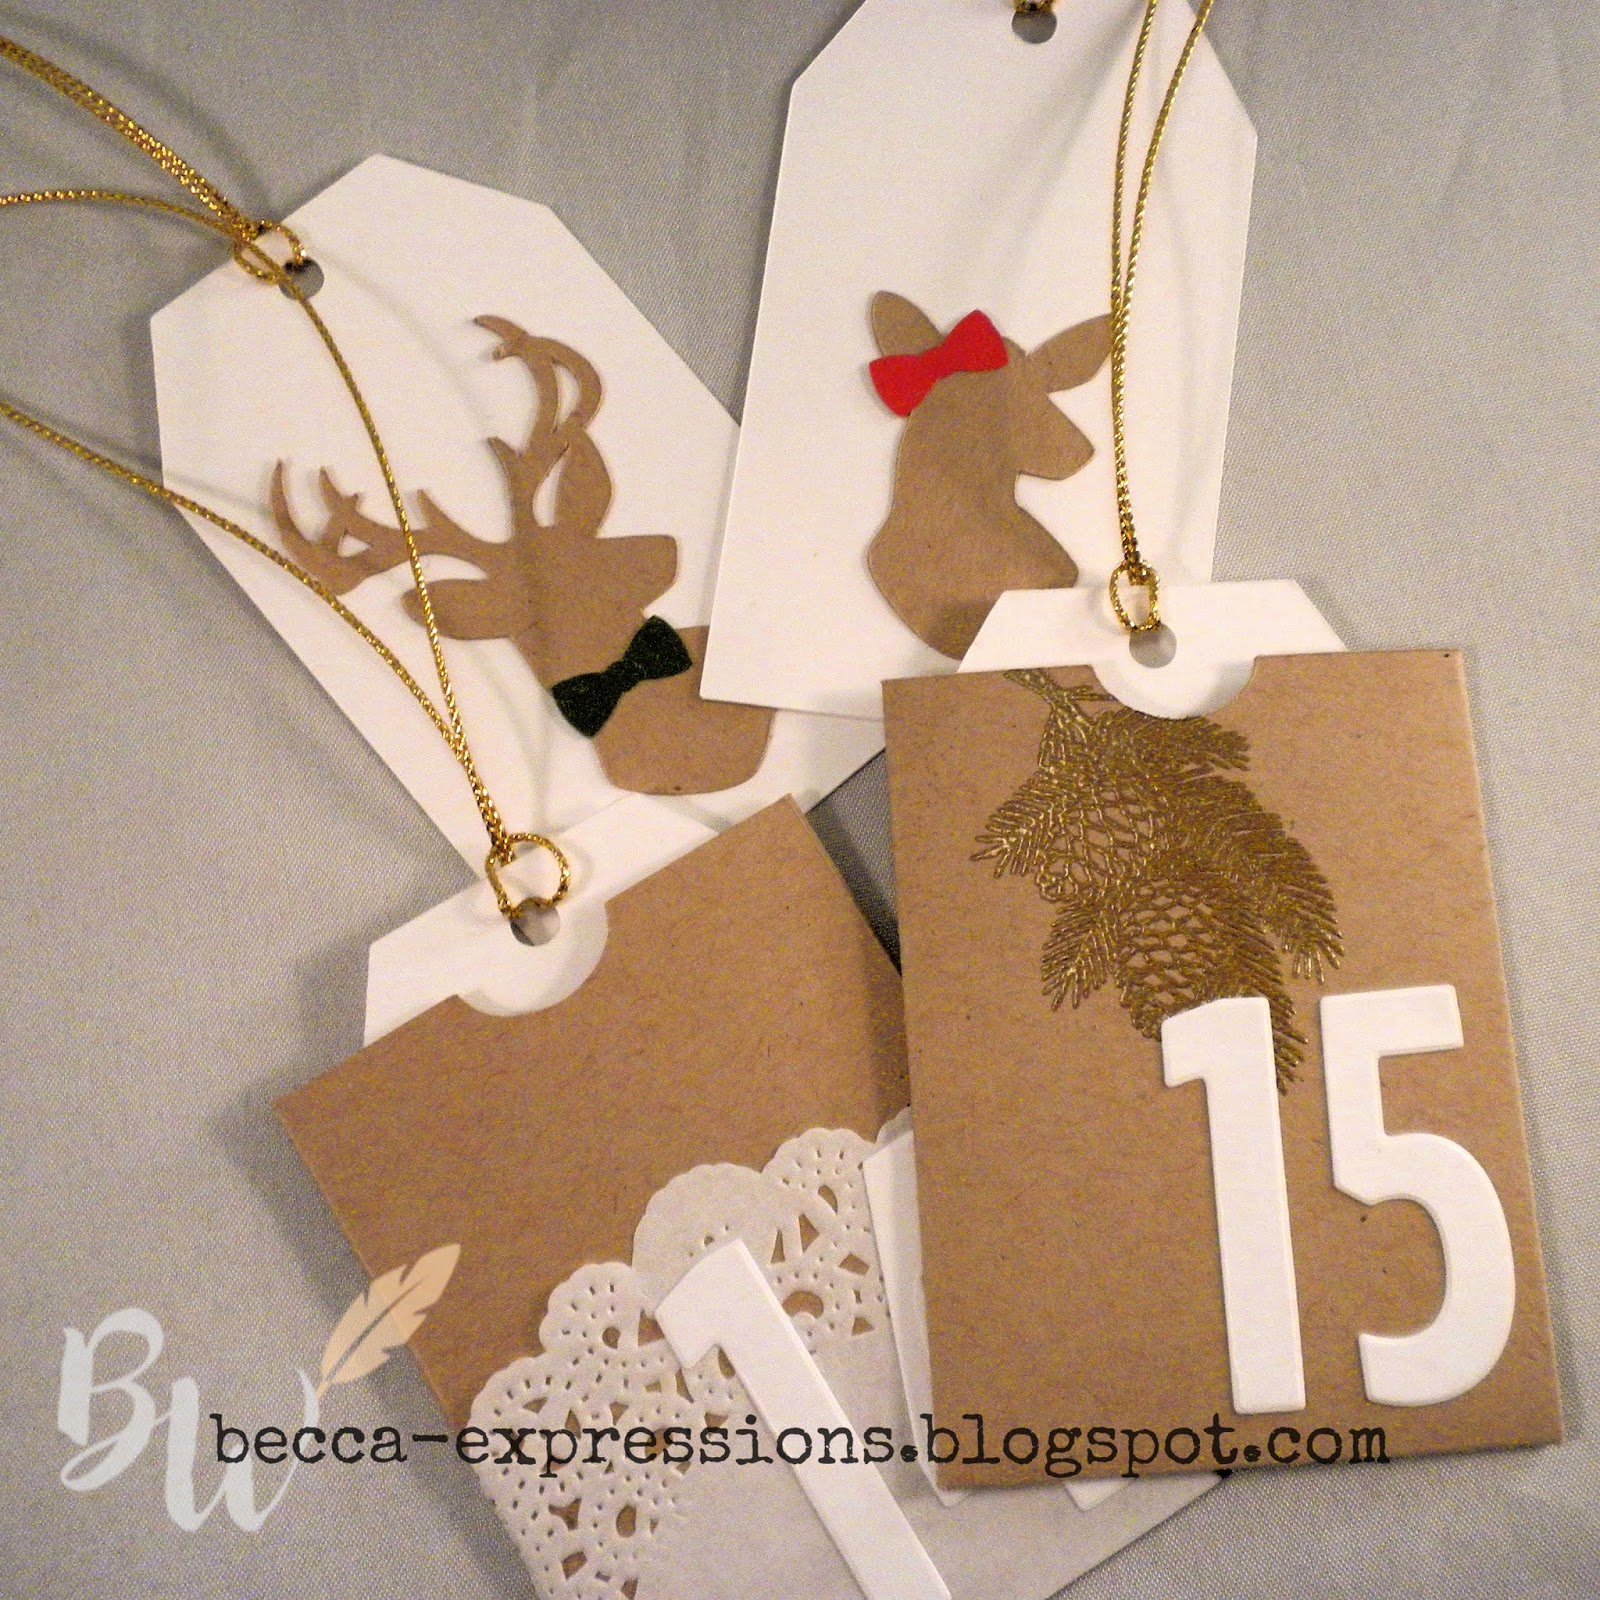
I'm so excited. Here's the advent calendar I made.


Inside the pockets, five of the tags are decorated with two bucks and three does. Guests will all put their names in a bowl. As their names are drawn, they will chose which day they think she'll deliver by taking down the pocket and pulling out the tag. Most of them will be blank. We'll keep guessing dates and pulling out tags until the three girl tags are revealed. With any luck, the two decoy boy tags will be revealed before the third girl one is, adding to the suspense.

My son-in-law built the frame. I made the Kraft pockets, tags, and the bucks and does using Cricut Design Space. Here's the file if you'd like to replicate this project, and here's the Pinterest picture I used for inspiration. I didn't want my calendar to be quite so intricate, so on the pockets without the doiley, I gold embossed the small pine cones and fir tree branches from Reindeer Crossing.

The currently available product I used includes various CTMH Cricut cartridges, Kraft paper, White Daisy paper, Candy Apple paper, Evergreen paper, Versamark ink, Gold Detail Embossing powder, and the SOTM, Retired product includes the Block Numbers Thin Cuts (still available in Online Only) and the doileys (I used pre-made ones, but a thin cut is available in Online Only). Non-CTMH product is the gold cord and mini clothes pins used to attach the pockets to the frame. CTMH used to sell smaller sized frames with chicken wire centers which is where I got the idea.

You're next stop on the hop is Cat's blog. Again, be sure to keep hopping until you've seen all the great projects.

Before you go, CTMH is having a sale on Monday, December 2 beginning at 3pm MST. Items are up to 50% off in limited quantities. It only lasts for 24 hours, so shop early. And, as always, if you spend $50, the Stamp of the Month is only $5.

Until next time,
Becca
(aka Grandma!)

Tuesday, October 15, 2019

Fall Into Christmas with the Hawthorne Cardmaking Workshop

It's an exciting day for those of us who love Close To My Heart (CTMH). Today, the Seasonal Expressions catalog released two week early because consultants were clamoring for holiday stamps and papers...and the head office listened! So I'm going to show you how to take a cardmaking workshop which was released in the September-October catalog and make Christmas cards with it. Here's the sample images shown in the catalog:


Here's the exact same cards made for Christmas:


I added the following supplies to make them:

  • Say It in Style stamp set (which is an absolute "must have" set!)
  • Cedar & Pines paper
  • Candy Apple Cardstock
  • Black Cardstock
  • Evergreen ink
  • Toffee ink
  • Christmas Red Stickles

My variations include using a third pine cone to cover up the acorn, "watercoloring" the back left image by smushing the Evergreen ink pad together to pick up ink in the lid then painting. I left off the Mink Twine (which comes in the workshop kit) and used the Christmas Red Stickles instead.

And then - because I just love the whole smushing of ink pads together to watercolor technique - I created this:


I started by getting my watercolor paper wet then stamping the Hawthorn image in Fern ink. The edges of the image feathered out immediately. Using the smushing method, I added more Fern, Saffron, Eggplant, and Raspberry here and there, letting the colors blend into each other. I had to add more water as I went along. Once the background was dry, I stamped over top of it again but I only inked the edges of the Hawthorn image and used a sponge dauber to be sure it was soft. I die cut a panel using the Stitched Rectangle Thin Cuts.

Using a separate piece of watercolor paper, I stamped the pumpkins from the Autumn Blessings stamp set in Black Pigment ink then embossed with Clear powder. Then...I smushed and painted some more. I used all the colors except Fern in the pumpkins, adding Paprika because I wanted some orange. It didn't work well, so I mopped it up with a dry paper towel.  I did used a combination of Paprika and Fern in the stems and colored outside the lines because it was going to be impossible to trim them right to the edges. After the pumpkins were dry, I added Nectarine ink because I wanted them to stand out a bit more against the background. To make them stand out even more, I added Clear Shimmer Pen to them, too.

I cut them out, trimming very close to the edges, with Micro-tip Scissors. After stamping the sentiment in Black ink over the background panel, I glued and foam mounted the pumpkins over the top.

But what about the black splatters, you may wonder. Well...let me tell you about that. If I had known then what I know now, I would have added them before the pumpkins were glued down. In truth, I added them after the fact which was awkward, to say the least. I used the smallest stamp in the Strokes of and Artist set. I inked only parts of  the stamp - even though it's really small - so it didn't look like I stamped the same image over and over again. Because I stamped after the pumpkins were down, I had gaps where the stamp couldn't get to. I still had the small paintbrush I'd used to watercolor on my desk, so I used the wooden end like a stamp, pressing it into the ink and then stamping here and there to fill in as needed.

For the final touch, I cut a piece of 4 x 5.25 Eggplant cardstock and glued it to the watercolor paper. I then foam mounted the top panel to the card base.

I want to give credit to the card maker who inspired this idea. Here's a link to the blog post with the card I used as my example.

Granted, this card used a large number of products, but that's one of the great things about having a large number of products. Sometimes it's fun to put them all to work...although my workspace is a crafty mess right now. Still, it's been fun!

Until next time,
Becca

Tuesday, October 1, 2019

October Stamp of the Month - Autumn Air


I love Fall most of all. Maybe it's because my birthday is this month, maybe it's pumpkin spice everything, and maybe it's the beautifully colored leaves. Whatever it is, I truly do love Fall most of all. So this set is perfect.


If you didn't start this Blog Hop here, you should have come from Darlys' blog. If you get lost, head over to Melinda's blog for a full list of participants. There are almost thirty participants this month (it seems I'm not the only one who loves Fall), so be sure you get all the way around to see the wonderful inspiration.


My upline does a weekly color challenge. Last week it was Ballerina. That's not a color we usually associate with Fall, but I love how this turned out. The other colors here are Ruby and Canary. I wanted my Ruby to have a light touch, so I applied it to my stamp using a sponge dauber, concentrating a little more color around the edges. I inked the thin leaf in Canary and sponged Ruby around the edges. The Ballerina leaves are straight stamping. The small font of the sentiment is stamped in Ruby, the large was embossed with Gold powder. It's tough to see them, but I added dots of Liquid Glass around the sentiment to look like dew drops. I thought about adding sequins, but I really liked how the Liquid Glass looks.

Now you're off to Kathy's blog. Again, be sure to hop all the way around.

Until next time,
Becca

Friday, September 27, 2019

Autumn Blessings

Sometimes I want to sit and color images, and sometimes I want a quick fill in. For these two cards, I filled in the pumpkins from Autumn Blessings with plaids. The first one, the plaid comes from the Hawthorn - Scrapbooking stamps set (all images from CTMH), and the second one I used the Build-a-Plaid set.


My colors are Glacier, Nectarine, Toffee, and Saffron. For this second card, the sentiment comes from the Perk Up set and the tiny leaves come from the Share the Seasons special promotion of the month. I colored the leaves with markers to tie in the orange color in the second pumpkin.

These were perfect cards to make on this perfect autumn day in the Pacific Northwest.

Until next time,
Becca

Saturday, September 21, 2019

Build-a-Plaid Goes Wonky

One of my must-have stamp sets in CTMH's new Core Catalog is Build-A-Plaid. It comes with a number of straight line images you can use to create patterns or borders. Sets like this have so much versatility to them, and I was eager to put it to work...in my own "can't always be normal" way.


I used three different stamp sets for this. Two are in the Core Catalog and one is in the Sept/Oct Catalog. After it was stamped, I ran it through the largest Stitched Rectangle Thin Cut. This step isn't necessary if you don't smudge ink on part of your card. Go ahead...laugh.

I embossed the sentiment in white over black cardstock and used a small bit of foam tape to adhere it to my card.

Here are the products used (linked to my website for your shopping convenience):


Here's hoping you have a wonderful - and maybe a little bit wonky - weekend.

Until next time,
Becca


Thursday, September 5, 2019

New Product Blog Hop


I'm so excited about today's blog hop. I literally gasped when I saw the front cover of the seasonal catalog shown above. So pretty. And there's a second "Core" catalog with products which will be available all year. Because Fall is my favorite time of year, I always look forward to the pretty papers and products in this catalog, and I wasn't disappointed. Yumminess abounds!!

You should have come from Haley's blog, but the hop is a circle so keep going. If you get lost, head to Melinda's blog for a full list of participants.

For my card, I used a mix of products from the Core Catalog (items available all year) and the Seasonal Catalog (items available Sept-Oct 2019).


I started by layering the Mix-In background paper at angles on a 4.25 x 4.25 square of white cardstock. I glued the watercolorish stripe pattern along the left side then stamped the X's (Every Little Thing - Scrapbooking stamp set) over top in black ink before adding the other layers of paper. The plaid stripe with the Hello! stamped on it is a zip strip. Once I had the paper glued, I ran it through my die cutting machine using the largest Stitched Square Thin Cut. Next I stamped and colored my bird (also from Every Little Thing - Scrapbooking) with markers. I then ran it through my die cutting machine using the largest Stitched Circle Thin Cut. I also die cut one of the Layered Leaves Thin Cuts from black cardstock and snipped apart the leaves. I glued the stitched square to a 4.25 x 4.25 card base then played with the arrangement of the leaves until I was happy. I added a lot of foam mounting tape to the back of my bird and carefully laid it over top of the leaves. I wanted the leaves to float, so it was important to have foam tape all the way to the edges of the bird layer to keep the leaves from falling off.

Here's a list of the products which are available all year:
Here are the products available only through the end of October:
And now here's the exact same card using almost the exact same products, only this time it's a Christmas card.

The only difference in products used between the two cards is that, on this one, I used Diamond Stickles instead of the Layered Leaves Thin Cuts.

My absolute favorite new product out of both catalogs is the Say It In Style stamp set. It goes with everything! My next favorite is the Mix-In paper. I adore the wide variety of colors and patterns in it. So many possibilities. I hope you'll take time to view the new catalogs online and see all the wonderful ideas and products now available.

Your next stop is Gina's blog. Remember to keep going because there's a ton of goodness being shared. If you missed the hop featuring the Stamp of the Month, click here to begin. And be sure to come back for the hop featuring the Share the Season special which will be coming to you soon.

Until next time,
Becca

Wednesday, September 4, 2019

New Cricut Cartridge Available

The brand new Cricut cartridge from Close To My Heart is now available. Here are few of the images.

And here's some artwork done with them...


To shop all the cartridges available through CTMH, or if you need supplies or want to sign up for a subscription, please click here or use the link on my sidebar.

Until next time,
Becca

Saturday, August 24, 2019

Stitched Flowers - Going, Going...

We're down to the last week of the current CTMH catalog. I'm very sad that the Stitched Flowers are being retired, but lovely new products are on the way which are filling my crafty heart with joy. However, if you've been hemming and hawing over getting these flowers, now is the time to do it. I used two different flowers for the focal point of this card...


I used Emerald ink to stamp the top part of the background using the Charming Borders stamp set.  The bottom part of the background is from the Craft On paper suite. All of these items are retiring. Not retiring are the White Daisy and Raspberry cardstocks, Raspberry ink, sponge daubers (inking the edge of the flower), and the Stitched Rectangular frames.

One of the great things about being at home is that I can now hand-deliver dimensional cards like this. I have a baby shower coming up for a little girl. I think this will work perfectly.

Until next time,
Becca

Saturday, August 10, 2019

Craft On Project

We moved into a new house a couple months ago. My craft area, while nice, needed some decoration. Craft On paper to the rescue!!


Now please don't think I came up with this idea on my own. I saw several similar ideas, but what I did was the cheap version. Where others used images of scissors, glue, and paint tubes made from the Crafting Shapes Thin Cuts, I used the cut apart sheet from the Craft On paper suite. Additional supplied I used include Stitched Square Thin Cuts, Stitched Circle Thin Cuts, and Stitched Heart Thin Cuts. After gluing down the cut out images onto the squares, I glued them to a 8.5+ a smidge square black piece of cardstock. I had an 8.5x11 piece which was just a fraction...like 1/16 of an inch...over 8.5, but that tiny bit of overage allowed me to just barely fit all of the squares over top with a thin border around and between them. I would probably have cut my black square to 8.75 square if I'd used a 12x12 piece of cardstock for the base. The border around the edge and between would have been larger but that would have looked just fine.

I glued the 8.5 square to a 12x12 piece of white cardstock and then added Craft On sequins. To make sure my sequins stay in place, I added a dollop of Liquid glass to the paper, placed my sequins over top and pressing enough for some of the Liquid Glass to bubble up through the center hole, then I added another dollop of Liquid Glass over the top. This under/over technique really makes those sequins secure.

I so love how this turned out. The fresh, vibrant colors - as well as the sentiments - bring joy to my heart.

The great part about this project is that, while the stitched die cuts are nice, you can create all of it with the Craft On paper, a paper cutter, a pair of scissors (plus maybe the bottom of a small jar if you want the center circle shape) and some glue. The "frame" here is just a border added via photoshop but represents how I plan to have it framed.

Eat. Sleep. Craft. Repeat. Gotta love it!!

Until next time,
Becca

Tuesday, August 6, 2019

Card #2 with From Me to You - August SOM

Someone we know just got really good news. To celebrate, I made this fun little card using the August Stamp of the Month (SOM): From Me to You. (See the sidebar for a complete image of all the great stamps in this fun set.)


I love the little smiley faces inside the shaker. I cut them from Lemon cardstock using the smallest stitched circle thin cut from this set. I then cut the circle frame from the Craft On paper suite. Using the coordinating foam mounting tape and plastic circle, I created my shaker with Craft On Loose Sequins and the smiley faces which are too large to turn over inside the plastic. I stamped the sentiment in Black ink, cut it with Micro-tip Scissors to create a banner, then outlined it and the 4.5x4.5 cardbase with a black micron pen.

Craft On paper, sequins, and this fun stamp set are all gone at the end of the month, so be sure to get them quick.

Until next time,
Becca

Thursday, August 1, 2019

August SOM Blog Hop - From Me to You


Welcome to the August Stamp of the Month Blog Hop featuring "From Me to You." You should have come from Michelle's blog. The hop is a circle, so you can start anywhere and keep going. If you get lost along the way, pop over to Melinda's blog for a full list of participants. You can view the full image of this SOM set on my side-bar or by clicking here.

I'll admit it...every time CTMH releases a new catalog, the first place I look is at the Stamp of the Month (SOM) specials because it's usually where I find my favorite stamp sets. Before I became a consultant, I planned which month I would order in based on which SOM I liked the best. And this one was the first set on my list because I love, love, LOVE sets with multiple sentiments. Privately, I call these stamp sets "justifiers." Let me show you why...

Below are two stamp sets with coordinating thin cuts which I absolutely love but would give me limited usefulness when it came to making cards.


Yes, I love the "bloom" sentiments in the watering can set, and the "enjoy each day" from the camper set could be used for cards. But how many of those would I actually send? Not that many. However, if I purchase the stamp sets and then add a $5 Stamp of the Month with lots of great sentiments, suddenly I can make a boatload of cards without adding very much to my overall stamp budget.


To get the shaded effect on my watering can, I swiped Mink ink across my stamp the pressed it down using my MISTI stamp positioner. I then sponged Heather ink around the edges with a Sponge Dauber - a tool I used constantly - and pressed down again. The leaves were stamped in Mint ink then sponged with Sage, and the flowers were stamped in Peach ink. I also stamped the small line of solid hearts in the From Me to You stamp set across the top of the watering can in Ballerina, although you could just as easily use Peach ink.

After cutting out my background paper from the Sweet Girl paper suite with Stitched Rectangle Thin Cuts, I glued it to my card base and then stamped the splotchy thing (yes, that's a technical term)  from the Timeless Textures stamp set in Ballerina ink before gluing  down my die cut watering can.

The sentiment and small swoosh are both from the SOM. I stamped them in Heather and Peach inks respectively. I then cut it out using the Circle Thin Cuts (which are retiring as of August 31, so get them before they sell out).


Okay...how cute is this for a retirement card? I used the exact same supplies except this one features the Oval Thin Cuts (also retiring August 31). I fussy cut the plaid bottom and peach curtains out of leftover paper in Sweet Girl. It doesn't really take that long and it sure ups the cuteness factor. You'll really want Micro-tip Scissors for this.

Now, just for the fun of it, here's the watering can again with various sentiments from this set.


See. Justifiers! But now I need to stop playing with them and actually get back to work. I'm heading to a writer's conference in a couple weeks, and it would be good to have some proposals for books ready to pitch to editors.

Your next stop is Jessica's blog. Again, the hop is a circle so be sure to keep going until you see all the inspiration these amazing consultants have for you.

Until next time,
Becca


Tuesday, July 30, 2019

Final Share the Joy Card with a Sneak Peek at the August SOM

July is coming to a close and August is upon us. Today I want to share two cards - both with the same saying, the same floral theme, and using the same color scheme - but which look entirely different. Here's card #1 using the Share the Joy special that expires at the end of the day tomorrow:


I white embossed the large floral background from a Hostess Only Rewards stamp set called "She's a Wildflower." I then used a sponge to add Pomegranate Ink over top, mindful to allow for varying levels of concentration. I die cut it using the Stitched Rectangle Thin Cuts, then stamped the sentiment on the banner (both a part of the Share the Joy special) and mounted them over a card base. Easy peasy!

Here's card #2 using the August SOM "From Me to You."


I die cut the flower out of a panel which had already been cut with the Stitched Rectangle Thin Cuts. I then used the leftover ink on my sponge from card #1 to color it. The sentiment is from the August SOM which I stamped in Pewter ink over both the white panel and the flower which insets directly back into it, then stamped again in Pomegranate to get the two-tone look. I accented the flower center with a Clear Shimmer Brush.

Also easy peasy!!

These cards are going to author friends, both of whom won awards in the past couple of weeks. The inside will say, "And you have the award to prove it!"

Until next time,
Becca

Saturday, July 20, 2019

Sunflower Card with Share the Joy Background Die Cut

Today's card uses both retired and current products but, as promised, features the Share the Joy special promotion running through the end of this month. I used the cover die with all the circles and took advantage of the two-tone cardstock sold by CTMH for the background.


I love sunflowers. Love them! Whenever we move, there are a few stamp sets which travel with me in case the movers lose all of our household belongings. This retired sunflower set is one of them. I stamped the flower in Goldrush ink, colored with markers, stamped it again to crisp up the lines then decided I needed some extra depth in the center so I used a Sponge Dauber to dab Espresso ink there, fading out as I got farther away from the center. The leaves were stamped in New England Ivy. I fussy cut all the images with Micro-tip Scissors. Before mounting the flowers onto the Goldrush Cardstock background, I added some splotches from the Timeless Textures stamp set. The sentiment comes from the Happy Trails stamp set (the feature image being a RV camper). I stamped it in Espresso ink and trimmed it almost to the very edge with my Micro-tip Scissors. I added it last using the thinnest 3D Foam Tape.

For the sake of artistic effect, I didn't fill the sunflower or leaves with color. I left quite a bit of white space. Not only does it look great, it's easier to color. Win, win!

Now I'm going to give you a little hint...  I got a sneak peek at some of the new products showing up in September. If you really wish you had a beautiful sunflower, you're in luck. And that's all I'm going to say about that.

Until next time,
Becca

Monday, July 15, 2019

Share the Joy Card #4

I've been having lots of fun with the Share the Joy special running this month. It features a die cut and two stamp sets. One is birthday themed; the other is summertime. Here's a birthday one that was lots of fun to color.


I began by stamping the center image then used Washi tape to place an oval die cut (the largest one from this set) around the sentiment as a placement guide. I then stamped image by image, rotating them to create a random pattern. I colored them with prismacolor pencils, but markers or water coloring would work just as well. After running it through the largest Stitched Rectangular Thin Cuts, I used 3D Foam Tape to adhere it to a card base. This was a little time-consuming, but I did it while watching TV, which was both relaxing and made me feel like I was accomplishing something while vegetating.

We're having company for dinner tonight, so I guess I'd better go do some grocery shopping.

Until next time,
Becca

Saturday, July 13, 2019

Share the Joy - Card #3

For today's card, I've combined the large die cut panel from the Share the Joy special with a number of other products to create this...


I love texture on texture, so I cut the cover die from the same cardstock as my card base and glued them together. Then I decorated a tag and the smallest flower from Stitched Flower Thin Cuts (also featured in this post) with stamps from Share the Joy. My ink colors are Sapphire, Willow, Lemon, and Nectarine. I sponged the edges of the flower and flower center in Lemon and Nectarine respectively just to give a little more interest. Next time I make this card, I'll cut the flower from the light side of Lemon paper before stamping and sponging. To ground the flower a bit more, I added So Much Happy Washi Tape. The finishing touch was Sapphire Crochet Thread.

There's a great deal of "finishing" work to do on the new house - pictures on the walls, curtains up, etc. - but I have a feeling it's going to be put off in favor of more play time for both my husband and me. I need to have company over to spur that final push. Anyone want to come?

Until next time,
Becca

Friday, July 12, 2019

More Cards with Share the Joy from CTMH

I did it. I spent the entire afternoon playing in my craft room using the Share the Joy promotion from Close To My Heart. And, as with yesterday's post, I didn't use it as designed...or at least as the artists at CTMH did (click here to see their work and a picture of the Share the Joy special).


The color choices here were determined by the leftovers sitting on my desk and Heart to Heart's current color challenge: Candy Apple. I simply cut the banner five times, twice in Candy Apple Cardstock but using the two-tone feature so the top one is slightly lighter than the lower one and twice with paper from Into the Wild. And aren't you impressed with how well I fit the individual letters on the banners?

Yeah...total luck. I had the banners already stapled to the background panel (cut with Stitched Square Thin Cuts) before I decided to stamp on them. I also had them stapled down before I decided to stamp the balloons in White Daisy ink on the top one so I had pattern-plain-pattern-plain-pattern going on with the layers. I added shading very, very carefully with a red marker so I didn't end up getting white pigment ink on it.

But hey, with as many cards as I make, I'll take a little good luck once in a while.

Okay, now I really do need to buckle down and get some "day job" work done. My publisher just put two of my novella's up on Kindle Unlimited, so I need to get that info out to the subscribers on my author newsletter.

Until next time (which will be tomorrow because I have at least three more cards to share with you using this same promotional set),
Becca

Thursday, July 11, 2019

Two Variations of CTMH's Share the Joy Promotion.

Well...the last part of my craft room is now unpacked: the light box for photographing my cards. And the best part??? I don't have to lie on the floor to take the shot. Whew!! I'm getting just a little old for that action.

Today's card uses one of this month's Close To My Heart promotions - Share the Joy. This promo comes with multiple options. I purchased the full set with the die cut (shown below), but you can purchase each part individually.


Here's a picture of some artwork made by the talented artists at CTMH. As you can see, the images are designed to fill the circle cut outs in the die cut.


But I - as per usual - wanted to use the die cut and stamp images differently to show you other options.


I started by die cutting the background, flowers, and leaves from paper in the Into the Wild paper suite with the flower centers cut from Sugarplum. I love how the cardstock now comes in two tones. The flowers were cut with the Stitched Flowers Thin Cuts. I held off purchasing these but have seen way, way, WAY too many adorable projects (both cards and scrapbook pages) to keep them out of my last shopping cart. I love how they coordinate perfectly with the sentiment from the Share the Joy stamp set.

Because I wanted to mount my background with foam tape, I cut a second one with plain White Daisy cardstock and glued it to the back of the gray patterned paper for added strength. Then I used a leftover circle from that second cut for this card...


I have an entire file of card ideas using small stamps. Just because they fit in the circles from the die cut in this set doesn't mean they have to be used that way. You can, as I did with the sentiment, or you can trim them out and cluster them together, as I did with the little envelopes and hearts. And trust me, you really want Micro-tip Scissors for this work. It makes getting into the tiniest places easy.

The background square of paper is also from the Into the Wild paper suite, but here I paired it with Candy Apple. I finished off the card with Sapphire Crochet Thread.

My house is almost put together. We still have to decide which paintings are going on the walls and which are going back into boxes to save for possible use in the next house. Yes...I know. We just got here and I'm already planning the next move. That's army wife life for ya. But today? Today I'm going to spend the entire afternoon in my newly re-assembled craft area playing like I haven't touched paper, stamps, and ink for a month...because I haven't.

Until next time,
Becca

Friday, May 31, 2019

Bye-Bye Besties

I'm so sad to see May end because this month's Stamp of the Month has been one of my top five of all time. I went very clean and simple this time, creating interest with textures. I'm squeezing it in just under the deadline of the Heart2Heart challenge: Besties.


The background splotches are from Timeless Textures. I featured this stamp set in this post. The envelope is lined with paper from the True Love Paper Pack. The featured color is Sugarplum which is really difficult to capture in a picture. It's taken me a while to warm up to this color, but I'm loving it now. Oh...and speaking of difficult to capture in a picture, I added shine to my flowers but squeezed my Clear Shimmer Brush too much. Quick fix was to flick splotches of it onto my background before adding my envelope.

Here's the supply list with links for your shopping convenience:


Here's another card featuring this same stamp set, but it has a very different feel to it.

The "Bestie" stamp set...and the Anniversary Flash Sale items...are going away as of midnight MST tonight.

Until next time,
Becca