Saturday, September 29, 2018

Old-school Text

My birthday is coming up in a little over a week. I'm getting to the age where technology is moving faster than my brain can keep up. It seems like there's some new App or gadget every day. That's why the Old-school Text stamp set in the new Holiday Expressions catalog was a must have. I combined it with this week's Color My Heart Tic-Tac-Toe challenge to create this card:


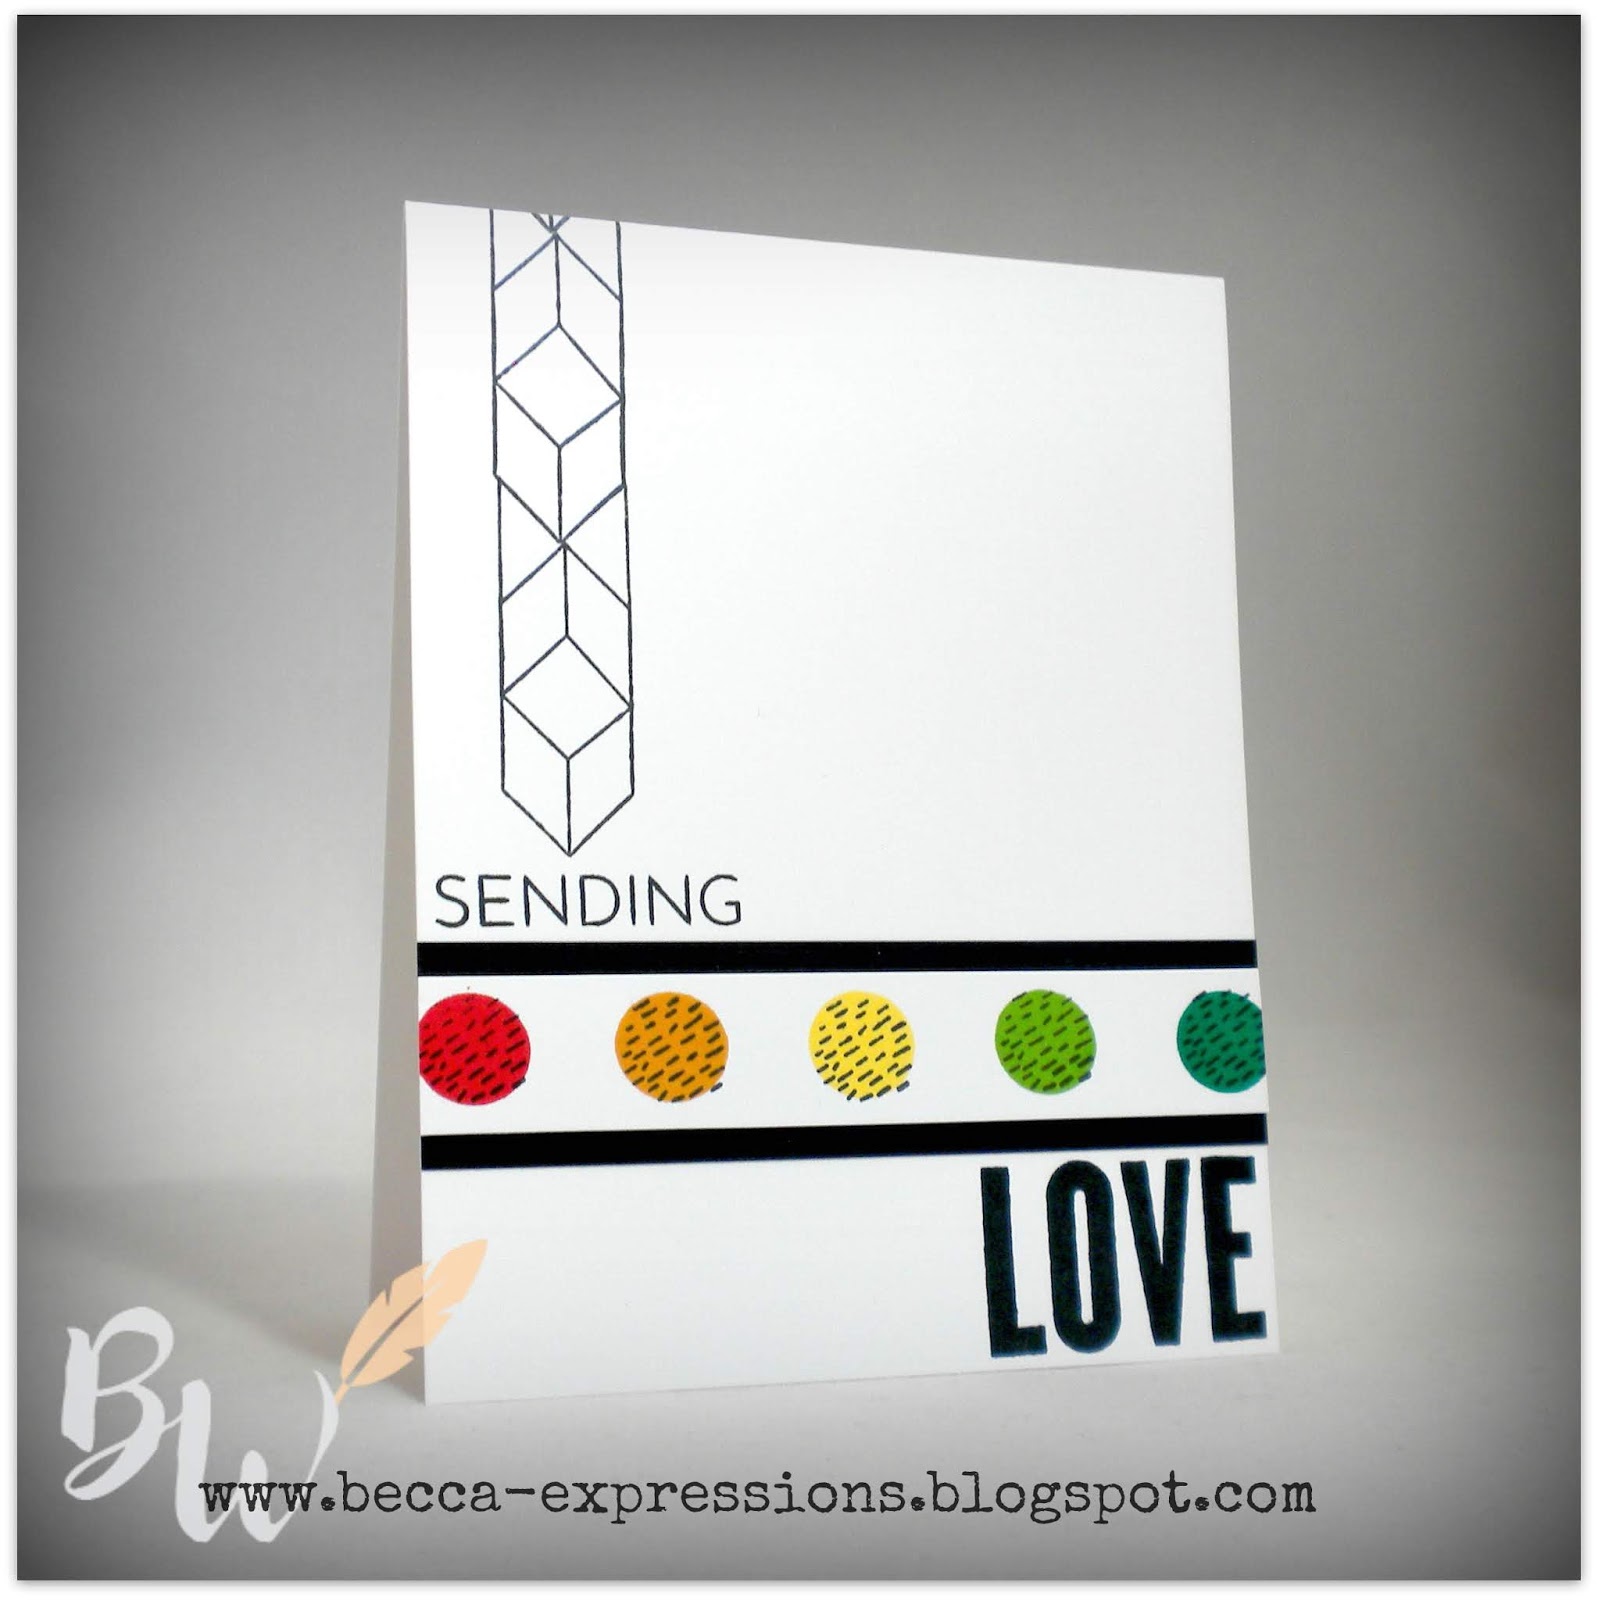
I chose the colors along the top row of the challenge: Sugarplum, Linen, and Saffron. I used Charcoal as my neutral. It might be a little difficult to see the Linen. It's shading "old-school" using the rectangular swoosh from the Colorful Texture stamp set. For the pencil border, I stamped the outline first then filled in with the color block stamps in Saffron and Sugarplum. I used my MISTI to stamp the sentiment in Charcoal because I knew it would need to be stamped twice in the exact same spot to get that deep, full coverage over the pencil border. 

To finish off, I carefully lined up the notebook paper border die from Decorative Border Thin Cuts so the cutting edge and top of the die lined up with the left side and top of my card. You could just as easily line it up with the right side of a card that folds on the left, but I do top folding cards because they photograph better.

Here's the supply list (with links for your shopping convenience):
There's another reason I made this card today. It took me a very long time yesterday to get my word count in on my latest novel. Whenever my writing brain gets sluggish, I take time to do something with my crafty brain. It tends to loosen up the writing brain by forcing it to still think creatively but in an entirely different way. If I'm particularly stuck, I take a whole day to craft. I'm heading upstairs as soon as this card is posted, but stay tuned. I might be back if I can't get the story to flow.

For those of you who follow my writing career, book two of the Montana Brides series, The Kitchen Marriage (see sidebar) released this week. According to a reader in South Carolina, it's already in her Walmart. I got my author copies on Monday. Most days this author thing is a lot of discipline to keep the rear in the chair and get the word count done. Then - every once in a while - you get to see the fruits of your labor on store shelves and in readers hands. Those are really good, really FUN days. Today is a rear in chair day...unless it's a craft until the brain starts working day. Let's see, shall we?

Until next time,
Becca

Wednesday, September 26, 2018

MFT Stitched Flowers with CTMH Paper and Sentiment

I'm in the thick of writing the final draft of the last book in The Montana Brides series. Book Two, The Kitchen Marriage, just released. It's available through online retailers now and should be in your local Walmart and other mass-market stores by Tuesday of next week. I've not had much crafty time, so I'm posting a card I made last month but never blogged.


This card combines my two favorite companies. The paper and die cut "thanks" is retired from CTMH, and the scallop border and stitched flower die cuts are from MFT. I colored the flowers and leaves with Copic markers.

Back to writing. I'm tellin' ya, deadlines are great for productivity but murder on my social life!

Until next time,
Becca

Saturday, September 22, 2018

Decorative Border and Falala Thin Cut Christmas Card

A week ago, I made this card and told you to watch for the same layout. Well...here it is, this time as a Christmas card.


My favorite thing about the new Candy Apple color is how perfectly it matches the Red Glitter paper.

Here's the supply list (with links for your shopping convenience):


I don't know about you, but as soon as September rolls around, I feel the pressure to get my cards made. I love how fast, easy, and pretty this card is. I just might get my cards done before December 25th this year! Now if I can just get book three of The Montana Brides series done by deadline, I might be able to breathe.

Until next time,
Becca


Monday, September 17, 2018

Decorative Border, Fancy Tags, and Just Treats

For my third card featuring the September Stamp of the Month (SOM), I combined the Decorative Border Thin Cuts, which I've used on the last two cards, with the Fancy Tags Thin Cuts. I'm really, really happy that I purchased both of these. I'll be using them alone and in combination, as I've done with this card.


This is the large tag that has a scallop bottom. I trimmed that off in order to turn the tag sideways and still fit on my card. I then cut another tag with Linen paper and cut it again with the stitched scallop border thin cut. Now, to be honest, you could probably finagle a similar result by using the scallop border of the tag itself, but it was so much easier to do it with the border cut and that stitched edge is just such a great addition.

To color, I used the "squeeze the ink pad together until you get ink in the lid, then pick up the ink with a damp paintbrush and color" method. I used it on the card from a few days ago. It's one of my favorite coloring methods. The sentiment is stamped in Heather and colored with Mink and Pomegranate. I added some Mink Twine then secured the ends with Liquid Glass. While that was out, I added a dots of it to the berries to give them dimension and shine.

My background paper comes from the Seasonal Mix-In pack. I LOVE this pack. It's perfect for adding to the current set of paper suites or great on its own.

Well...then I started to put my supplies away and moved some paper to the side of my desk. Underneath was the "Ugly Sweater" stamp set. Sweater. Warm. Winter. Hm...


Do you see that slightly fuzzy texture. That was a mistake. My stamp pad needed to be reinked but I overdid it. But hey...if you're going to make a fuzzy image, it might as well be on a sweater. That's my story and I'm sticking to it. The heart comes from the SOM set and is also stamped in Pomegranate.

I honestly can't decide which card I like best. What do you think?

Time to head up to the writing cave. I need to pound out 3K words today if I'm going to stay on schedule. There are parts of being an author that I love, but deadlines are not one of them.

Until next time,
Becca

Sunday, September 16, 2018

More with Decorative Border Thin Cuts and Just Treats

As promised yesterday, here's another card using the Decorative Border Thin Cuts and the September Stamp of the Month (SOM) Just Treats.


I went with a traditional red and white color scheme for this card using the new Candy Apple color and 'Tis the Season Paper Pack. Remember yesterday when I talked about the fun things to do with the striped border included in the Just Treats SOM set? Well, those striped hearts were made by stamping that border twice (because once wasn't quite wide enough for the smallest heart thin cut). The other fun thing I did was to cut the scallop border from White Daisy cardstock, flip the border over and line it up so I ended up with a border of stitched circles...and wonder of wonders, the inside of the peppermint candy fit inside perfectly. It's almost like I planned it, which I didn't (but maybe the genius designers at CTMH did).

The tag was cut using an image from Artiste, which is retired but still wonderful. I dressed it up by adding some of the 'Tis the Season paper along the bottom and trimming off the excess with scissors. I also made my own ring to go around the opening of the tag. I simply used the "Hide Contour" button in Design Space to get rid of the outside edge of the tag (leaving me with only the center hole) then used the "Shapes" button to add a circle, size it to a bit larger than the center hole, used the "Slice" feature to cut the smaller circle out of the larger one, and then cut using the patterned paper. The only non-CTMH thing on this card is the wider red ribbon which is tied with White Twine at the top of the tag. I also used White Twine along the bottom of the tag between the white space and the red bottom border.

For the sake of design principles, I used the same patterned paper for two places on the tag plus on the larger heart, positioning it so it created a triangle. The stripe on the smaller hearts is similar in design to the swirled images along the bottom border, and they also create a triangle. My third triangle is the placement of the three hearts. The very bottom border of Candy Apple grounds the entire card and highlights the scalloped edge, drawing your eye so you see the fancy stitching. I used a gray marker to highlight "Friends" because it's the trend to add that swoosh and because gray is a neutral that adds interest without fighting with the rest of the color scheme.

Here's the supply list (with links for your shopping convenience):
I love tags on cards. Pretty soon I'll start showing you ideas with the new Fancy Tags, but many of you have already purchased Artiste or other CTMH Cricut Cartridges, all of which have some kind of tag. Let's make sure you're getting your money's worth out of them before we encourage you to spend more...although the stitched and pierced edges of the Fancy Tags is what pushed me over the edge to purchase them. Both the Fancy Tags and Decorative Borders are spendy, but remember you can always get them half-price if you host a party that goes over $250. With all the fun new things just released, I doubt you'll have trouble getting to that level if you know two or three people who enjoy crafting. Who knows, you might even be able to host your own party!

Until next time,
Becca

Saturday, September 15, 2018

Decorative Border Thin Cuts - 2 with Just Treats Stamp of the Month

Hubby and I went to see "Unbroken" last night. Now I know the movie is meant to be inspirational, a story of triumph over extreme adversity, but I can't handle it. As an Army Wife and Mom, my biggest fear for my soldiers is capture and torture at the hands of the enemy. I told hubs that asking me to go used up almost all of his "husband points" from the cruise.

Almost.

I couldn't go to sleep right after we got home, so I stayed up to make this...


I love the versatility of these borders. In addition to using them in the traditional way, I can create my own tags (although I purchased the new Fancy Tag Thin Cuts and will be showing you ideas with them soon). I used three of the border dies, one for the notebook paper type of edge on the top of the tag, the double stitched line around all the edges of the background paper and just under the Mink Twine, and the slanted edge across the top of the bottom border of patterned paper on the tag. The patterned paper comes from the Boutique Paper Pack. It's so fresh and trendy. I combined it with some Candy Apple accents and red coloring to change up the color palate just a smidge.


All of the stamped images come from the September Stamp of the Month (SOM), Just Treats. This set is only $5 with a qualified purchase and will take you through the holidays, Winter, and beyond. That darling little cup can be combined with the top left sentiment at any time of the year for coffee, tea, and hot chocolate. With some Saffron ink coloring, you could even make the cup hold chicken soup. It would be fussy, but you could get a Warm Comfort for You sentiment out of what's in this set...or you could just use a get well sentiment. I'm betting you already have one.

Before we quit discussing the versatility of this SOM,  don't forget about the fantastic striped border. So many fun things to do with that!

Here's the supply list (with links for your shopping convenience):


As for techniques, I used an old favorite when it comes to coloring. It's called "squeeze your stamp pad so the lid picks up ink, then use a paintbrush to pick up ink and color." I did that to fill in "Tidings," to highlight "and," and to add a slight border around the stitched heart. The cup and little red swooshes (or splash marks) were all colored with markers.

Another card tomorrow with this same SOM and more of the border die cuts. Unless I can't sleep again tonight, in which case you might be seeing it late tonight.

Until next time,
Becca

Friday, September 14, 2018

Hugs for You WYW with Decorative Border Thin Cuts

One of the new products I just had to get in my hands as soon as possible was the new Decorative Border Thin Cuts. These beauties are going to make it super easy to create fun, different, interesting cards and scrapbook page borders. Here's my first card...


I used the Hugs for You Workshop Your Way (WYW) which is a cardmaking kit. It comes with a stamp set, paper, card bases, and twine as well as instructions for making twelve cards of two different designs. If you've been around my blog at all, you know that I don't purchase a WYW unless I can use the stamp set long after the included supplies are gone. Like I did here.

I was surprised to find that this scallop border wasn't even. At first I was disappointed, but then I realized that the lack of symmetry gave me far more flexibility. I can make a cloud or hill border to set a scene, I can tilt it as I did on this card for a unique look, and I can create an even look on the short end of a 4.25 x 5.5 card with some planning. But, to tell you the truth, I really like this tilted border. You might see that show up again. And again. And possibly even a few more times.

Here's the supply list (with links for your shopping convenience):


I've already sent two cards using this WYW. The sentiments are exactly what I've wanted to say on multiple occasions.

Today is all about getting everything done that I've put off doing this week. We had such a lovely cruise (pictures to come) that it's difficult to adjust to real life again where I have to cook and clean up after myself. Plus there's the hurricane. We're in central Virginia and no longer expect to get much except some wind and rain, but I was doing a little prep just in case.

More than anything, I need to get back to 1888 and the final novel in the Montana Brides Series. Book two releases in eleven days, so there's quite a bit of publicity around that which also needs to be done...and honestly, I just want to play some more with these fancy border cuts.

Until next time,
Becca

Wednesday, September 12, 2018

Bunches of Love - 8

I'm back from my cruise and back in the swing of life. Laundry is in, the dishwasher is running, and I found a little time to craft. I'm so in love with this Bunches of Love set I just had to play with it again.


I stayed with the basic color scheme of black and red which is nearly impossible mess up.

Here is the supply list (with links for your shopping convenience):


I really need to get back to writing, but I'm still fighting the jet lag

Until next time,
Becca

Monday, September 10, 2018

Love Notes - 3

As I said yesterday, this card is the entire reason I purchased the Love Note stamp set. The ENTIRE reason. I'll be making a bunch of these cards because, honestly, who doesn't love a chocolaty frappuccino?


I created the cup using the You Are Here Cricut cartridge and basic shapes included in Design Space. Here's the cutting file (which includes some extra images I didn't use but didn't want to delete).

Here's the supply list (with links for your shopping convenience):
We should have arrived home from our European river cruise in the wee hours of this morning. I'm sure today will be filled with lots of caffeine in order to function...which is why I saved this card for today.

I have lots more ideas to share with you, but I hope you've enjoyed the last ten days of daily cards. I've already got more ideas for the Bunches of Love set featured the first week, but you'll have to wait until next month because I've used it with the October Stamp of the Month.

Speaking of which, I'll be back in a few days to feature this month's SOM. It's only $5 with a qualifying purchase...which shouldn't be hard given the number of fabulous new products that went live ten days ago!

Until next time,
Becca

Sunday, September 9, 2018

Love Notes - 2

Like yesterday's card, this one uses the Love Note stamp set with a rainbow of color.


I love the Frank Lloyd Wright architectural vibe of this card. I'm always searching for ways to have manly cards, and this one fits the bill.

Here's the supply list (with links for your shopping convenience):

  • Love Note stamp set
  • Candy Apple ink
  • Nectarine ink
  • Lemon ink
  • Willow ink
  • Emerald ink
  • Black ink
  • Black cardstock

We should be on the plane heading home from our cruise. I'll probably be worthless for the next few days, so I'm glad I scheduled all these posts ahead of time. I have one more card with this Love Note stamp set, and I'm telling you now, it's the entire reason I purchased this set. The ENTIRE reason. I hope you'll come back tomorrow to see it.

Until next time,
Becca

Saturday, September 8, 2018

Love Notes - 1

Two things you need to know about me: 1) I don't like it when CTMH changes their color palate and 2) the main reasons I became a consultant were for the discounts and early ordering of new products. Having said that, I'm LOVING the new colors introduced this year.


I only used two new colors, Nectarine and Candy Apple, on this card. They are replacing Tangerine, which was practically brand new,  and Cranberry, which has been around since CTMH opened for business. Were it not for the wonderful surprise bonus that consultants got to order all the new ink colors at an even bigger discount than normal, I would be grumbling about replacing a brand new and a staple color with what seem like only slight color changes. Well...they are slight, but that tiny adjustment makes the entire color palate bright and cheerful. They also work together much better. So...there you have it. Sign up as a consultant and you, too, will no longer need to grumble about color palate changes. Ha!

Here's the supply list (with links for your shopping convenience):


Like yesterday's card, you really want the fine point of the Micro-tip scissors for this. That tiny notch in the frame around the sentiment can get bent out of shape if you use larger, clunkier scissors. Another confession...the only reason I have the scissors is because they came in my new consultant kit. Yes, indeed, I'm really glad I signed up!

Now, I know that supply list is long for this small card, but that rainbow effect is really nice against the marble texture background. Just wait until you see what I did with it the day after tomorrow's card.

We're on the last day of our European vacation. Long, exhausting flight home, but then my own bed. Ah...

Until next time,
Becca

Friday, September 7, 2018

Bunches of Love - 7 (with Love Notes)

I love this card! It was a little fussy, although not difficult. As promised yesterday, it combines Bunches of Love with Love Note, which only shows up in "SENDING." Tomorrow I'll start featuring more of the Love Note set.


Here's the supply list (with links for your shopping convenience):


Again, this wasn't technical, but you do need to have patience to cut out the top portion. I stamped it as the set was designed, with some images left open. I also took advantage of the precise cutting to give myself a wider border around "love" than in yesterday's card. Against the charcoal background here, it needed some white space.

My cruise is winding down. We should be in Nuremburg, Germany by now. I'm probably looking forward to sleeping in my own bed but regretting that our time in Europe is coming to an end.

Until next time,
Becca

Thursday, September 6, 2018

Bunches of Love - 6

And now for something completely different...


How great is this? I simply took the longest sentiment, "thinking," mounted it on my acrylic block upside down, stamped it in five different colors (although I wish I'd done the lighter blue in a green), then stamped "hello" in black, cut it out, and glued it over the top. I think I'm going to make about eight of these. So fast, easy, and versatile.

Who knew this...

...could do that?

Here's the supply list (with links for your shopping convenience):


Tomorrow, I'm going to start pairing Bunches of Love with the Love Notes set. I hope you'll come back and see it.

Until next time,
Becca

Wednesday, September 5, 2018

Bunches of Love - 5

Here's the third card combining Bunches of Love stamp set with Hello Pumpkin paper. (See previous two posts for more.)


Here's the supply list (with links for your shopping convenience):


Like yesterday's card, there's nothing too technical going on. I trimmed 3/4 of an inch off the left side of a top folding card base and glued my strip of Hello Pumpkin paper to the inside of the card.  After stamping the images, I connected the small flower and bud trio to the main image by wetting a small paintbrush, picking up some Willow ink from the lid, and drawing some mostly straight lines. That's about as techy as this gets. Oh...and wrapping some sewing thread around my fingers and securing it with the sentiments mounted on foam tape.

I hope you'll come back tomorrow for another card with Bunches of Love.

Until next time,
Becca

Tuesday, September 4, 2018

Bunches of Love - 4

As promised yesterday, here's another card combining the new Bunches of Love stamp set with Hello Pumpkin paper. I've also added colored pencils to the mix.


There's nothing terribly technical about this card. I glued my Hello Pumpkin paper to the card base first, then stamped my row of sentiment on a separate piece of paper and glued it over the top. I stamped the main image from Bunches of Love in black, colored parts of it using dry Watercolor pencils, cut them out very close to the edge, then glued them down before mounting the center flower over the top with foam tape. Pretty straightforward but very eye-catching.

Here's the supply list (with links for your shopping convenience):


Back tomorrow with another card using almost identical supplies

Until next time,
Becca

Monday, September 3, 2018

Bunches of Love - 3

I'm not only in love with the new Bunches of Love stamp set but also the new Hello Pumpkin paper. I don't do much with Halloween, so the limited number of Halloween specific patterns combined with the large number of general patterns--including this awesome black and white print--makes the entire pack usable. You'll be seeing more of it combined with Bunches of Love in the next few days.


Here's the supply list (with links for your shopping convenience):


The only special techniques on this card were: 1) stamping the flowers and leaves in a light color (Peach and Mint) then adding the darker coordinating colors (Smoothie and Emerald) with a sponge dauber to create shading, and 2) adding water to ink squeezed into the lids of both Emerald and Smoothie, picking up the watered-down ink with a paintbrush, then flicking the colored ink over the image.

I'm still on my cruise, but I've scheduled another card for tomorrow. I hope to see you then.

Until next time,
Becca

Sunday, September 2, 2018

Bunches of Love - 2

For my second card with the new Bunches of Love set, I wanted to do something completely different than yesterday's card. I love the versatility of this set!!


Here, I used just the floral "filler" stamps and left off the outline. It was a very simple card to make, which is the best kind!

Here's the supply list (with shopping links for your convenience):


The only thing I didn't get from the new catalog is the white sequins.

I'm still cruising, but come back tomorrow for another card using this amazing new stamp set. And, if you'll let me be pushy for just a moment, let me say you should order this stamp set now. By the time it arrives, you'll have lots of ideas about how to use it.

Until next time,
Becca

Saturday, September 1, 2018

Bunches of Love - 1

Welcome to the new Holiday Expressions from Close to My Heart. As always, there are things I can do without and things I was losing sleep over until they were in my hot, little hands. The new "Bunches of Love" set is in the latter category. I couldn't stop playing with it.


The photography doesn't do this justice. The colors are Ballerina, Glacier, Linen and Black. The bottom border of paper is from the new Boutique collection. It's a gorgeous paper suite, and my favorite pattern is this soft watercolor stripe pattern. Soooo pretty. I accented it with Black Shimmer trim.

Here's the supply list (with shopping links for your convenience):


As this post goes live, I'm enjoying a European cruise down the Danube River. It's the first "grown up" vacation my husband and I have taken. We're going with his sister and brother-in-law. I can't wait to show you the pictures...probably in scrapbook pages. If I get the chance, I'll post a few shots here but, I'm tellin' ya now, I'm going to spend as much time as possible enjoying this once-in-a-lifetime vacation.

I have posts scheduled to go up once a day while I'm gone, so I hope you'll come back tomorrow to see what else I've created with this amazing new set.

Until next time,
Becca