
Welcome to the New Products Blog Hop featuring items from the Jan-Feb Seasonal Catalog. You probably came from Darlys' blog. But if you started here, that's fine. The hop is a circle so keep going until you get back where you started. If you get lost along the way, head to Melinda's blog for a complete list of participants.
I have three different cards using three different sets of products for you because--frankly--I just couldn't choose among them. So many great things in this catalog!
My first card features the Sawyer Cardmaking Workshop (new) plus Slim Line Alpha Thin Cuts (Core Catalog).
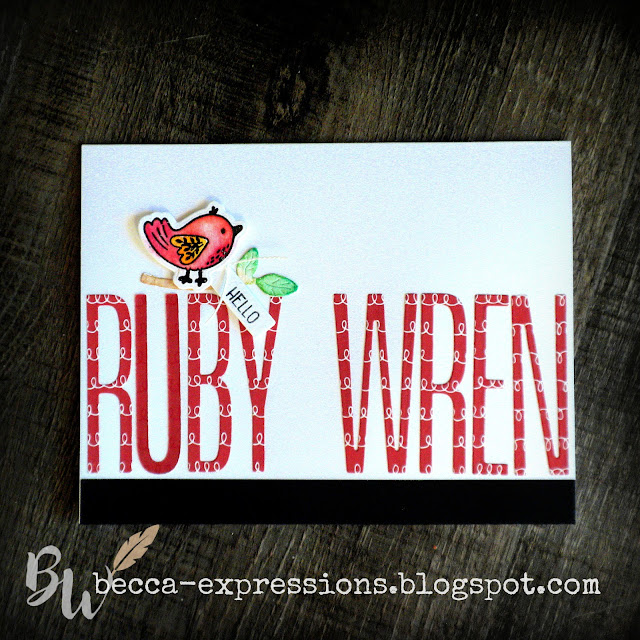
The bird and branch were done on watercolor paper. I used Black Detail Embossing Powder for the bird. I then watercolored, using the barrier created by the plastic embossing to keep colors in place. On the branch, I just let the brown of the branch and green of the leaves bleed into one another. The tiny little tag and hello were done on regular White Daisy Cardstock. To ground the card, I added a half-inch wide border of plain Black Cardstock.

I sent this picture to my sister. She cropped it and put it on her Skylight because she loved it so much.
Here's card #2...
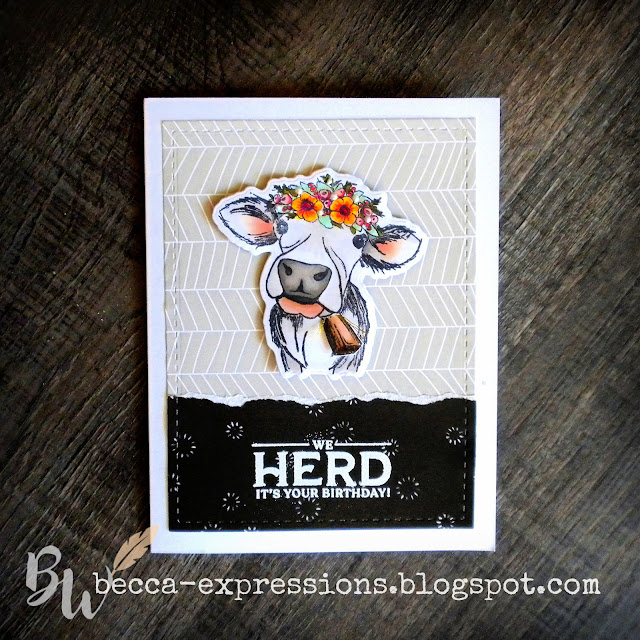
This "Udderly Wonderful" stamp set was the very first thing in my cart. It's different than anything else I have, and I love the punny sentiments. I used two papers from the current Mix-In Paper, tore the edge of the black one and layered it on top of the gray one. I then ran both through my die cutting machine using the Stitched Rectangle Frames. I embossed the sentiment in White Detail Embossing Powder. The cow was stamped in black ink and then colored with alcohol markers to get some blend. I used the coordinating thin cuts to cut out the cow head. I stamped and colored the bell then cut it out using my Microtip scissors to eliminate the white border that would have been around it had I used the coordinating thin cut. I then created a small slit under the cows chin with an x-acto knife and inserted the bell. I used foam tape to secure the bell on the underside. I added more foam tape around the edges of the cow head and added it to my card. I tied a knot of Gold Embellishing Thread and tucked it into the slit, securing it with a dot of Liquid Glass. It doesn't show up well in the picture, but it gives just a little something, something in real life.
My final card features Build-a-Flower (new) and the For All Occasions stamp set (Core Catalog). But it also features one more stamp set from the Jan-Feb Seasonal Catalog. Can you spot it?
That bottom border is the light side of Flamingo Cardstock stamped with the new Barn Door stamp set in Flamingo ink. I LOVE that I now have the ability to create woodgrain in any color I want! My colors here are Raspberry, Flamingo, Caroline, Bluebird, Lemonade, Sundance, and Nectarine on the flowers. I want to point out that I used Lemonade and Sundance on the large yellow flower at the top of the cluster. The center of the blue flower is Lemonade overstamped with the smaller center in Nectarine. Using Nectarine over Lemonade made the Nectarine fade a bit, making it identical to Sundance stamped straight on white as shown at the top of the big yellow flower. I hope that makes sense. The leaves are Clover (outline) and Green Apple (centers) with Evergreen vines. My sentiment is Sapphire. (NOTE: Please click here to see another fun way I've used this Build-a-Flower stamp set for a previous blog hop.)
The drawback of solid image stamp sets like this is that you need lots of ink colors. The benefit is that, if you already have those colors, you can do amazing things in a very short amount of time. I stamped the vines directly on my card base. Everything else was stamped on White Daisy, cut out, and then layered either by gluing directly to the cardbase or using foam tape. The final touch was adding dots of Sage Liquid Pearls.
I made five more of these, leaving off the sentiment, so I can add whatever I need for any occasion.
Well, that's it for me. Now you're headed to Megan@Crop Craft Create. I can't wait to see what we she and the rest of our talented Makers have created to inspire us.
Until next time,
Becca
I love all of your cards, as always! The first one is striking, but I don't know that I have a favorite because they're all great!
ReplyDeleteLove all your cards! I can't get enough of the Utterly Wonderful stamp set!
ReplyDeleteMore great cards Becca. My favourite is the Udderly Wonderful one, that was the first set in my cart too. My Mom grew up on a dairy farm and we had some cows too when I was growing up, so I knew I would use it for multiple things.
ReplyDeleteGorgeous projects as always! I love how you used the Barn Door stamp as a border!
ReplyDeleteAll your cards are fantastic! Thank you for the inspirations!
ReplyDeleteBeautiful blog
ReplyDeleteGreat cards, especially the Udderly Wonderful!
ReplyDelete