Friday, October 25, 2019

Holiday Cheer Blog Hop


Welcome to the Holiday Cheer blog hop. This special set is designed to make Christmas ornaments. However, true to form, you'll be getting something different here. The stop before mine is Michelle's blog. The entire hop is a circle, so keep going until you get back to where you started. If you get lost, head to Melinda's blog for a full list of participants.

I make around 80-90 Christmas cards every year, so I'm always looking for ways to stretch my paper purchase. The following cards all use the Mix-In paper from the Nov-Dec catalog (which went live two weeks earlier than planned due to customer demand).

This first card uses a strip of 3x1 paper, which means I could make 48 cards from one 12x12 piece of Mix-In paper.


The colors are Evergreen and Mint. I used both the Stitched Rectangle and Stitched Oval Thin Cuts as well as the Mint Shimmer Brush to accent.

My second card uses a 3x3 square of paper from the same pack, so I could get another 16 cards with this design.


Here I used the Stitched Square Thin Cuts. As with the above card, you have to line up the Thin Cut with the paper carefully to make sure you're getting the stitching all the way around. Because my purpose was to get as much use out of one piece of paper as possible, I was willing to do the fussy work of lining up my Thin Cut with the paper.

My final three cards all use a 4x4 piece of red plus a 1.25 x 4 piece of kraft paper from the Mix-In pack. With careful planning, I can get 3 cards from each piece of red cardstock, adding another 27 cards to my stash.

I started with the 4x4 piece of red cardstock and centered the stitched circle frame from the Circle Shaker Card Thin Cuts set on top. This thin cut set us used on the ornaments, but you must purchase them separately; it's not included in the kit. I figured, if you're getting it for the ornaments anyway, you might as well get some more use out of it. Once I cut the circle, I had three pieces of red cardstock.

Here's the first card I made using the 4x4 piece with the center cut out.


The wreath is stamped in Toffee and the sentiment is stamped in Candy Apple. The only extra thing I added here was a teensy, tiny piece of white cardstock to add a border between the red and kraft papers.

Here's the second card using the stitched circle frame.


I stamped the December 25 image in both Candy Apple and Toffee ink, cut them both with Micro-tip Scissors, and glued the Toffee partial image over top of the Candy Apple full image. I also used my Micro-tip Scissors to cut a small fishtail in the kraft paper to create a banner.

Here's my final card.


I cut 1/2 inch from the edge of my kraft cardstock and glued it to the right hand side of the card while glue the other piece on the left hand edge. Once my circle with the sentiment goes over the top, no one knows it's two pieces of paper instead of one. I stamped the sentiment then cut it out with Stitched Circle Thin Cuts.

And I still have two pieces of Mix-In paper left!

Okay...yes, I used a lot of the stitched thin cuts which are pricey to purchase all at once. So don't. Get one set at a time. I'm getting a total to 91 cards with just under four pieces of Mix-In paper. They aren't fancy cards, but they are more personal than anything you can get in a store (and I can do all of them while watching football). I'm ALL ABOUT justifying my purchases. I haven't purchased Christmas cards in ages, but the last time I checked, they were around $7 for a box of ten. What I've showed you here is the equivalent of nine boxes of cards. That would be $63 I'd spend with nothing to show for it at the end. Why not take that $63 and spend it on craft supplies? Get the stamps and paper first, of course, but then start adding in the thin cuts as your budget allows. Once you have them, they are good forever.

Now you're off to Darlys' blog. And don't forget to visit the Flash Sale going on until October 26, 2019 at 3pm Mountain Standard Time. That's another great way to stretch your crafty dollars.

Until next time,
Becca

Tuesday, October 15, 2019

Fall Into Christmas with the Hawthorne Cardmaking Workshop

It's an exciting day for those of us who love Close To My Heart (CTMH). Today, the Seasonal Expressions catalog released two week early because consultants were clamoring for holiday stamps and papers...and the head office listened! So I'm going to show you how to take a cardmaking workshop which was released in the September-October catalog and make Christmas cards with it. Here's the sample images shown in the catalog:


Here's the exact same cards made for Christmas:


I added the following supplies to make them:

  • Say It in Style stamp set (which is an absolute "must have" set!)
  • Cedar & Pines paper
  • Candy Apple Cardstock
  • Black Cardstock
  • Evergreen ink
  • Toffee ink
  • Christmas Red Stickles

My variations include using a third pine cone to cover up the acorn, "watercoloring" the back left image by smushing the Evergreen ink pad together to pick up ink in the lid then painting. I left off the Mink Twine (which comes in the workshop kit) and used the Christmas Red Stickles instead.

And then - because I just love the whole smushing of ink pads together to watercolor technique - I created this:


I started by getting my watercolor paper wet then stamping the Hawthorn image in Fern ink. The edges of the image feathered out immediately. Using the smushing method, I added more Fern, Saffron, Eggplant, and Raspberry here and there, letting the colors blend into each other. I had to add more water as I went along. Once the background was dry, I stamped over top of it again but I only inked the edges of the Hawthorn image and used a sponge dauber to be sure it was soft. I die cut a panel using the Stitched Rectangle Thin Cuts.

Using a separate piece of watercolor paper, I stamped the pumpkins from the Autumn Blessings stamp set in Black Pigment ink then embossed with Clear powder. Then...I smushed and painted some more. I used all the colors except Fern in the pumpkins, adding Paprika because I wanted some orange. It didn't work well, so I mopped it up with a dry paper towel.  I did used a combination of Paprika and Fern in the stems and colored outside the lines because it was going to be impossible to trim them right to the edges. After the pumpkins were dry, I added Nectarine ink because I wanted them to stand out a bit more against the background. To make them stand out even more, I added Clear Shimmer Pen to them, too.

I cut them out, trimming very close to the edges, with Micro-tip Scissors. After stamping the sentiment in Black ink over the background panel, I glued and foam mounted the pumpkins over the top.

But what about the black splatters, you may wonder. Well...let me tell you about that. If I had known then what I know now, I would have added them before the pumpkins were glued down. In truth, I added them after the fact which was awkward, to say the least. I used the smallest stamp in the Strokes of and Artist set. I inked only parts of  the stamp - even though it's really small - so it didn't look like I stamped the same image over and over again. Because I stamped after the pumpkins were down, I had gaps where the stamp couldn't get to. I still had the small paintbrush I'd used to watercolor on my desk, so I used the wooden end like a stamp, pressing it into the ink and then stamping here and there to fill in as needed.

For the final touch, I cut a piece of 4 x 5.25 Eggplant cardstock and glued it to the watercolor paper. I then foam mounted the top panel to the card base.

I want to give credit to the card maker who inspired this idea. Here's a link to the blog post with the card I used as my example.

Granted, this card used a large number of products, but that's one of the great things about having a large number of products. Sometimes it's fun to put them all to work...although my workspace is a crafty mess right now. Still, it's been fun!

Until next time,
Becca

Tuesday, October 1, 2019

October Stamp of the Month - Autumn Air


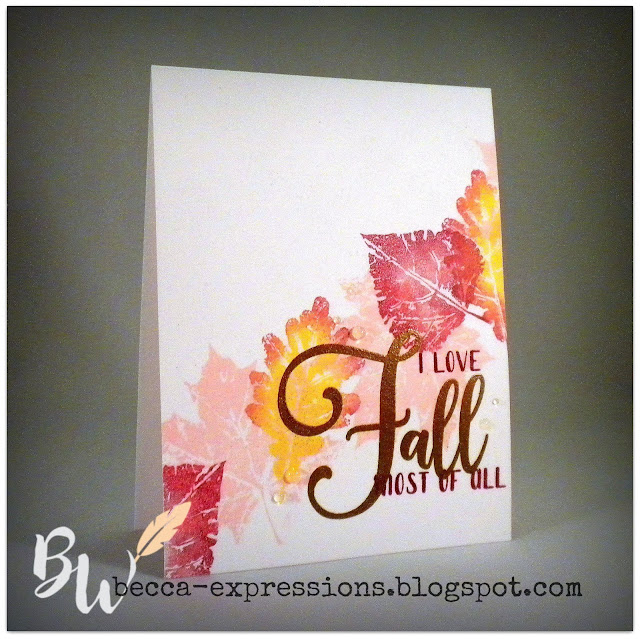
I love Fall most of all. Maybe it's because my birthday is this month, maybe it's pumpkin spice everything, and maybe it's the beautifully colored leaves. Whatever it is, I truly do love Fall most of all. So this set is perfect.


If you didn't start this Blog Hop here, you should have come from Darlys' blog. If you get lost, head over to Melinda's blog for a full list of participants. There are almost thirty participants this month (it seems I'm not the only one who loves Fall), so be sure you get all the way around to see the wonderful inspiration.


My upline does a weekly color challenge. Last week it was Ballerina. That's not a color we usually associate with Fall, but I love how this turned out. The other colors here are Ruby and Canary. I wanted my Ruby to have a light touch, so I applied it to my stamp using a sponge dauber, concentrating a little more color around the edges. I inked the thin leaf in Canary and sponged Ruby around the edges. The Ballerina leaves are straight stamping. The small font of the sentiment is stamped in Ruby, the large was embossed with Gold powder. It's tough to see them, but I added dots of Liquid Glass around the sentiment to look like dew drops. I thought about adding sequins, but I really liked how the Liquid Glass looks.

Now you're off to Kathy's blog. Again, be sure to hop all the way around.

Until next time,
Becca