Monday, April 25, 2022

Wild Berry Blast Blog Hop


Welcome to the Wild Berry Blast Blog Hop. Wild Berry is the CTMH color of the year. It's vibrant and fun and a blast to work with. It's also on sale until the end of the month, so if you see something here or on another stop along the hop, be sure to click here to get it. You should have come from Lauren's CTMH Craftings, but don't worry if you started here. The hop is a circle so just keep going until you get back to where you started from. If you get lost along the way, head to Melinda's blog for a full list of participants.

I went back to an old favorite for my project...tags on cards. I love them! But this time I jazzed up my tag a little.

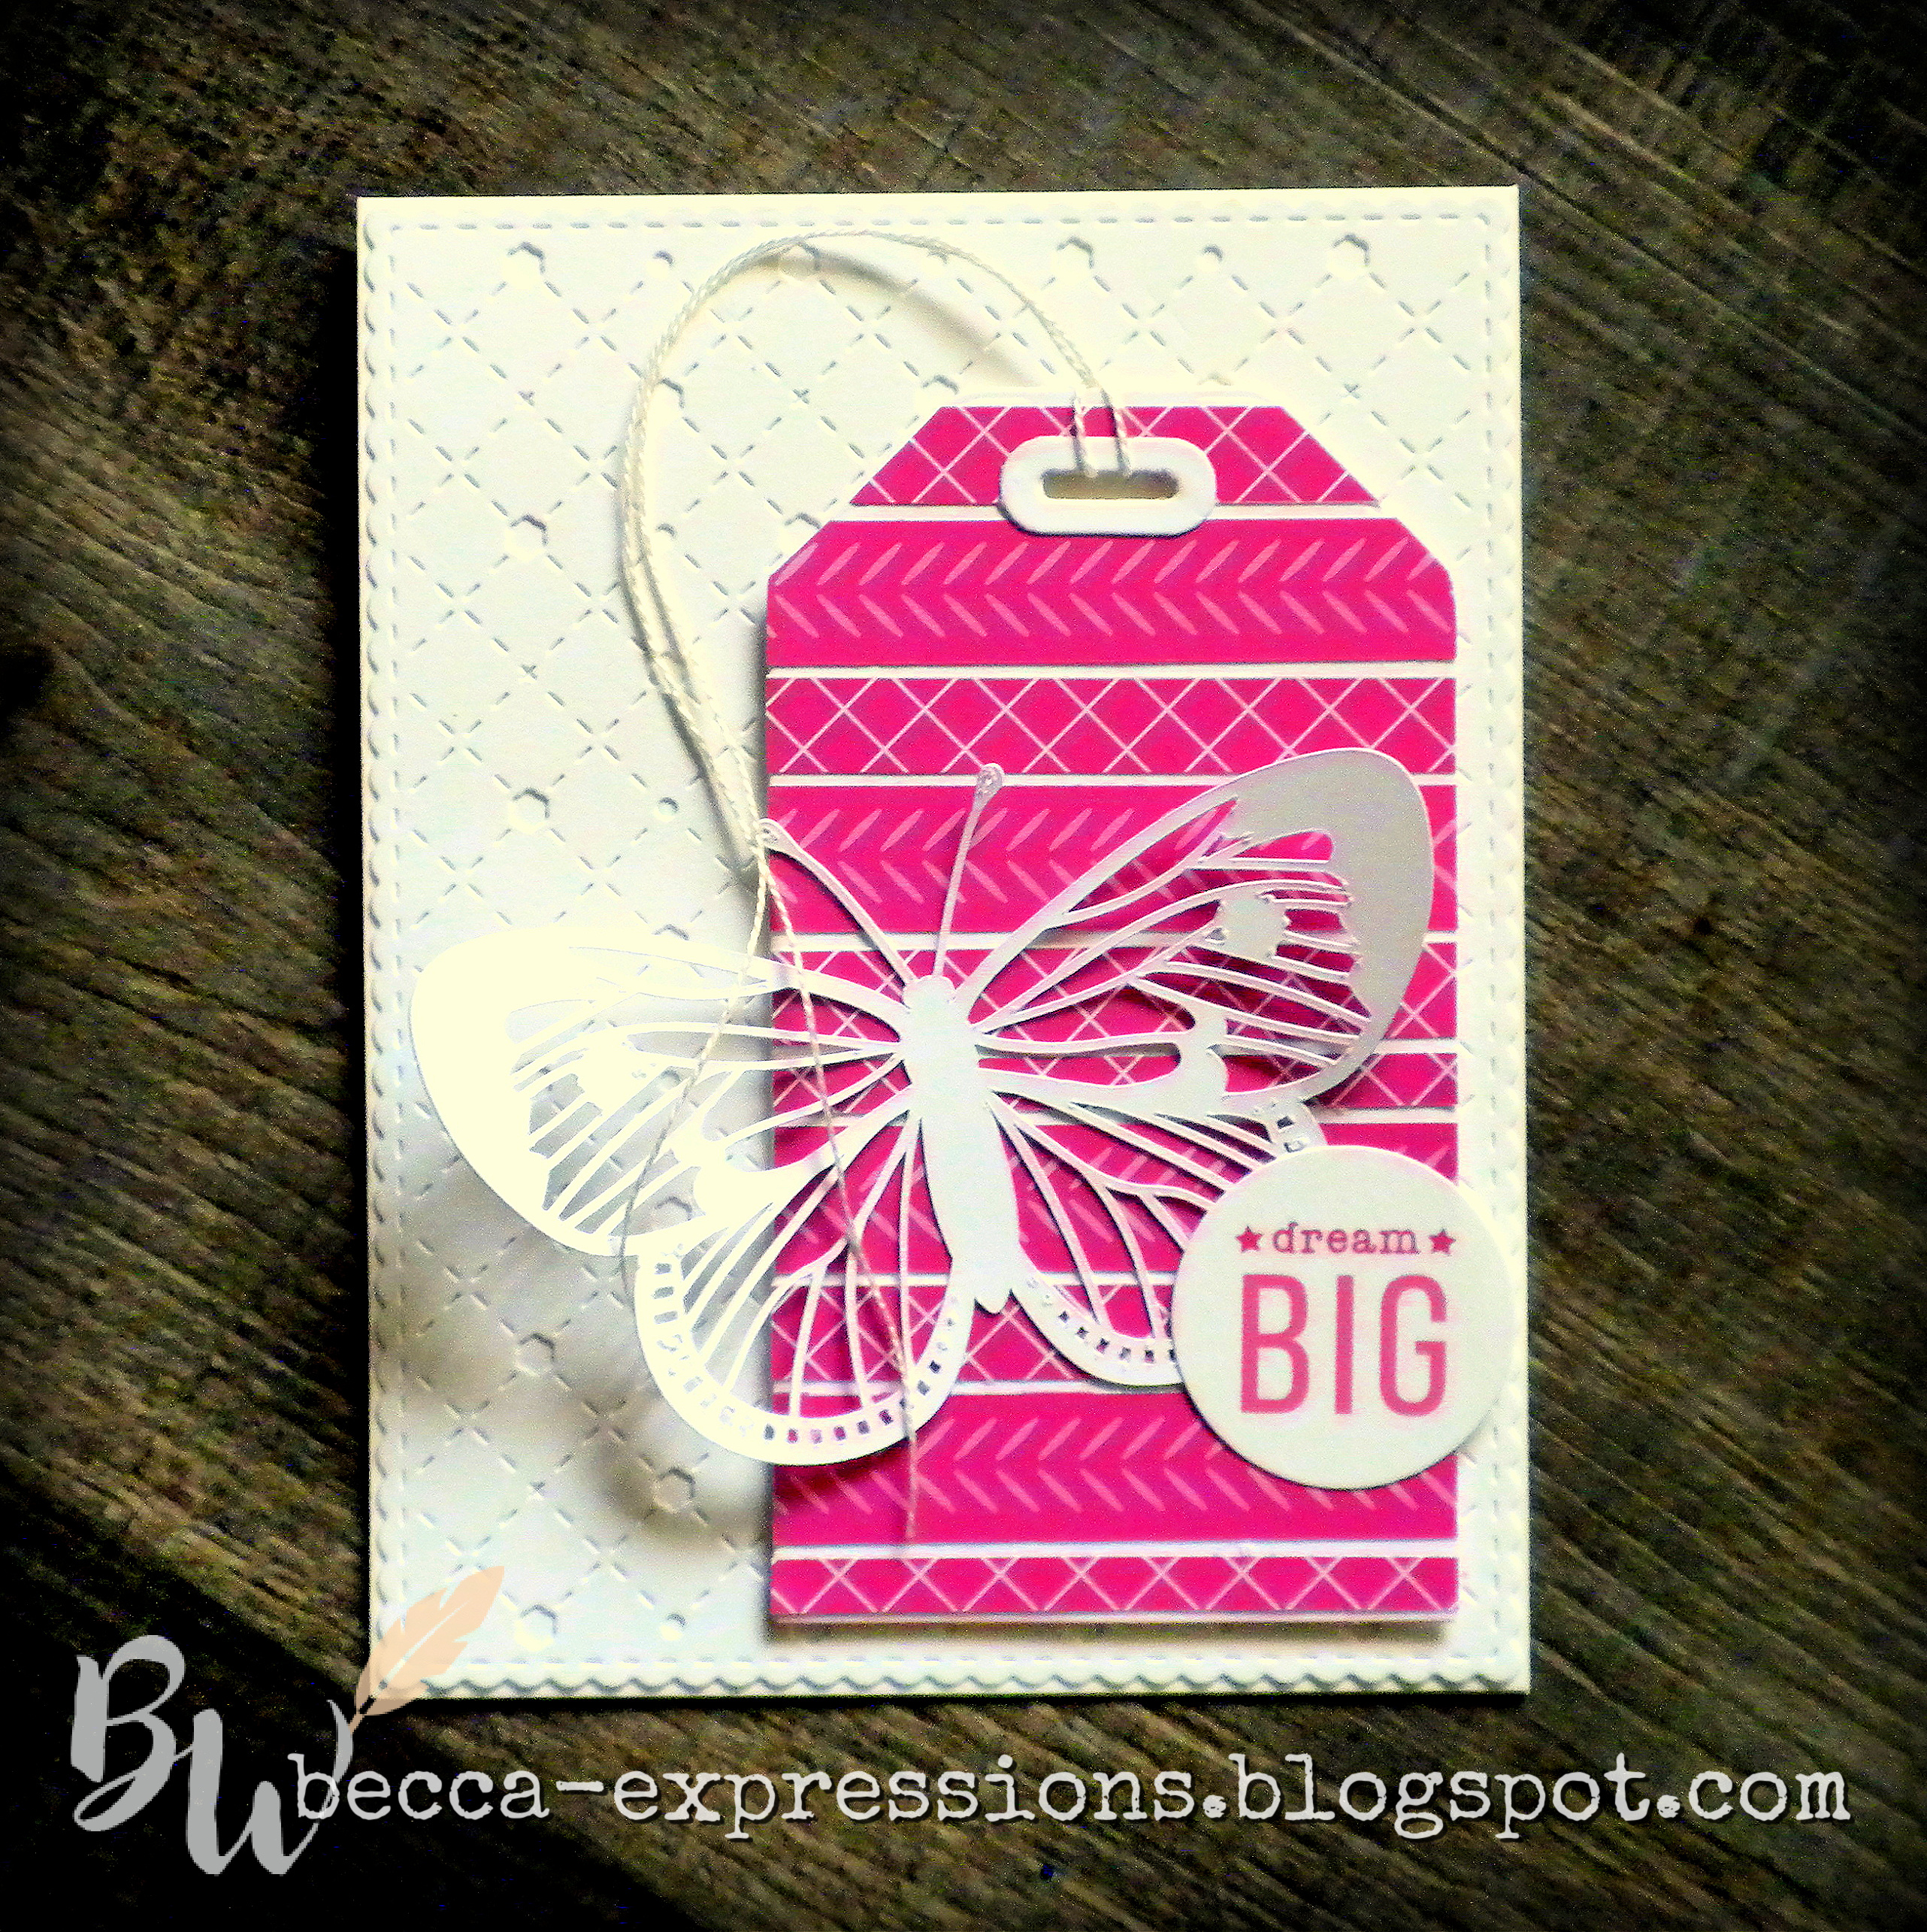
Every one of those stripes on the tag is a zip strip from the Wild Berry Blast special paper packet. CTMH has a special half-inch wide strip on every piece of patterned paper. One side is product information and the other is a fun design. They call it a zip strip. I regularly end up with lots of them left over. So I decided to feature them. I cut one of them not quite in half (more like one-third to two-thirds) and another at the full half inch. I only used two strips for this entire tag with some left over.

You could do this by creating your paper design first and then cutting it out (our thin cuts will go through two layers of our paper), or you could cut your tag first, add your zip strip layers, and then trim off the edges, which is what I did. I had to fuss with the opening of the tag (thank goodness for Micro-tip scissors). Although, in hind sight, I guess I could have run the tag back through my die cut to get that hole out. At any rate, I managed.

The butterfly is cut from the In Full Bloom digital collection. I made him 4 inches wide. I was worried about those thin inner lines, but my Cricut Maker handled them like a champ. Once I had it adhered to the tag, I pulled a Wild Berry Blast sticker and added it over the edge of the tag. I mounted the tag with foam tape over a card base topped with the Stitched Lattice Overlay. It's still available and one of my very favorite thin cuts.

I also made this scrapbook page.

My colors here are Wild Berry, Capri, and Black. I trimmed down the Wild Berry patterned paper to 11x11 and gutted it with a two inch border. I then cut the Capri paper to 11.25x11.25 and gutted it at...I don't really remember because I had to cut it twice when the first one didn't work. I adhered it to a piece of 12x12 White Daisy cardstock. I splattered Black Shimmer Brush over all of it.

As it happened, I had just enough room to put two 3x3 photos matted with Capri at 3.25x3.25. I accented with Layered Floral Thin Cuts and one of the stickers from the Wild Berry Blast special. Don't ask me how. I got lucky.

I have no idea what pictures I'm going to put in this, but I've started to really enjoy having pre-made pages ready. I might make a second page because I love how this turned out.

Again, this special only runs through the end of April, so get it while the gettin's good! Now head over to Show & Tell with Michelle. I can't wait to see what she and our other fabulous Makers have created to inspire us.

Until next time,
Becca


Sunday, April 17, 2022

National Scrapbook Day Blog Hop


Welcome to the National Scrapbook Day blog hop. There are five different product bundles - plus one mega bundle - featured in this hop. I'm so excited to see what everyone has done. You should have come from Show and Tell with Michelle, but don't worry if you started here. The hop is a circle, so just keep going until you get back to where you started. Head over to Melinda's blog for a full list of participants if you get lost along the way.

I'm featuring the thin cuts and embellishments from the "Circles and Patterns" bundle with paper from the "Little Penguins Mini Album." Click here to see all five bundles.


I'm so in love with how this turned out!! My daughter is pregnant with her second child. For the gender reveal, she took her firstborn to their church for a photo shoot. Inside that egg are either pink or blue candies. My daughter sent us this as a teaser until the big reveal on Easter Sunday. So mean!! 

To create this layout, I started by cutting six circles, one each of the background and texture paper. After they were cut, I cut one more from some Lemonade and another from White Daisy. I'll point out where I used the last two in a moment. I then cut an 11x11 sheet of black and a 10.75x10.75 White Daisy piece. I splattered Black Shimmer Pen on the smaller White Daisy, adhered it to the Black, then adhered everything to a 12x12 piece of White Daisy with no splatters on it. I then started figuring out my circles. 

I stamped one center and one outer leaf shaped one in Nectarine over White Daisy using the small stripe stamp from the "Circles and Patterns" bundle (see top left and bottom middle circles). I sponged Flamingo ink to the bottom left leaf shape of the top middle circle so I didn't have white on white. The top right leaf of the top right circle is White Daisy sponged with Flamingo and then stamped with the weave pattern from "Circles and Patterns." It doesn't really show up well, but it's there. I promise. And lastly, the top right leaf of the top middle circle is the light side of Lemonade cardstock stamped with the flower pattern from "Circles and Patterns." It's so great to have the stamps that allow you to add some patterns to scraps of cardstock! I only needed a 2.5 inch square of patterned paper from the "Little Penguins Mini Album" to create this layout. 

My Versamat came in really handy when it was time to assemble. I lined up the points of my centers at the 3, 6, and 9 inch marks both vertically and horizontally. Easy peasy! 

The 4x6 photo is matted on White Daisy and then Capri. I popped it up on foam tape before adhering it to my base page. I decorated with a pink tab and some stickers from the Smitten sticker sheet (still available). Black embellishments are all from the "Circles and Patterns" bundle augmented with a few  Black Acrylic Hearts. Once those were down, I added a few dots of Robin's Egg Blue and Ballerina Liquid Pearls. I love adding these, and when they're placed close to acrylic shapes, they don't get smooshed in your scrapbook.

"Easter" was stamped in Black ink. It's from the For All Occasions set featured in the Core Catalog. That set is a must have in my book.

I don't often show my scrapbook pages because my kids don't want their babies all over social media, but I got permission for this one because you can't see her face. Soooo cute!!  Now you're off to Kristine's blog. I can't wait to see what she and our other talented Makers created to inspire us.

Until next time,
Becca
P.S. It's a boy!!

Friday, April 1, 2022

Message In a Bottle: April SOM Blog Hop


Welcome to the April Stamp of the Month blog hop featuring "Message in a Bottle." I come after Michelle's Show and Tell with Michelle blog, but don't worry if you started here. The hop is a circle, so you can start anywhere and just keep going until you get back to where started. If you get lost along the way, hop over to Melinda's blog where she'll have a complete list of all the participants.

Here's a look at this fun, versatile stamp set. 


I decided to show you how to take the In Full Bloom Cardmaking Workshop and change it up by using the images in this set. Here's what the original workshop makes (four of each design)...


Here's how I changed it up (because, even though I really like the above images, I'd like some variety)...

It might be difficult to see the difference in the bottom right card because the only change is the sentiment inside the film strip. The original card stamps "Thanks" multiple times, so I just substituted one of the sentiments from "Message in a Bottle." 

It's not really noticeable in the above photos, but I used a Mint Shimmer Brush on all the cards except the bottom right one. It's the "water" in the two left ones and just highlights the sentiment in the top right one. On the top left one, I did stamp the heart twice, once inside the bottle and once on a separate piece of white cardstock. I cut out just the heart and layered it inside the bottle.

And then, just for fun, I decided to turn one of the bottles into a vase. I used the "In Full Bloom - Scrapbooking" set, which I featured in this blog hop post, because...well...it's GORGEOUS!


I stamped the flower and leaves in Mink ink then colored with pencils. I stamped the bottle in black. I then cut everything out by hand, although you could use the thin cuts on the flowers and leaves if you purchase the stamp set with coordinating thin cuts rather the just the stamp set like I did. The background paper is from the current Mix-in paper suite and looks like wood. The border is Black Shimmer Trim which I cut lengthwise to make it thinner.

Here's a close up on the bottle so you can see the shine I got by covering it with Liquid Glass. It's also a better look at the background texture paste I tinted with a tiny bit of Mermaid Lagoon Distress Oxide ink. The bottle is glued directly to the card base, the leaves are on a single layer of foam tape, and the flower is on a double layers of foam tape.

I love the tiny sentiments in this set. I stamped and cut it out, tucking it behind the flower and adhered directly to the leaves for some more dimension. The final touch was some Gold Twine which I tucked under the flower. 

Now you're headed to ScrappinKaty's blog. I can't wait to see what she and the other fabulously creative Makers have made to inspire us with this great stamp set. 

Until next time,
Becca