

The trick to this card was cutting the flower stamp into two separate parts. I have to admit, the first time I cut a stamp apart, it made me extremely nervous. Now I do it all the time because I can always fit them back together.
Here's the general technique:
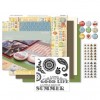
Stamp the flower in Honey and roll the edges in Cranberry. I stayed with the colors in the Jubilee paper kit, but this would be gorgeous in a pastel version. Use watercolor paper for the best result. Stamp one flower at a time and take a wet paint brush to blend the edge between Honey and Cranberry. (Hint: Create your banner piece first and position it on your cardstock without affixing. Use a pencil to draw a faint line so you know where to place your flowers.) After all the flowers are done and dry, stamp the leaves in Topiary and tip them with Lagoon. Again, do one set of leaves at a time and use a wet paint brush to blend the edge between colors. Let everything dry before proceeding.
To create the blue shading, get the paper wet without touching the edges of the flowers and leaves. Pick up some Sky ink either from the lid of your ink pad or by using a re-inker and water. Touch your brush close to the flowers/leaves and let it bleed out.
When dry, stamp and affix your banner. Or, if you want your banner to sit up higher, stamp "celebration" in Cocoa ink first then affix the banner. I actually painted my banner after it was affixed to the card. Maybe not the smartest way to do it, but the 140# thickness of watercolor paper saved me. After both sentiments were stamped, I flicked Cocoa, Cranberry, and Honey onto the entire card. I mounted it onto Cranberry cardstock and then onto a Topiary card base.
If you'd like to see another watercolor card I made with a stamp from Jubilee WOTG, you can see it here.
Please leave a comment if you have any questions.
Until next time,
Becca


No comments:
Post a Comment
Thanks so much for taking the time to comment. You bless me!