For design team duties over at Mimi, Myself, and I, I combined two stamp sets, a few papers, and several oldie-but-goodie stamping techniques to create a unique card by adapting a pattern from the Originals Card Confidence Program.
Here's the supply list with links for your shopping convenience:
- Stamps: You're Own Kind of Wonderful, You're the Bomb
- Ink: Glacier, Cocoa, and Slate
- Paper: Seaside, Cocoa cardstock, White Daisy cardstock
- Accessories: Slate Striped Ribbon, Liquid Glass, Sparkles Clear Assortment, Bronze ShinHan Marker
- Tools: Bonding Glue, Paper Trimmer, Micro-Tip Scissors, Foam Tape, Score Board, Sanding Kit, Sponge Daubers, Originals Card Confidence Program (p. 13, "Center Accent")
The second technique doesn't show up well. I masked off the word "Wonderful" from the original sentiment (see below) and substituted "awesome" in Cocoa ink from You're the Bomb.
 Liquid Glass is my "go to" accessory. As you see in this close-up, I used it to give the butterfly bodies some shine and dimension. It's also great to adhere a tiny, butterfly body because it's strong enough you can fold up the wings knowing it will stay put. I also used it to affix the tails of the ribbon where I wanted them. I rarely get the tails of either knots or bows to naturally fall the way I like, and it used to bug me. Then I saw someone dot tiny bits of Liquid Glass under the tails and cement them in place. Genius!
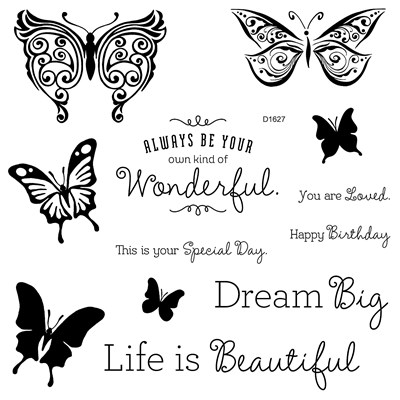
There are a couple other things I want you to see about these butterflies. The first is how I got that very cool swirly pattern on them. I started by inking the largest solid butterfly from You're Own Kind of Wonderful (bottom, left) in Glacier ink and rolling the edges in Slate ink. Then I inked the largest, swirly butterfly (top, left) in Cocoa ink. I "kissed" the solid butterfly to the swirly one, twisted without taking the two images apart, then pulled them apart.

I did the "kiss and twist" technique a couple times to cover the entire surface of the solid butterfly. I stamped it on a separate piece of white card stock, trimmed it out (cutting off the antennae), and colored the body with the Bronze marker. I did the same "kiss and twist" technique using the same colors with the medium, solid butterfly (middle, right) and stamped it under my sentiment. I had stamped my sentiment onto a rectangle of white cardstock that was extra long. I then used my Paper Trimmer to slice up to the edge of the small butterfly and used scissors to trim out the bottom of the butterfly. After I adhered the larger butterfly over top of the smaller one, I used a marker to re-draw the antennae.
Because I'd distressed my background paper, I had to touch up the butterflies with the sponge dauber to tone down the colors.
The last technique used on this card was adapting the card pattern from Originals. As shown, it's a 4.75 x 3" card, but I wanted a standard 4.25 x 5.5" card. Basically, I looked at the picture and created my own measurements. After creating my card base, I cut another piece of White Daisy cardstock at 4 x 5.25" and adhered the Seaside paper (4 x 3.75") and Cocoa cardstock (4 x 1.5"). Having a card panel that goes over the top of card base allows me to tape the edges of ribbon (or staple, or poke holes, or...) without the card recipient ever seeing my mess.
I want to re-create this card and substitute "Beautiful" for "Wonderful" then send it to my daughter. But that only uses one stamp set, and it's my job to make you want more than one. (**Big, cheezy grin**)
Until next time,
Becca


I love the versatility of the products and the paper that you showcased with this card. Thanks for sharing such good ideas. Vicki Mimi Emmerson
ReplyDeleteOh this is so fabulous, I love the way you combined these two sets and the card design is so great.
ReplyDelete